


More on Technology

caroline sinders
3 years ago
Holographic concerts are the AI of the Future.
A few days ago, I was discussing dall-e with two art and tech pals. One artist acquaintance said she knew a frightened illustrator. Would the ability to create anything with a click derail her career? The artist feared this. My curator friend smiled and said this has always been a dread among artists. When the camera was invented, didn't painters say this? Even in the Instagram era, painting exists.
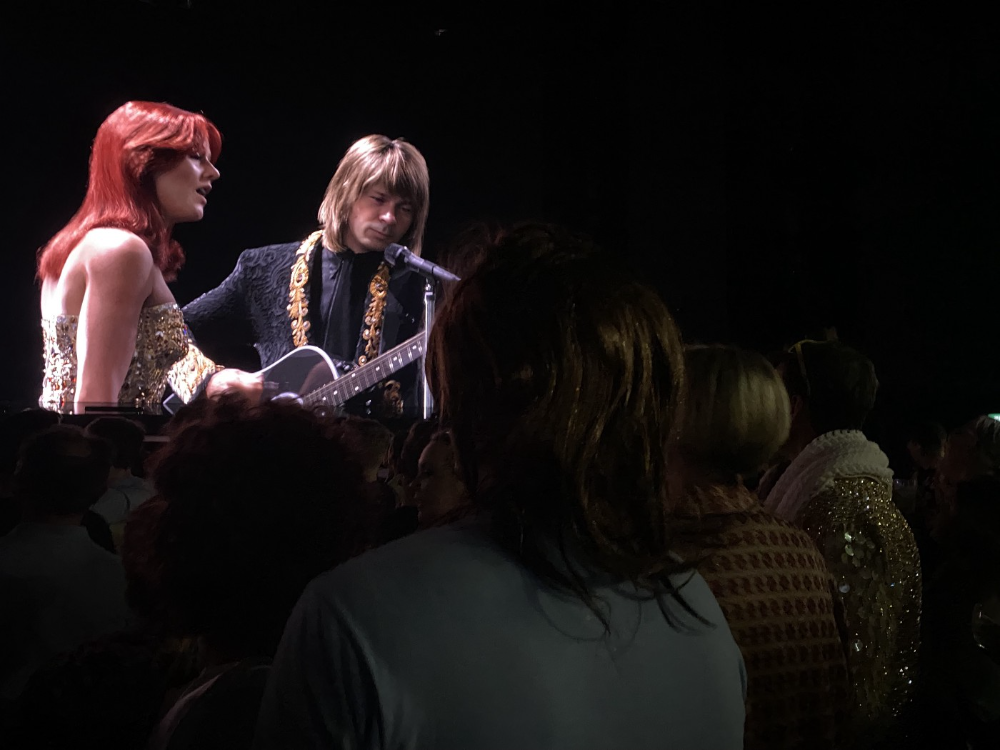
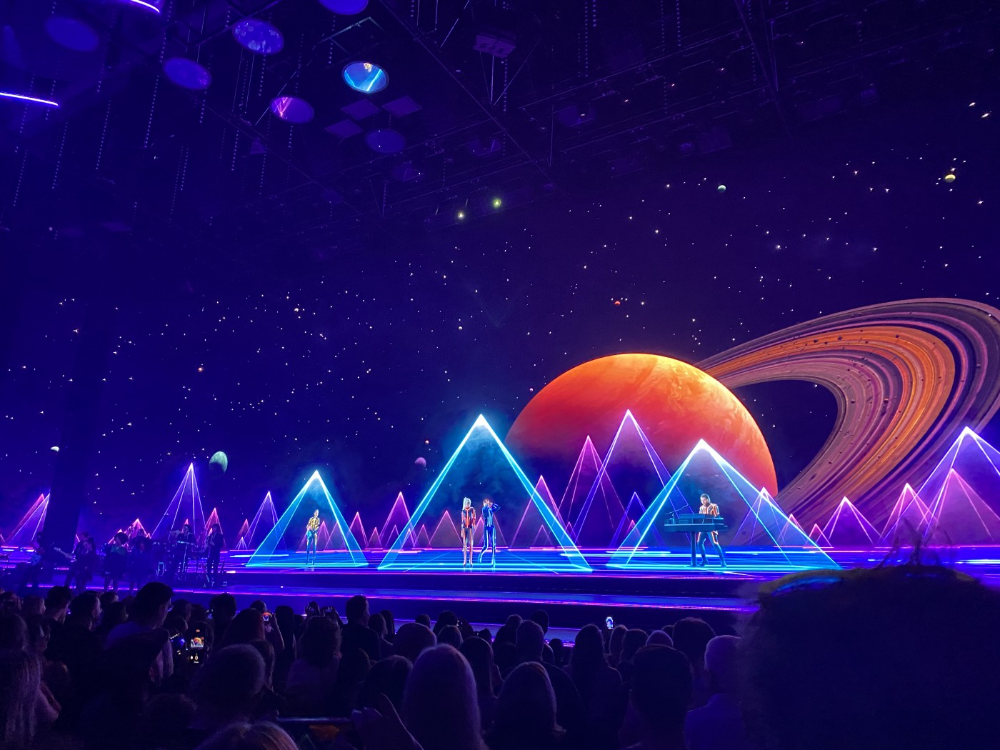
When art and technology collide, there's room for innovation, experimentation, and fear — especially if the technology replicates or replaces art making. What is art's future with dall-e? How does technology affect music, beyond visual art? Recently, I saw "ABBA Voyage," a holographic ABBA concert in London.
"Abba voyage?" my phone asked in early March. A Gen X friend I met through a fashion blogging ring texted me.
"What's abba Voyage?" I asked while opening my front door with keys and coffee.
We're going! Marti, visiting London, took me to a show.
"Absolutely no ABBA songs here." I responded.
My parents didn't play ABBA much, so I don't know much about them. Dad liked Jimi Hendrix, Cream, Deep Purple, and New Orleans jazz. Marti told me ABBA Voyage was a holographic ABBA show with a live band.
The show was fun, extraordinary fun. Nearly everyone on the dance floor wore wigs, ankle-breaking platforms, sequins, and bellbottoms. I saw some millennials and Zoomers among the boomers.
I was intoxicated by the experience.
Automatons date back to the 18th-century mechanical turk. The mechanical turk was a chess automaton operated by a person. The mechanical turk seemed to perform like a human without human intervention, but it required a human in the loop to work properly.
Humans have used non-humans in entertainment for centuries, such as puppets, shadow play, and smoke and mirrors. A show can have animatronic, technological, and non-technological elements, and a live show can blur real and illusion. From medieval puppet shows to mechanical turks to AI filters, bots, and holograms, entertainment has evolved over time.
I'm not a hologram skeptic, but I'm skeptical of technology, especially since I work with it. I love live performances, I love hearing singers breathe, forget lines, and make jokes. Live shows are my favorite because I love watching performers make mistakes or interact with the audience. ABBA Voyage was different.
Marti and I traveled to Manchester after ABBA Voyage to see Liam Gallagher. Similar but different vibe. Similar in that thousands dressed up for the show. ABBA's energy was dizzying. 90s chic replaced sequins in the crowd. Doc Martens, nylon jackets, bucket hats, shaggy hair. The Charlatans and Liam Gallagher opened and closed, respectively. Fireworks. Incredible. People went crazy. Yelling exhausted my voice.
This week in music featured AI-enabled holograms and a decades-old rocker. Both are warm and gooey in our memories.
After seeing both, I'm wondering if we need AI hologram shows. Why? Is it good?
Like everything tech-related, my answer is "maybe." Because context and performance matter. Liam Gallagher and ABBA both had great, different shows.
For a hologram to work, it must be impossible and big. It must be big, showy, and improbable to justify a hologram. It must feel...expensive, like a stadium pop show. According to a quick search, ABBA broke up on bad terms. Reuniting is unlikely. This is also why Prince or Tupac hologram shows work. We can only engage with their legacy through covers or...holograms.
I drove around listening to the radio a few weeks ago. "Dreaming of You" by Selena played. Selena's music defined my childhood. I sang along and turned up the volume (or as loud as my husband would allow me while driving on the highway).
I discovered Selena's music six months after her death, so I never saw her perform live. My babysitter Melissa played me her album after I moved to Houston. Melissa took me to see the Selena movie five times when it came out. I quickly wore out my VHS copy. I constantly sang "Bibi Bibi Bom Bom" and "Como la Flor." I love Selena. A Selena hologram? Yes, probably.
Instagram advertised a cellist's Arthur Russell tribute show. Russell is another deceased artist I love. I almost walked down the aisle to "This is How We Walk on the Moon," but our cellist couldn't find it. Instead, I walked to Magnetic Fields' "The Book of Love." I "discovered" Russell after a friend introduced me to his music a few years ago.
I use these as analogies for the Liam Gallagher and ABBA concerts.
You have no idea how much I'd pay to see a hologram of Selena's 1995 Houston Livestock Show and Rodeo concert. Arthur Russell's hologram is unnecessary. Russell's work was intimate and performance-based. We can't separate his life from his legacy; popular audiences overlooked his genius. He died of AIDS broke. Like Selena, he died prematurely. Given his music and history, another performer would be a better choice than a hologram. He's no Selena. Selena could have rivaled Beyonce.
Pop shows' size works for holograms. Along with ABBA holograms, there was an anime movie and a light show that would put Tron to shame. ABBA created a tourable stadium show. The event was lavish, expensive, and well-planned. Pop, unlike rock, isn't gritty. Liam Gallagher hologram? No longer impossible, it wouldn't work. He's touring. I'm not sure if a rockstar alone should be rendered as a hologram; it was the show that made ABBA a hologram.
Holograms, like AI, are part of the future of entertainment, but not all of it. Because only modern interpretations of Arthur Russell's work reveal his legacy. That's his legacy.
Large-scale arena performers may use holograms in the future, but the experience must be impossible. A teacher once said that the only way to convey emotion in opera is through song, and I feel the same way about holograms, AR, VR, and mixed reality. A story's impossibility must make sense, like in opera. Impossibility and bombastic performance must be present for an immersive element to "work." ABBA was an impossible and improbable experience, which made it magical. It helped the holographic show work.
Marti told me about ABBA Voyage. She said it was a great concert. Marti has worked in music since the 1990s. She's a music expert; she's seen many shows.
Ai isn't a god or sentient, and the ABBA holograms aren't real. The renderings were glassy-eyed, flat, and robotic, like the Polar Express or the Jaws shark. Even today, the uncanny valley is insurmountable. We know it's not real because it's not about reality. It was about a suspended moment and performance feelings.
I knew this was impossible, an 'unreal' experience, but the emotions I felt were real, like watching a movie or tv show. Perhaps this is one of the better uses of AI, like CGI and special effects, like the beauty of entertainment- we were enraptured and entertained for hours. I've been playing ABBA since then.

Gareth Willey
3 years ago
I've had these five apps on my phone for a long time.
TOP APPS
Who survives spring cleaning?

Relax. Notion is off-limits. This topic is popular.
(I wrote about it 2 years ago, before everyone else did.) So).
These apps are probably new to you. I hope you find a new phone app after reading this.
Outdooractive
ViewRanger is Google Maps for outdoor enthusiasts.
This app has been so important to me as a freedom-loving long-distance walker and hiker.
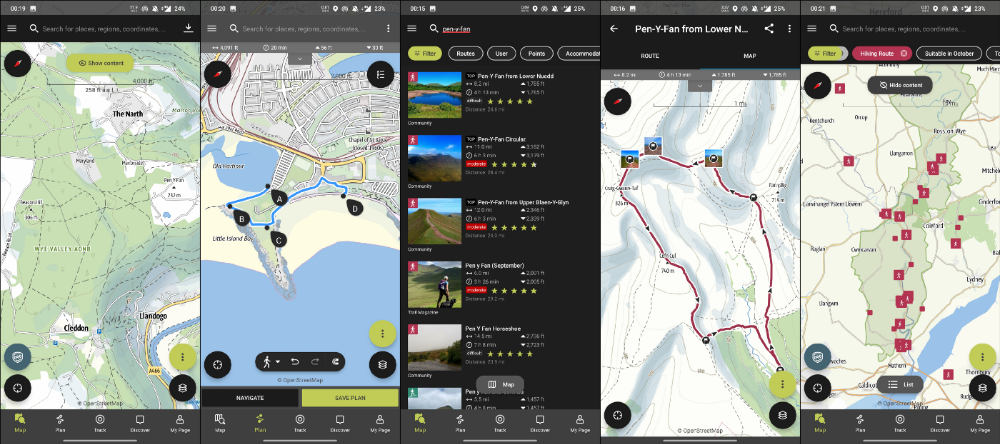
This app shows nearby trails and right-of-ways on top of an Open Street Map.
Helpful detail and data. Any route's distance,
You can download and follow tons of routes planned by app users.
This has helped me find new routes and places a fellow explorer has tried.
Free with non-intrusive ads. Years passed before I subscribed. Pro costs £2.23/month.
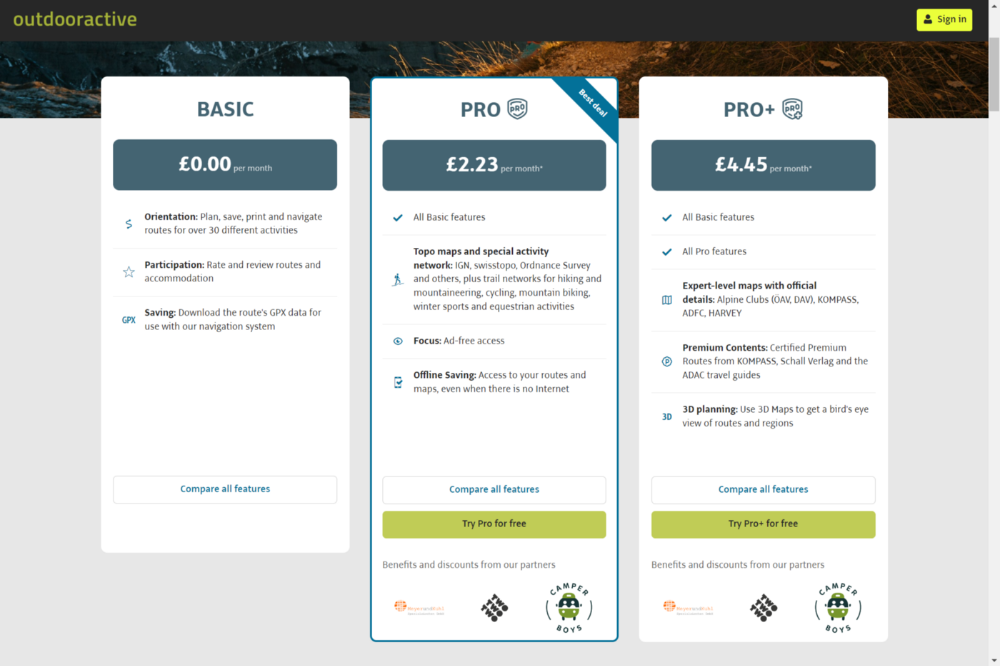
This app is for outdoor lovers.
Google Files
New phones come with bloatware. These rushed apps are frustrating.
We must replace these apps. 2017 was Google's year.
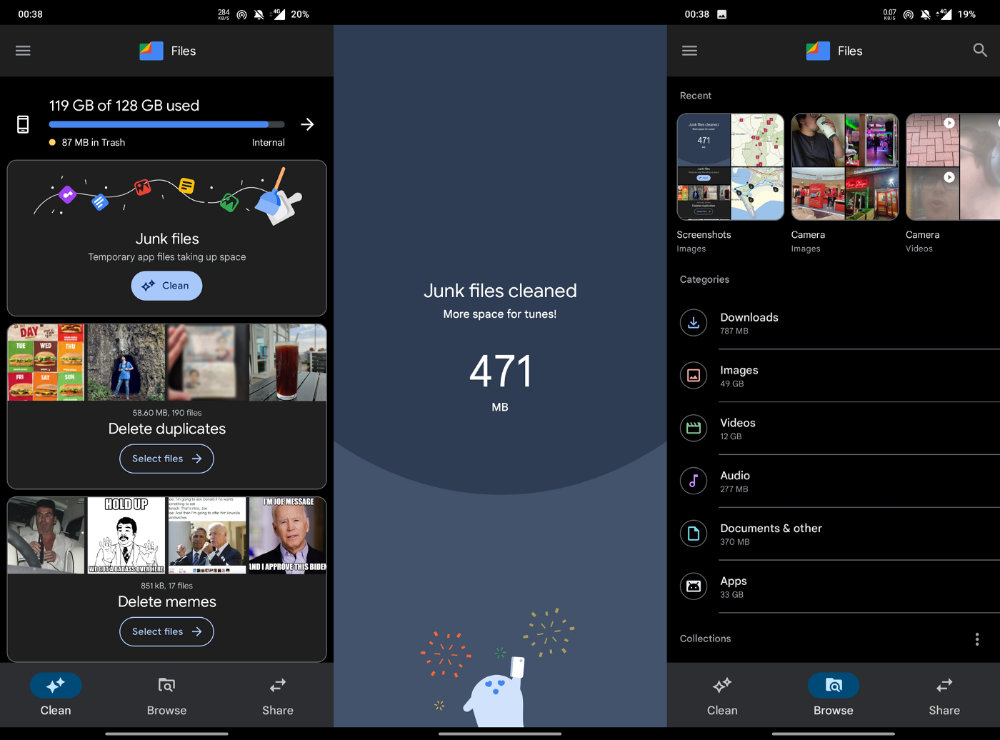
Files is a file manager. It's quick, innovative, and clean. They've given people what they want.
It's easy to organize files, clear space, and clear cache.
I recommend Gallery by Google as a gallery app alternative. It's quick and easy.
Trainline
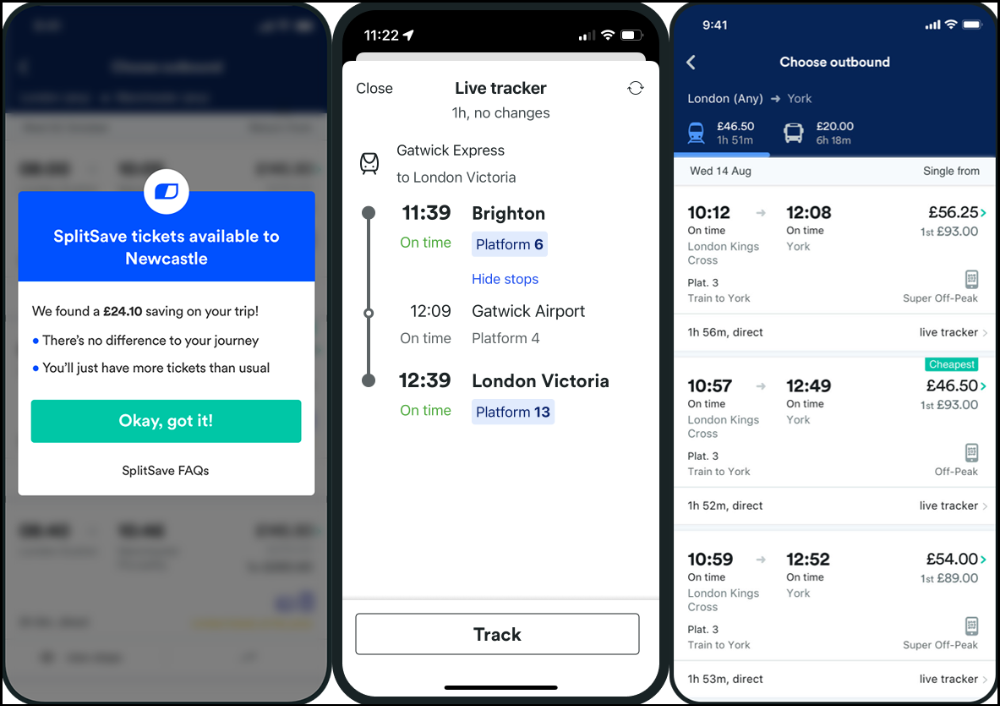
App for trains, buses, and coaches.
I've used this app for years. It did the basics well when I first used it.
Since then, it's improved. It's constantly adding features to make traveling easier and less stressful.
Split-ticketing helps me save hundreds a year on train fares. This app is only available in the UK and Europe.
This service doesn't link to a third-party site. Their app handles everything.
Not all train and coach companies use this app. All the big names are there, though.
Here's more on the app.
Battlefield: Mobile
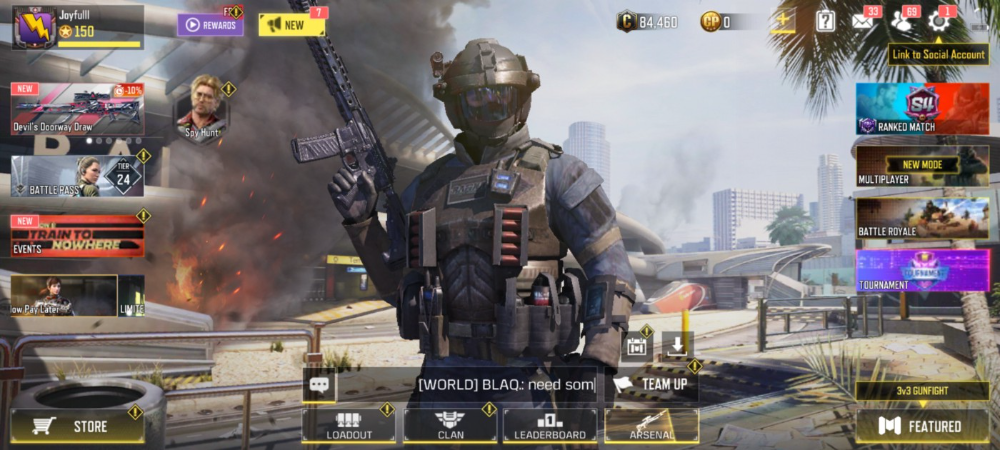
Play Store has 478,000 games. Few can turn my phone into a console.
Call of Duty Mobile and Asphalt 8/9 are examples.
Asphalt's loot boxes and ads make it unplayable. Call of Duty opens with a few ads. Close them to play without hassle.
This game uses all your phone's features to provide a high-quality, seamless experience. If my internet connection is good, I never experience lag or glitches.
The gameplay is energizing and intense, just like on consoles. Sometimes I'm too involved. I've thrown my phone in anger. I'm totally absorbed.
Customizability is my favorite. Since phones have limited screen space, we should only have the buttons we need, placed conveniently.
Size, opacity, and position are modifiable. Adjust audio, graphics, and textures. It's customizable.
This game has been on my phone for three years. It began well and has gotten better. When I think the creators can't do more, they do.
If you play, read my tips for winning a Battle Royale.
Lightroom
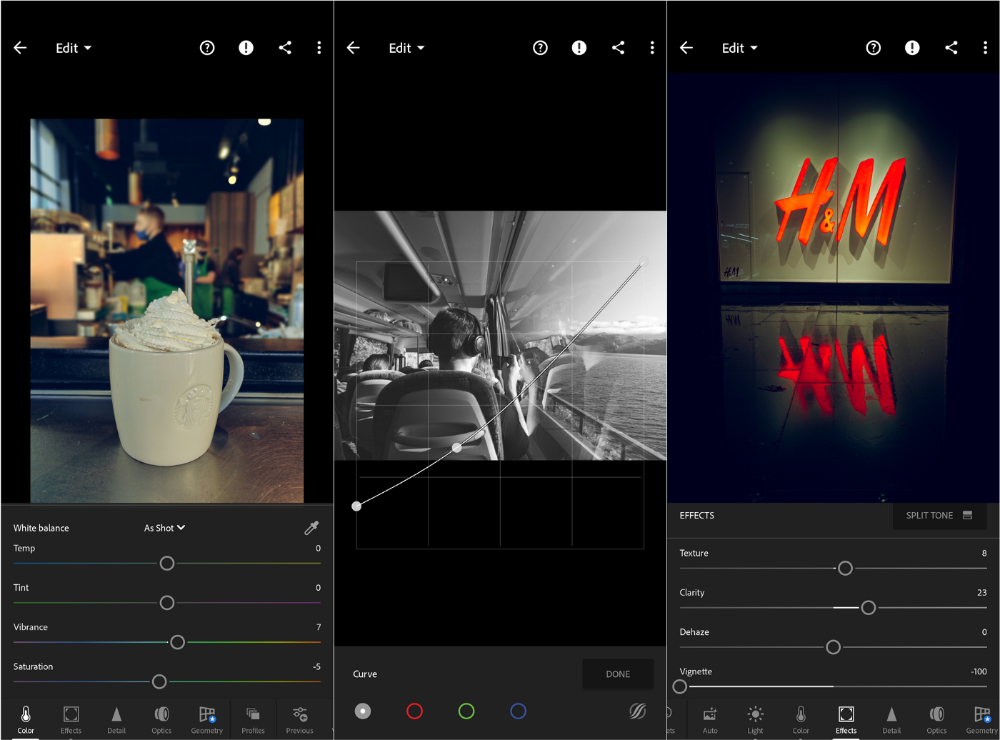
As a photographer, I believe your best camera is on you. The phone.
2017 was a big year for this app. I've tried many photo-editing apps since then. This always wins.
The app is dull. I've never seen better photo editing on a phone.
Adjusting settings and sliders doesn't damage or compress photos. It's detailed.
This is important for phone photos, which are lower quality than professional ones.
Some tools are behind a £4.49/month paywall. Adobe must charge a subscription fee instead of selling licenses. (I'm still bitter about Creative Cloud's price)
Snapseed is my pick. Lightroom is where I do basic editing before moving to Snapseed. Snapseed review:

These apps are great. They cover basic and complex editing needs while traveling.
Final Reflections
I hope you downloaded one of these. Share your favorite apps. These apps are scarce.

Jay Peters
3 years ago
Apple AR/VR heaset
Apple is said to have opted for a standalone AR/VR headset over a more powerful tethered model.
It has had a tumultuous history.
Apple's alleged mixed reality headset appears to be the worst-kept secret in tech, and a fresh story from The Information is jam-packed with details regarding the device's rocky development.
Apple's decision to use a separate headgear is one of the most notable aspects of the story. Apple had yet to determine whether to pursue a more powerful VR headset that would be linked with a base station or a standalone headset. According to The Information, Apple officials chose the standalone product over the version with the base station, which had a processor that later arrived as the M1 Ultra. In 2020, Bloomberg published similar information.
That decision appears to have had a long-term impact on the headset's development. "The device's many processors had already been in development for several years by the time the choice was taken, making it impossible to go back to the drawing board and construct, say, a single chip to handle all the headset's responsibilities," The Information stated. "Other difficulties, such as putting 14 cameras on the headset, have given hardware and algorithm engineers stress."
Jony Ive remained to consult on the project's design even after his official departure from Apple, according to the story. Ive "prefers" a wearable battery, such as that offered by Magic Leap. Other prototypes, according to The Information, placed the battery in the headset's headband, and it's unknown which will be used in the final design.
The headset was purportedly shown to Apple's board of directors last week, indicating that a public unveiling is imminent. However, it is possible that it will not be introduced until later this year, and it may not hit shop shelves until 2023, so we may have to wait a bit to try it.
For further down the line, Apple is working on a pair of AR spectacles that appear like Ray-Ban wayfarer sunglasses, but according to The Information, they're "still several years away from release." (I'm interested to see how they compare to Meta and Ray-Bans' true wayfarer-style glasses.)
You might also like
Daniel Clery
3 years ago
Twisted device investigates fusion alternatives
German stellarator revamped to run longer, hotter, compete with tokamaks
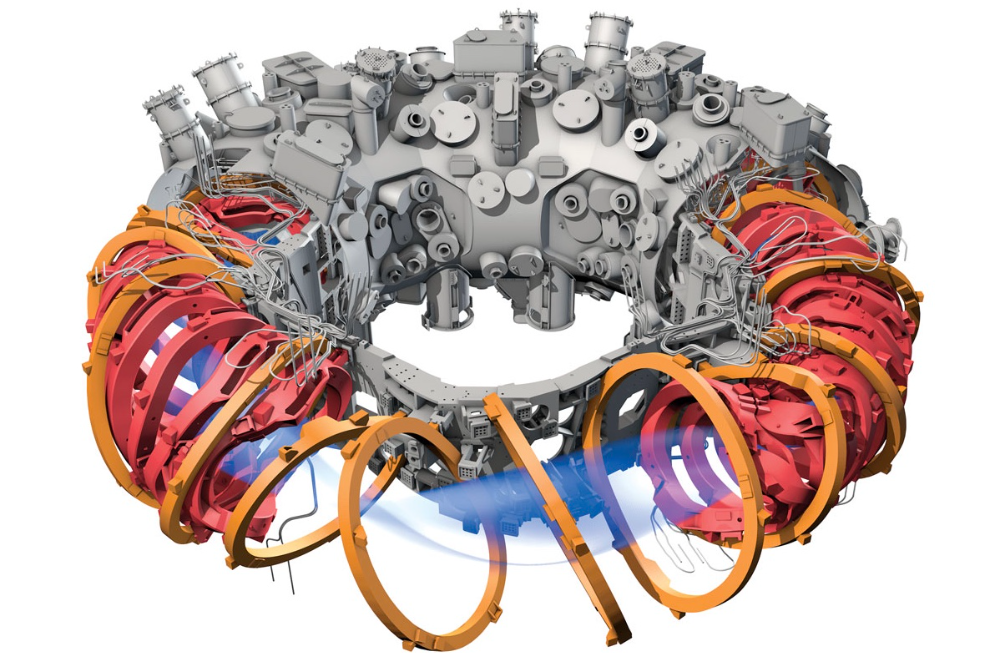
Tokamaks have dominated the search for fusion energy for decades. Just as ITER, the world's largest and most expensive tokamak, nears completion in southern France, a smaller, twistier testbed will start up in Germany.
If the 16-meter-wide stellarator can match or outperform similar-size tokamaks, fusion experts may rethink their future. Stellarators can keep their superhot gases stable enough to fuse nuclei and produce energy. They can theoretically run forever, but tokamaks must pause to reset their magnet coils.
The €1 billion German machine, Wendelstein 7-X (W7-X), is already getting "tokamak-like performance" in short runs, claims plasma physicist David Gates, preventing particles and heat from escaping the superhot gas. If W7-X can go long, "it will be ahead," he says. "Stellarators excel" Eindhoven University of Technology theorist Josefine Proll says, "Stellarators are back in the game." A few of startup companies, including one that Gates is leaving Princeton Plasma Physics Laboratory, are developing their own stellarators.
W7-X has been running at the Max Planck Institute for Plasma Physics (IPP) in Greifswald, Germany, since 2015, albeit only at low power and for brief runs. W7-X's developers took it down and replaced all inner walls and fittings with water-cooled equivalents, allowing for longer, hotter runs. The team reported at a W7-X board meeting last week that the revised plasma vessel has no leaks. It's expected to restart later this month to show if it can get plasma to fusion-igniting conditions.
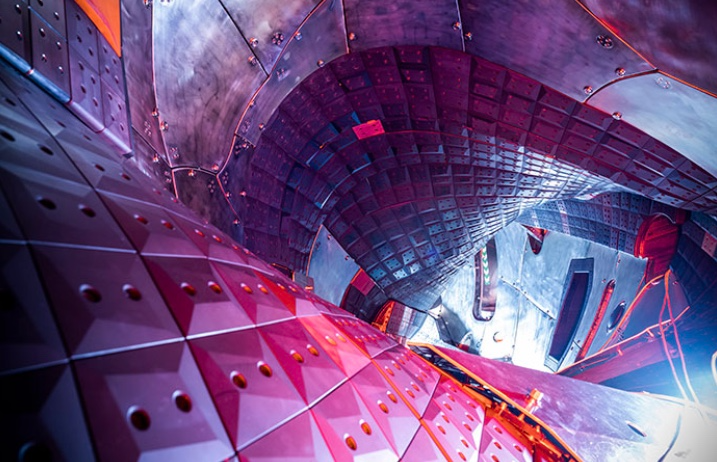
Wendelstein 7-X's water-cooled inner surface allows for longer runs.
HOSAN/IPP
Both stellarators and tokamaks create magnetic gas cages hot enough to melt metal. Microwaves or particle beams heat. Extreme temperatures create a plasma, a seething mix of separated nuclei and electrons, and cause the nuclei to fuse, releasing energy. A fusion power plant would use deuterium and tritium, which react quickly. Non-energy-generating research machines like W7-X avoid tritium and use hydrogen or deuterium instead.
Tokamaks and stellarators use electromagnetic coils to create plasma-confining magnetic fields. A greater field near the hole causes plasma to drift to the reactor's wall.
Tokamaks control drift by circulating plasma around a ring. Streaming creates a magnetic field that twists and stabilizes ionized plasma. Stellarators employ magnetic coils to twist, not plasma. Once plasma physicists got powerful enough supercomputers, they could optimize stellarator magnets to improve plasma confinement.
W7-X is the first large, optimized stellarator with 50 6- ton superconducting coils. Its construction began in the mid-1990s and cost roughly twice the €550 million originally budgeted.
The wait hasn't disappointed researchers. W7-X director Thomas Klinger: "The machine operated immediately." "It's a friendly machine." It did everything we asked." Tokamaks are prone to "instabilities" (plasma bulging or wobbling) or strong "disruptions," sometimes associated to halted plasma flow. IPP theorist Sophia Henneberg believes stellarators don't employ plasma current, which "removes an entire branch" of instabilities.
In early stellarators, the magnetic field geometry drove slower particles to follow banana-shaped orbits until they collided with other particles and leaked energy. Gates believes W7-X's ability to suppress this effect implies its optimization works.
W7-X loses heat through different forms of turbulence, which push particles toward the wall. Theorists have only lately mastered simulating turbulence. W7-X's forthcoming campaign will test simulations and turbulence-fighting techniques.
A stellarator can run constantly, unlike a tokamak, which pulses. W7-X has run 100 seconds—long by tokamak standards—at low power. The device's uncooled microwave and particle heating systems only produced 11.5 megawatts. The update doubles heating power. High temperature, high plasma density, and extensive runs will test stellarators' fusion power potential. Klinger wants to heat ions to 50 million degrees Celsius for 100 seconds. That would make W7-X "a world-class machine," he argues. The team will push for 30 minutes. "We'll move step-by-step," he says.
W7-X's success has inspired VCs to finance entrepreneurs creating commercial stellarators. Startups must simplify magnet production.
Princeton Stellarators, created by Gates and colleagues this year, has $3 million to build a prototype reactor without W7-X's twisted magnet coils. Instead, it will use a mosaic of 1000 HTS square coils on the plasma vessel's outside. By adjusting each coil's magnetic field, operators can change the applied field's form. Gates: "It moves coil complexity to the control system." The company intends to construct a reactor that can fuse cheap, abundant deuterium to produce neutrons for radioisotopes. If successful, the company will build a reactor.
Renaissance Fusion, situated in Grenoble, France, raised €16 million and wants to coat plasma vessel segments in HTS. Using a laser, engineers will burn off superconductor tracks to carve magnet coils. They want to build a meter-long test segment in 2 years and a full prototype by 2027.
Type One Energy in Madison, Wisconsin, won DOE money to bend HTS cables for stellarator magnets. The business carved twisting grooves in metal with computer-controlled etching equipment to coil cables. David Anderson of the University of Wisconsin, Madison, claims advanced manufacturing technology enables the stellarator.
Anderson said W7-X's next phase will boost stellarator work. “Half-hour discharges are steady-state,” he says. “This is a big deal.”

Sammy Abdullah
3 years ago
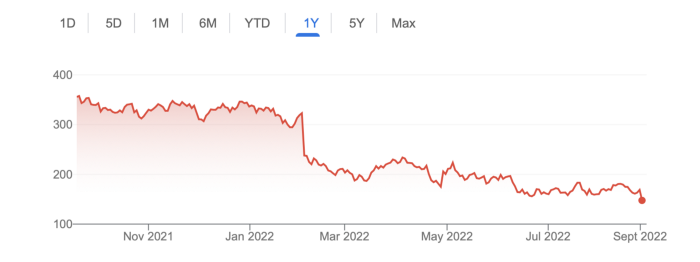
SaaS payback period data
It's ok and even desired to be unprofitable if you're gaining revenue at a reasonable cost and have 100%+ net dollar retention, meaning you never lose customers and expand them. To estimate the acceptable cost of new SaaS revenue, we compare new revenue to operating loss and payback period. If you pay back the customer acquisition cost in 1.5 years and never lose them (100%+ NDR), you're doing well.
To evaluate payback period, we compared new revenue to net operating loss for the last 73 SaaS companies to IPO since October 2017. (55 out of 73). Here's the data. 1/(new revenue/operating loss) equals payback period. New revenue/operating loss equals cost of new revenue.
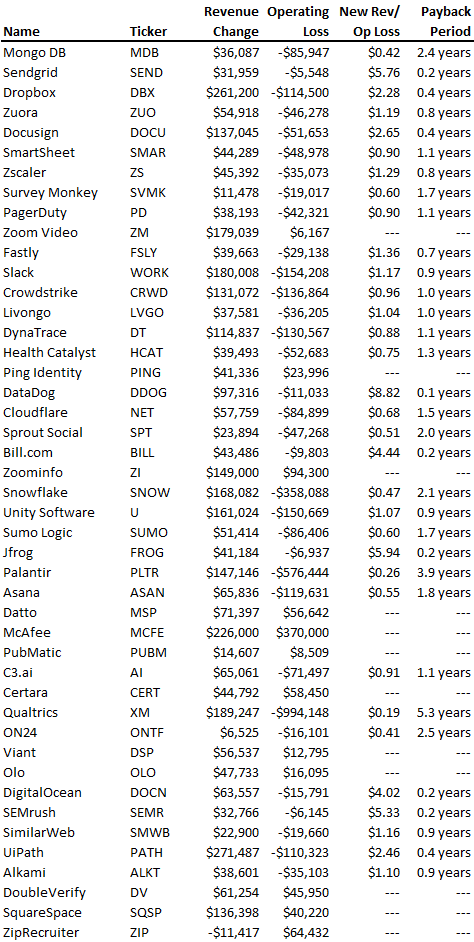
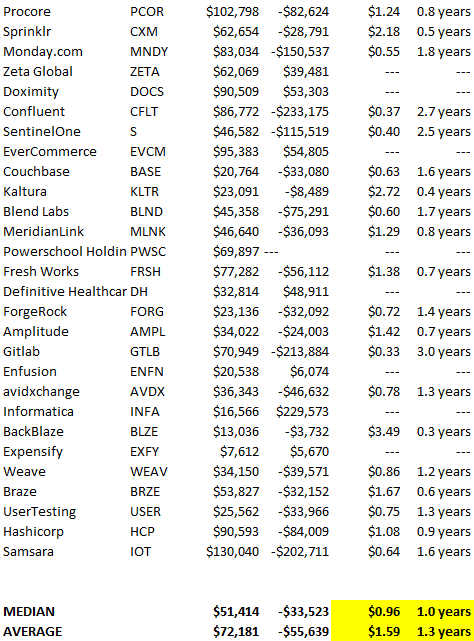
Payback averages a year. 55 SaaS companies that weren't profitable at IPO got a 1-year payback. Outstanding. If you pay for a customer in a year and never lose them (100%+ NDR), you're establishing a valuable business. The average was 1.3 years, which is within the 1.5-year range.
New revenue costs $0.96 on average. These SaaS companies lost $0.96 every $1 of new revenue last year. Again, impressive. Average new revenue per operating loss was $1.59.
Loss-in-operations definition. Operating loss revenue COGS S&M R&D G&A (technical point: be sure to use the absolute value of operating loss). It's wrong to only consider S&M costs and ignore other business costs. Operating loss and new revenue are measured over one year to eliminate seasonality.
Operating losses are desirable if you never lose a customer and have a quick payback period, especially when SaaS enterprises are valued on ARR. The payback period should be under 1.5 years, the cost of new income < $1, and net dollar retention 100%.
Josh Chesler
3 years ago
10 Sneaker Terms Every Beginner Should Know
So you want to get into sneakers? Buying a few sneakers and figuring it out seems simple. Then you miss out on the weekend's instant-sellout releases, so you head to eBay, Twitter, or your local sneaker group to see what's available, since you're probably not ready to pay Flight Club prices just yet.
That's when you're bombarded with new nicknames, abbreviations, and general sneaker slang. It would take months to explain every word and sneaker, so here's a starter kit of ten simple terms to get you started. (Yeah, mostly Jordan. Does anyone really start with Kith or Nike SB?)
10. Colorways
Colorways are a common term in fashion, design, and other visual fields. It's just the product's color scheme. In the case of sneakers, the colorway is often as important as the actual model. Are this year's "Chicago" Air Jordan 1s more durable than last year's "Black/Gum" colorway? Because of their colorway and rarity, the Chicagos are worth roughly three pairs of the Black/Gum kicks.
Pro Tip: A colorway with a well-known nickname is almost always worth more than one without, and the same goes for collaborations.
9. Beaters
A “beater” is a well-worn, likely older model of shoe that has significant wear and tear on it. Rarely sold with the original box or extra laces, beaters rarely sell for much. Unlike most “worn” sneakers, beaters are used for rainy days and the gym. It's exactly what it sounds like, a box full of beaters, and they're a good place to start if you're looking for some cheap old kicks.
Pro Tip: Know which shoes clean up nicely. The shape of lower top sneakers with wider profiles, like SB Dunk Lows and Air Jordan 3s, tends to hold better over time than their higher and narrower cousins.
8. Retro
In the world of Jordan Brand, a “Retro” release is simply a release (or re-release) of a colorway after the shoe model's initial release. For example, the original Air Jordan 7 was released in 1992, but the Bordeaux colorway was re-released in 2011 and recently (2015). An Air Jordan model is released every year, and while half of them are unpopular and unlikely to be Retroed soon, any of them could be re-released whenever Nike and Jordan felt like it.
Pro Tip: Now that the Air Jordan line has been around for so long, the model that tends to be heavily retroed in a year is whichever shoe came out 23 (Michael Jordan’s number during the prime of his career) years ago. The Air Jordan 6 (1991) got new colorways last year, the Air Jordan 7 this year, and more Air Jordan 8s will be released later this year and early next year (1993).
7. PP/Inv
In spite of the fact that eBay takes roughly 10% of the final price, many sneaker buyers and sellers prefer to work directly with PayPal. Selling sneakers for $100 via PayPal invoice or $100 via PayPal friends/family is common on social media. Because no one wants their eBay account suspended for promoting PayPal deals, many eBay sellers will simply state “Message me for a better price.”
Pro Tip: PayPal invoices protect buyers well, but gifting or using Google Wallet does not. Unless you're certain the seller is legitimate, only use invoiced goods/services payments.
6. Yeezy
Kanye West and his sneakers are known as Yeezys. The rapper's first two Yeezys were made by Nike before switching to Adidas. Everything Yeezy-related will be significantly more expensive (and therefore have significantly more fakes made). Not only is the Nike Air Yeezy 2 “Red October” one of the most sought-after sneakers, but the Yeezy influence can be seen everywhere.
Pro Tip: If you're going to buy Yeezys, make sure you buy them from a reputable retailer or reseller. With so many fakes out there, it's not worth spending a grand on something you're not 100% sure is real.
5. GR/Limited
Regardless of how visually repulsive, uncomfortable, and/or impractical a sneaker is, if it’s rare enough, people will still want it. GR stands for General Release, which means they're usually available at retail. Reselling a “Limited Edition” release is costly. Supply and demand, but in this case, the limited supply drives up demand. If you want to get some of the colorways made for rappers, NBA players (Player Exclusive or PE models), and other celebrities, be prepared to pay a premium.
Pro Tip: Limited edition sneakers, like the annual Doernbecher Freestyle sneakers Nike creates with kids from Portland's Doernbecher Children's Hospital, will always be more expensive and limited. Or, you can use automated sneaker-buying software.
4. Grails
A “grail” is a pair of sneakers that someone desires above all others. To obtain their personal grails, people are willing to pay significantly more than the retail price. There doesn't have to be any rhyme or reason why someone chose a specific pair as their grails.
Pro Tip: For those who don't have them, the OG "Bred" or "Royal" Air Jordan 1s, the "Concord" Air Jordan 11s, etc., are all grails.
3. Bred
Anything released in “Bred” (black and red) will sell out quickly. Most resale Air Jordans (and other sneakers) come in the Bred colorway, which is a fan favorite. Bred is a good choice for a first colorway, especially on a solid sneaker silhouette.
Pro Tip: Apart from satisfying the world's hypebeasts, Bred sneakers will probably match a lot of your closet.
2. DS
DS = Deadstock = New. That's it. If something has been worn or tried on, it is no longer DS. Very Near Deadstock (VNDS) Pass As Deadstock It's a cute way of saying your sneakers have been worn but are still in good shape. In the sneaker world, “worn” means they are no longer new, but not too old or beat up.
Pro Tip: Ask for photos of any marks or defects to see what you’re getting before you buy used shoes, also find out if they come with the original box and extra laces, because that can be a sign that they’re in better shape.
1. Fake/Unauthorized
The words “Unauthorized,” “Replica,” “B-grades,” and “Super Perfect” all mean the shoes are fake. It means they aren't made by the actual company, no matter how close or how good the quality. If that's what you want, go ahead and get them. Do not wear them if you do not want the rest of the sneaker world to mock them.
Pro Tip: If you’re not sure if shoes are real or not, do a “Legit Check” on Twitter or Facebook. You'll get dozens of responses in no time.