


More on Productivity

Darshak Rana
3 years ago
17 Google Secrets 99 Percent of People Don't Know
What can't Google do?
Seriously, nothing! Google rocks.
Google is a major player in online tools and services. We use it for everything, from research to entertainment.
Did I say entertain yourself?
Yes, with so many features and options, it can be difficult to fully utilize Google.
#1. Drive Google Mad
You can make Google's homepage dance if you want to be silly.
Just type “Google Gravity” into Google.com. Then select I'm lucky.
See the page unstick before your eyes!
#2 Play With Google Image
Google isn't just for work.
Then have fun with it!
You can play games right in your search results. When you need a break, google “Solitaire” or “Tic Tac Toe”.
#3. Do a Barrel Roll
Need a little more excitement in your life? Want to see Google dance?
Type “Do a barrel roll” into the Google search bar.
Then relax and watch your screen do a 360.
#4 No Internet? No issue!
This is a fun trick to use when you have no internet.
If your browser shows a “No Internet” page, simply press Space.
Boom!
We have dinosaurs! Now use arrow keys to save your pixelated T-Rex from extinction.
#5 Google Can Help
Play this Google coin flip game to see if you're lucky.
Enter “Flip a coin” into the search engine.
You'll see a coin flipping animation. If you get heads or tails, click it.
#6. Think with Google
My favorite Google find so far is the “Think with Google” website.
Think with Google is a website that offers marketing insights, research, and case studies.
I highly recommend it to entrepreneurs, small business owners, and anyone interested in online marketing.
#7. Google Can Read Images!
This is a cool Google trick that few know about.
You can search for images by keyword or upload your own by clicking the camera icon on Google Images.
Google will then show you all of its similar images.
Caution: You should be fine with your uploaded images being public.
#8. Modify the Google Logo!
Clicking on the “I'm Feeling Lucky” button on Google.com takes you to a random Google Doodle.
Each year, Google creates a Doodle to commemorate holidays, anniversaries, and other occasions.
#9. What is my IP?
Simply type “What is my IP” into Google to find out.
Your IP address will appear on the results page.
#10. Send a Self-Destructing Email With Gmail,
Create a new message in Gmail. Find an icon that resembles a lock and a clock near the SEND button. That's where the Confidential Mode is.
By clicking it, you can set an expiration date for your email. Expiring emails are automatically deleted from both your and the recipient's inbox.
#11. Blink, Google Blink!
This is a unique Google trick.
Type “blink HTML” into Google. The words “blink HTML” will appear and then disappear.
The text is displayed for a split second before being deleted.
To make this work, Google reads the HTML code and executes the “blink” command.
#12. The Answer To Everything
This is for all Douglas Adams fans.
The answer to life, the universe, and everything is 42, according to Google.
An allusion to Douglas Adams' Hitchhiker's Guide to the Galaxy, in which Ford Prefect seeks to understand life, the universe, and everything.
#13. Google in 1998
It's a blast!
Type “Google in 1998” into Google. "I'm feeling lucky"
You'll be taken to an old-school Google homepage.
It's a nostalgic trip for long-time Google users.
#14. Scholarships and Internships
Google can help you find college funding!
Type “scholarships” or “internships” into Google.
The number of results will surprise you.
#15. OK, Google. Dice!
To roll a die, simply type “Roll a die” into Google.
On the results page is a virtual dice that you can click to roll.
#16. Google has secret codes!
Hit the nine squares on the right side of your Google homepage to go to My Account. Then Personal Info.
You can add your favorite language to the “General preferences for the web” tab.
#17. Google Terminal
You can feel like a true hacker.
Just type “Google Terminal” into Google.com. "I'm feeling lucky"
Voila~!
You'll be taken to an old-school computer terminal-style page.
You can then type commands to see what happens.
Have you tried any of these activities? Tell me in the comments.
Read full article here

wordsmithwriter
3 years ago
2023 Will Be the Year of Evernote and Craft Notetaking Apps.
Note-taking is a vital skill. But it's mostly learned.

Recently, innovative note-taking apps have flooded the market.
In the next few years, Evernote and Craft will be important digital note-taking companies.
Evernote is a 2008 note-taking program. It can capture ideas, track tasks, and organize information on numerous platforms.
It's one of the only note-taking app that lets users input text, audio, photos, and videos. It's great for collecting research notes, brainstorming, and remaining organized.
Craft is a popular note-taking app.
Craft is a more concentrated note-taking application than Evernote. It organizes notes into subjects, tags, and relationships, making it ideal for technical or research notes.
Craft's search engine makes it easy to find what you need.
Both Evernote and Craft are likely to be the major players in digital note-taking in the years to come.
Their concentration on gathering and organizing information lets users generate notes quickly and simply. Multimedia elements and a strong search engine make them the note-taking apps of the future.
Evernote and Craft are great note-taking tools for staying organized and tracking ideas and projects.
With their focus on acquiring and organizing information, they'll dominate digital note-taking in 2023.
Pros
Concentrate on gathering and compiling information
special features including a strong search engine and multimedia components
Possibility of subject, tag, and relationship structuring
enables users to incorporate multimedia elements
Excellent tool for maintaining organization, arranging research notes, and brainstorming
Cons
Software may be difficult for folks who are not tech-savvy to utilize.
Limited assistance for hardware running an outdated operating system
Subscriptions could be pricey.
Data loss risk because of security issues
Evernote and Craft both have downsides.
The risk of data loss as a result of security flaws and software defects comes first.
Additionally, their subscription fees could be high, and they might restrict support for hardware that isn't running the newest operating systems.
Finally, folks who need to be tech-savvy may find the software difficult.
Evernote versus. Productivity Titans Evernote will make Notion more useful. medium.com

Aldric Chen
3 years ago
Jack Dorsey's Meeting Best Practice was something I tried. It Performs Exceptionally Well in Consulting Engagements.

Yes, client meetings are difficult. Especially when I'm alone.
Clients must tell us their problems so we can help.
In-meeting challenges contribute nothing to our work. Consider this:
Clients are unprepared.
Clients are distracted.
Clients are confused.
Introducing Jack Dorsey's Google Doc approach
I endorse his approach to meetings.
Not Google Doc-related. Jack uses it for meetings.
This is what his meetings look like.
Prior to the meeting, the Chair creates the agenda, structure, and information using Google Doc.
Participants in the meeting would have 5-10 minutes to read the Google Doc.
They have 5-10 minutes to type their comments on the document.
In-depth discussion begins
There is elegance in simplicity. Here's how Jack's approach is fantastic.
Unprepared clients are given time to read.
During the meeting, they think and work on it.
They can see real-time remarks from others.
Discussion ensues.
Three months ago, I fell for this strategy. After trying it with a client, I got good results.
I conducted social control experiments in a few client workshops.
Context matters.
I am sure Jack Dorsey’s method works well in meetings. What about client workshops?
So, I tested Enterprise of the Future with a consulting client.
I sent multiple emails to client stakeholders describing the new approach.
No PowerPoints that day. I spent the night setting up the Google Doc with conversation topics, critical thinking questions, and a Before and After section.
The client was shocked. First, a Google Doc was projected. Second surprise was a verbal feedback.
“No pre-meeting materials?”
“Don’t worry. I know you are not reading it before our meeting, anyway.”
We laughed. The experiment started.
Observations throughout a 90-minute engagement workshop from beginning to end
For 10 minutes, the workshop was silent.
People read the Google Doc. For some, the silence was unnerving.
“Are you not going to present anything to us?”
I said everything's in Google Doc. I asked them to read, remark, and add relevant paragraphs.
As they unlocked their laptops, they were annoyed.
Ten client stakeholders are typing on the Google Doc. My laptop displays comment bubbles, red lines, new paragraphs, and strikethroughs.
The first 10 minutes were productive. Everyone has seen and contributed to the document.
I was silent.
The move to a classical workshop was smooth. I didn't stimulate dialogue. They did.
Stephanie asked Joe why a blended workforce hinders company productivity. She questioned his comments and additional paragraphs.
That is when a light bulb hit my head. Yes, you want to speak to the right person to resolve issues!
Not only that was discussed. Others discussed their remark bubbles with neighbors. Debate circles sprung up one after the other.
The best part? I asked everyone to add their post-discussion thoughts on a Google Doc.
After the workshop, I have:
An agreement-based working document
A post-discussion minutes that are prepared for publication
A record of the discussion points that were brought up, argued, and evaluated critically
It showed me how stakeholders viewed their Enterprise of the Future. It allowed me to align with them.
Finale Keynotes
Client meetings are a hit-or-miss. I know that.
Jack Dorsey's meeting strategy works for consulting. It promotes session alignment.
It relieves clients of preparation.
I get the necessary information to advance this consulting engagement.
It is brilliant.
You might also like

Tim Denning
3 years ago
I Posted Six Times a Day for 210 Days on Twitter. Here's What Happened.
I'd spend hours composing articles only to find out they were useless. Twitter solved the problem.

Twitter is wrinkled, say critics.
Nope. Writing is different. It won't make sense until you write there.
Twitter is resurgent. People are reading again. 15-second TikToks overloaded our senses.
After nuking my 20,000-follower Twitter account and starting again, I wrote every day for 210 days.
I'll explain.
I came across the strange world of microblogging.
Traditional web writing is filler-heavy.
On Twitter, you must be brief. I played Wordle.
Twitter Threads are the most popular writing format. Like a blog post. It reminds me of the famous broetry posts on LinkedIn a few years ago.
Threads combine tweets into an article.
Sharp, concise sentences
No regard for grammar
As important as the information is how the text looks.
Twitter Threads are like Michael Angelo's David monument. He chipped away at an enormous piece of marble until a man with a big willy appeared.
That's Twitter Threads.
I tried to remove unnecessary layers from several of my Wordpress blog posts. Then I realized something.
Tweeting from scratch is easier and more entertaining. It's quicker and makes you think more concisely.
Superpower: saying much with little words. My long-form writing has improved. My article sentences resemble tweets.
You never know what will happen.
Twitter's subcultures are odd. Best-performing tweets are strange.
Unusual trend: working alone and without telling anyone. It's a rebellion against Instagram influencers who share their every moment.
Early on, random thoughts worked:
My friend’s wife is Ukrainian. Her family are trapped in the warzone. He is devastated. And here I was complaining about my broken garage door. War puts everything in perspective. Today is a day to be grateful for peace.
Documenting what's happening triggers writing. It's not about viral tweets. Helping others matters.
There are numerous anonymous users.
Twitter uses pseudonyms.
You don't matter. On sites like LinkedIn, you must use your real name. Welcome to the Cyberpunk metaverse of Twitter :)
One daily piece of writing is a powerful habit.
Habits build creator careers. Read that again.
Twitter is an easy habit to pick up. If you can't tweet in one sentence, something's wrong. Easy-peasy-japanese.
Not what I tweeted, but my constancy, made the difference.
Daily writing is challenging, especially if your supervisor is on your back. Twitter encourages writing.
Tweets evolved as the foundation of all other material.
During my experiment, I enjoyed Twitter's speed.
Tweets get immediate responses, comments, and feedback. My popular tweets become newspaper headlines. I've also written essays from tweet discussions.
Sometimes the tweet and article were clear. Twitter sometimes helped me overcome writer's block.
I used to spend hours composing big things that had little real-world use.
Twitter helped me. No guessing. Data guides my coverage and validates concepts.
Test ideas on Twitter.
It took some time for my email list to grow.
Subscribers are a writer's lifeblood.
Without them, you're broke and homeless when Mark Zuckerberg tweaks the algorithms for ad dollars. Twitter has three ways to obtain email subscribers:
1. Add a link to your bio.
Twitter allows bio links (LinkedIn now does too). My eBook's landing page is linked. I collect emails there.
2. Start an online newsletter.
Twitter bought newsletter app Revue. They promote what they own.
I just established up a Revue email newsletter. I imported them weekly into my ConvertKit email list.
3. Create Twitter threads and include a link to your email list in the final tweet.
Write Twitter Threads and link the last tweet to your email list (example below).
Initial email subscribers were modest.
Numbers are growing. Twitter provides 25% of my new email subscribers. Some days, 50 people join.
Without them, my writing career is over. I'd be back at a 9-5 job begging for time off to spend with my newborn daughter. Nope.
Collect email addresses or die trying.
As insurance against unsubscribes and Zucks, use a second email list or Discord community.
What I still need to do
Twitter's fun. I'm wiser. I need to enable auto-replies and auto-DMs (direct messages).
This adds another way to attract subscribers. I schedule tweets with Tweet Hunter.
It’s best to go slow. People assume you're an internet marketer if you spam them with click requests.
A human internet marketer is preferable to a robot. My opinion.
210 days on Twitter taught me that. I plan to use the platform until I'm a grandfather unless Elon ruins it.

Peter Steven Ho
3 years ago
Thank You for 21 Fantastic Years, iPod
Apple's latest revelation may shock iPod fans and former owners.

Apple discontinued the iPod touch on May 11, 2022. After 21 years, Apple killed the last surviving iPod, a device Steve Jobs believed would revolutionize the music industry.
Jobs was used to making bold predictions, but few expected Apple's digital music player to change the music industry. It did.
This chaos created new business opportunities. Spotify, YouTube, and Amazon are products of that chaotic era.
As the digital landscape changes, so do consumers, and the iPod has lost favor. I'm sure Apple realizes the importance of removing an icon. The iPod was Apple like the Mac and iPhone. I think it's bold to retire such a key Apple cornerstone. What would Jobs do?
iPod evolution across the ages
Here's an iPod family tree for all you enthusiasts.
iPod vintage (Oct 2001 to Sep 2014, 6 generations)
The original iPod had six significant upgrades since 2001. Apple announced an 80 GB ($249) and 160 GB ($349) iPod classic in 2007.
Apple updated the 80 GB model with a 120 GB device in September 2008. Apple upgraded the 120 GB model with a 160 GB variant a year later (2009). This was the last iteration, and Apple discontinued the classic in September 2014.
iPod nano (Jan 2004 to Sep 2005, 2 generations)
Apple debuted a smaller, brightly-colored iPod in 2004. The first model featured 4 GB, enough for 1,000 songs.
Apple produced a new 4 GB or 6 GB iPod mini in February 2005 and discontinued it in September when they released a better-looking iPod nano.
iTouch nano (Sep 2005 to July 2017, 7 generations)
I loved the iPod nano. It was tiny and elegant with enough tech to please most music aficionados, unless you carry around your complete music collection.

Apple owed much of the iPod nano's small form and success to solid-state flash memory. Flash memory doesn't need power because it has no moving parts. This makes the iPod nano more durable than the iPod classic and mini, which employ hard drives.
Apple manufactured seven generations of the iPod nano, improving its design, display screen, memory, battery, and software, but abandoned it in July 2017 due to dwindling demand.
Shuffle iPod (Jan 2005 to Jul 2017, 4 generations)
The iPod shuffle was entry-level. It was a simple, lightweight, tiny music player. The iPod shuffle was perfect for lengthy bike trips, runs, and hikes.

Apple sold 10 million iPod shuffles in the first year and kept making them for 12 years, through four significant modifications.
iOS device (Sep 2007 to May 2022, 7 generations)
The iPod touch's bigger touchscreen interface made it a curious addition to the iPod family. The iPod touch resembled an iPhone more than the other iPods, making them hard to tell apart.
Many were dissatisfied that Apple removed functionality from the iPod touch to avoid making it too similar to the iPhone. Seven design improvements over 15 years brought the iPod touch closer to the iPhone, but not completely.
The iPod touch uses the same iOS operating system as the iPhone, giving it access to many apps, including handheld games.
The iPod touch's long production run is due to the next generation of music-loving gamers.
What made the iPod cool
iPod revolutionized music listening. It was the first device to store and play MP3 music, allowing you to carry over 1,000 songs anywhere.
The iPod changed consumer electronics with its scroll wheel and touchscreen. Jobs valued form and function equally. He showed people that a product must look good to inspire an emotional response and ignite passion.
The elegant, tiny iPod was a tremendous sensation when it arrived for $399 in October 2001. Even at this price, it became a must-have for teens to CEOs.
It's hard to identify any technology that changed how music was downloaded and played like the iPod. Apple iPod and iTunes had 63% of the paid music download market in the fourth quarter of 2012.
The demise of the iPod was inevitable
Apple discontinuing the iPod touch after 21 years is sad. This ends a 00s music icon.
Jobs was a genius at anticipating market needs and opportunities, and Apple launched the iPod at the correct time.
Few consumer electronics items have had such a lasting impact on music lovers and the music industry as the iPod.
Smartphones and social media have contributed to the iPod's decline. Instead of moving to the music, the new generation of consumers is focused on social media. They're no longer passive content consumers; they're active content creators seeking likes and followers. Here, the smartphone has replaced the iPod.
It's hard not to feel a feeling of loss, another part of my adolescence now forgotten by the following generation.
So, if you’re lucky enough to have a working iPod, hang on to that relic and enjoy the music and the nostalgia.

Marco Manoppo
3 years ago
Failures of DCG and Genesis
Don't sleep with your own sister.
70% of lottery winners go broke within five years. You've heard the last one. People who got rich quickly without setbacks and hard work often lose it all. My father said, "Easy money is easily lost," and a wealthy friend who owns a family office said, "The first generation makes it, the second generation spends it, and the third generation blows it."
This is evident. Corrupt politicians in developing countries live lavishly, buying their third wives' fifth Hermès bag and celebrating New Year's at The Brando Resort. A successful businessperson from humble beginnings is more conservative with money. More so if they're atom-based, not bit-based. They value money.
Crypto can "feel" easy. I have nothing against capital market investing. The global financial system is shady, but that's another topic. The problem started when those who took advantage of easy money started affecting other businesses. VCs did minimal due diligence on FTX because they needed deal flow and returns for their LPs. Lenders did minimum diligence and underwrote ludicrous loans to 3AC because they needed revenue.
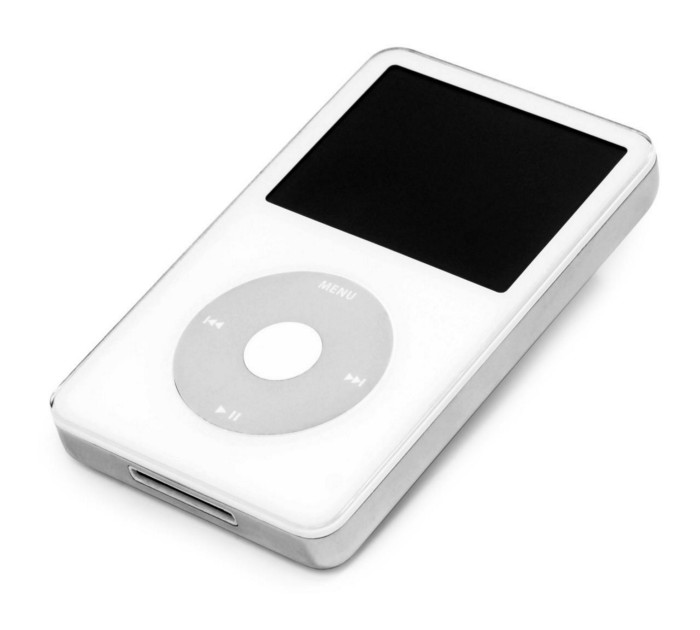
Alameda (hence FTX) and 3AC made "easy money" Genesis and DCG aren't. Their businesses are more conventional, but they underestimated how "easy money" can hurt them.
Genesis has been the victim of easy money hubris and insolvency, losing $1 billion+ to 3AC and $200M to FTX. We discuss the implications for the broader crypto market.
Here are the quick takeaways:
Genesis is one of the largest and most notable crypto lenders and prime brokerage firms.
DCG and Genesis have done related party transactions, which can be done right but is a bad practice.
Genesis owes DCG $1.5 billion+.
If DCG unwinds Grayscale's GBTC, $9-10 billion in BTC will hit the market.
DCG will survive Genesis.
What happened?
Let's recap the FTX shenanigan from two weeks ago. Shenanigans! Delphi's tweet sums up the craziness. Genesis has $175M in FTX.
Cred's timeline: I hate bad crisis management. Yes, admitting their balance sheet hole right away might've sparked more panic, and there's no easy way to convey your trouble, but no one ever learns.
By November 23, rumors circulated online that the problem could affect Genesis' parent company, DCG. To address this, Barry Silbert, Founder, and CEO of DCG released a statement to shareholders.
A few things are confirmed thanks to this statement.
DCG owes $1.5 billion+ to Genesis.
$500M is due in 6 months, and the rest is due in 2032 (yes, that’s not a typo).
Unless Barry raises new cash, his last-ditch efforts to repay the money will likely push the crypto market lower.
Half a year of GBTC fees is approximately $100M.
They can pay $500M with GBTC.
With profits, sell another port.
Genesis has hired a restructuring adviser, indicating it is in trouble.
Rehypothecation
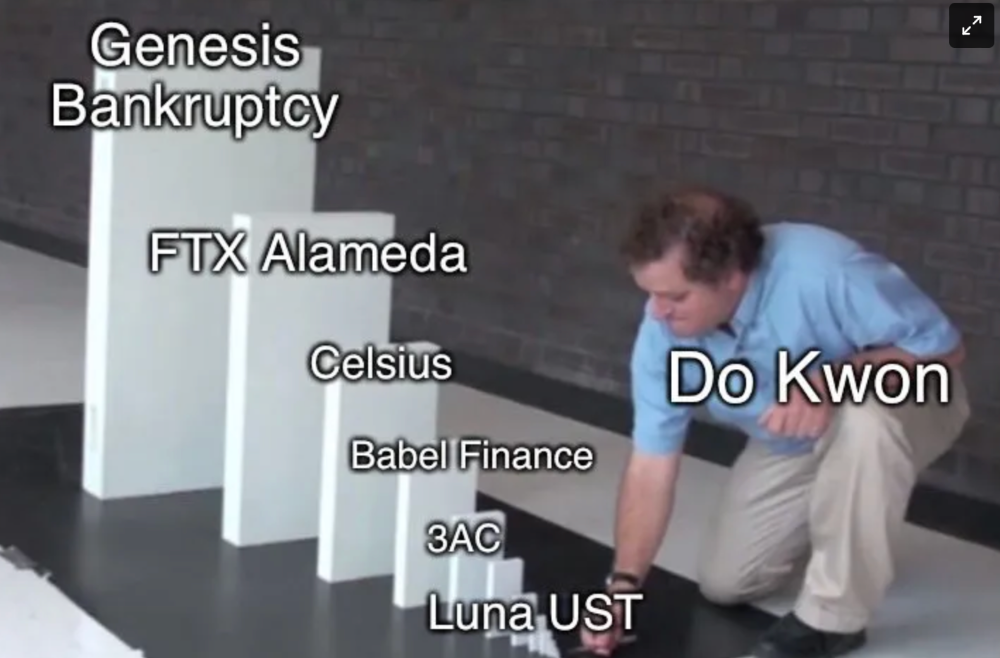
Every crypto problem in the past year seems to be rehypothecation between related parties, excessive leverage, hubris, and the removal of the money printer. The Bankless guys provided a chart showing 2021 crypto yield.
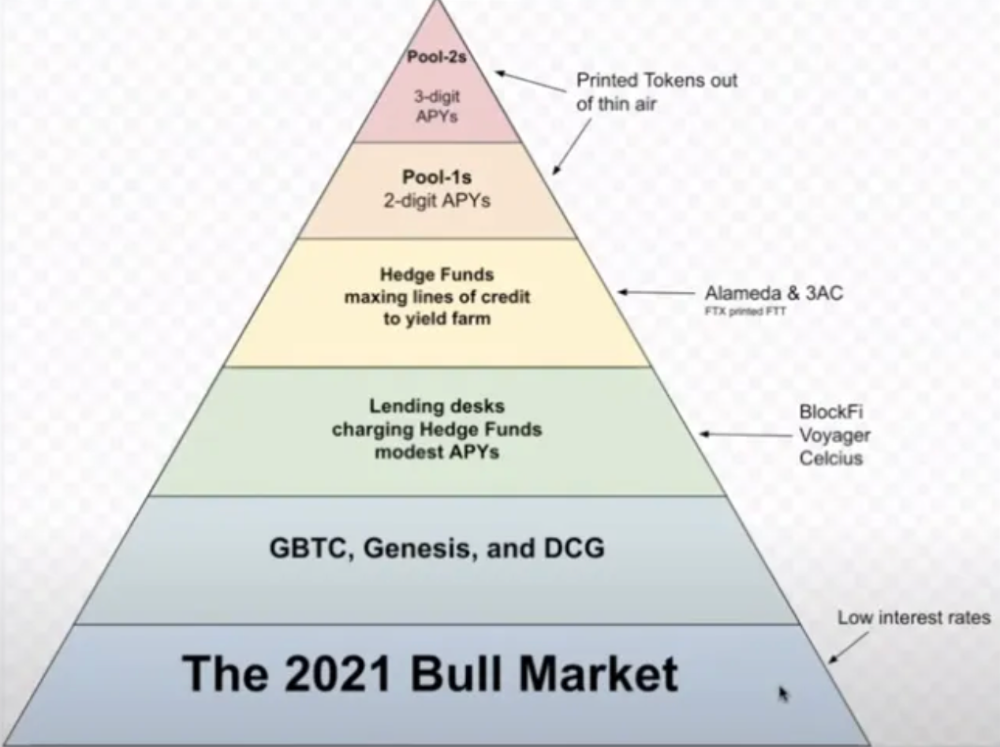
In June 2022, @DataFinnovation published a great investigation about 3AC and DCG. Here's a summary.
3AC borrowed BTC from Genesis and pledged it to create Grayscale's GBTC shares.
3AC uses GBTC to borrow more money from Genesis.
This lets 3AC leverage their capital.
3AC's strategy made sense because GBTC had a premium, creating "free money."
GBTC's discount and LUNA's implosion caused problems.
3AC lost its loan money in LUNA.
Margin called on 3ACs' GBTC collateral.
DCG bought GBTC to avoid a systemic collapse and a larger discount.
Genesis lost too much money because 3AC can't pay back its loan. DCG "saved" Genesis, but the FTX collapse hurt Genesis further, forcing DCG and Genesis to seek external funding.
bruh…
Learning Experience
Co-borrowing. Unnecessary rehypothecation. Extra space. Governance disaster. Greed, hubris. Crypto has repeatedly shown it can recreate traditional financial system disasters quickly. Working in crypto is one of the best ways to learn crazy financial tricks people will do for a quick buck much faster than if you dabble in traditional finance.
Moving Forward
I think the crypto industry needs to consider its future. This is especially true for professionals. I'm not trying to scare you. In 2018 and 2020, I had doubts. No doubts now. Detailing the crypto industry's potential outcomes helped me gain certainty and confidence in its future. This includes VCs' benefits and talking points during the bull market, as well as what would happen if government regulations became hostile, etc. Even if that happens, I'm certain. This is permanent. I may write a post about that soon.
Sincerely,
M.