


More on Productivity

Ethan Siegel
2 years ago
How you view the year will change after using this one-page calendar.
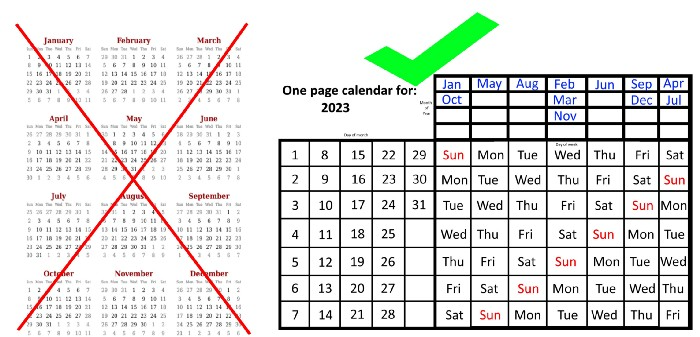
No other calendar is simpler, smaller, and reusable year after year. It works and is used here.
Most of us discard and replace our calendars annually. Each month, we move our calendar ahead another page, thus if we need to know which day of the week corresponds to a given day/month combination, we have to calculate it or flip forward/backward to the corresponding month. Questions like:
What day does this year's American Thanksgiving fall on?
Which months contain a Friday the thirteenth?
When is July 4th? What day of the week?
Alternatively, what day of the week is Christmas?
They're hard to figure out until you switch to the right month or look up all the months.
However, mathematically, the answers to these questions or any question that requires matching the day of the week with the day/month combination in a year are predictable, basic, and easy to work out. If you use this one-page calendar instead of a 12-month calendar, it lasts the whole year and is easy to alter for future years. Let me explain.
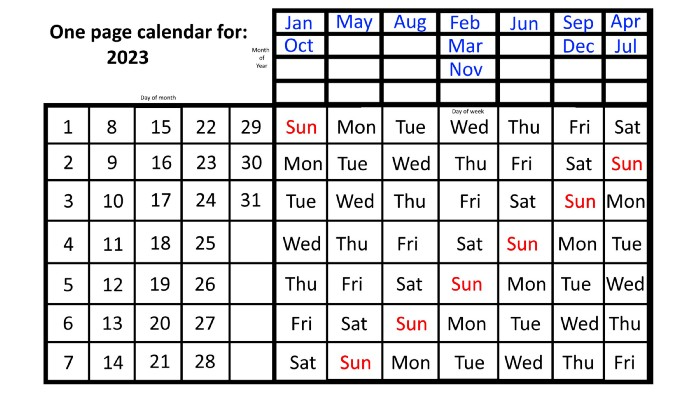
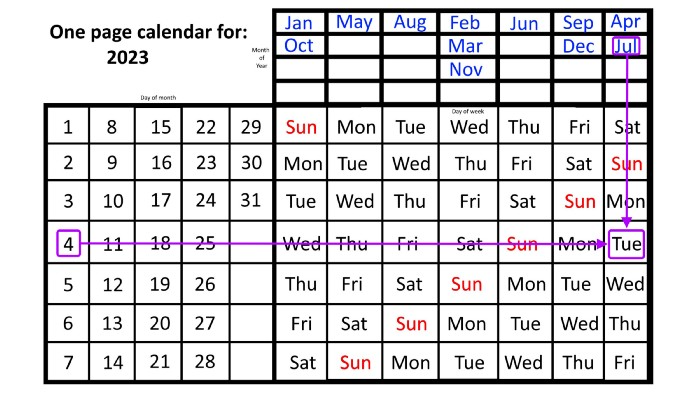
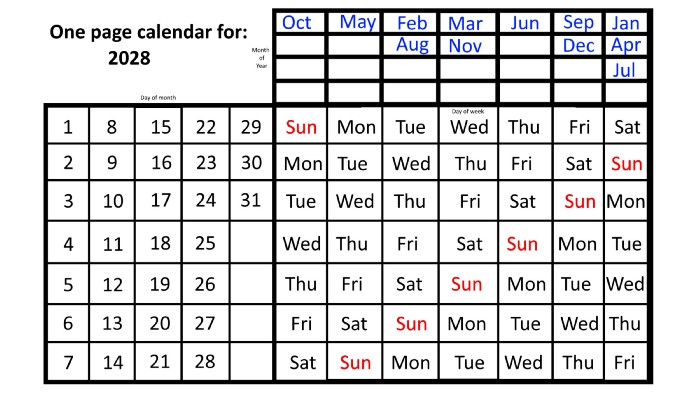
The 2023 one-page calendar is above. The days of the month are on the lower left, which works for all months if you know that:
There are 31 days in January, March, May, July, August, October, and December.
All of the months of April, June, September, and November have 30 days.
And depending on the year, February has either 28 days (in non-leap years) or 29 days (in leap years).
If you know this, this calendar makes it easy to match the day/month of the year to the weekday.
Here are some instances. American Thanksgiving is always on the fourth Thursday of November. You'll always know the month and day of the week, but the date—the day in November—changes each year.
On any other calendar, you'd have to flip to November to see when the fourth Thursday is. This one-page calendar only requires:
pick the month of November in the top-right corner to begin.
drag your finger down until Thursday appears,
then turn left and follow the monthly calendar until you reach the fourth Thursday.
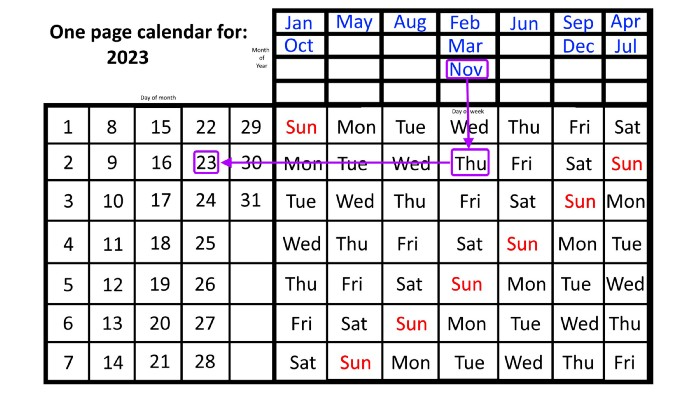
It's obvious: 2023 is the 23rd American Thanksgiving. For every month and day-of-the-week combination, start at the month, drag your finger down to the desired day, and then move to the left to see which dates match.
What if you knew the day of the week and the date of the month, but not the month(s)?
A different method using the same one-page calendar gives the answer. Which months have Friday the 13th this year? Just:
begin on the 13th of the month, the day you know you desire,
then swipe right with your finger till Friday appears.
and then work your way up until you can determine which months the specific Friday the 13th falls under.
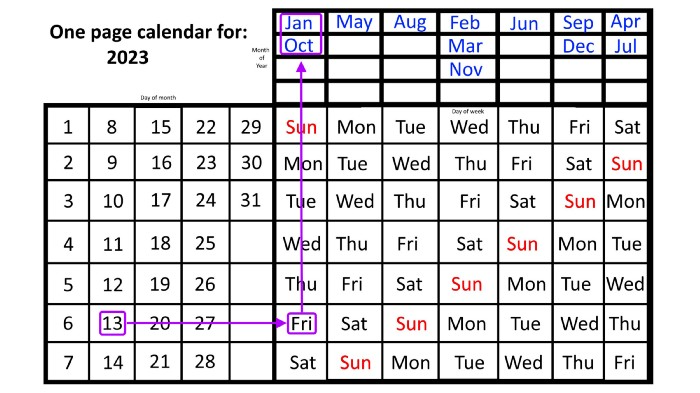
One Friday the 13th occurred in January 2023, and another will occur in October.
The most typical reason to consult a calendar is when you know the month/day combination but not the day of the week.
Compared to single-month calendars, the one-page calendar excels here. Take July 4th, for instance. Find the weekday here:
beginning on the left on the fourth of the month, as you are aware,
also begin with July, the month of the year you are most familiar with, at the upper right,
you should move your two fingers in the opposite directions till they meet: on a Tuesday in 2023.
That's how you find your selected day/month combination's weekday.
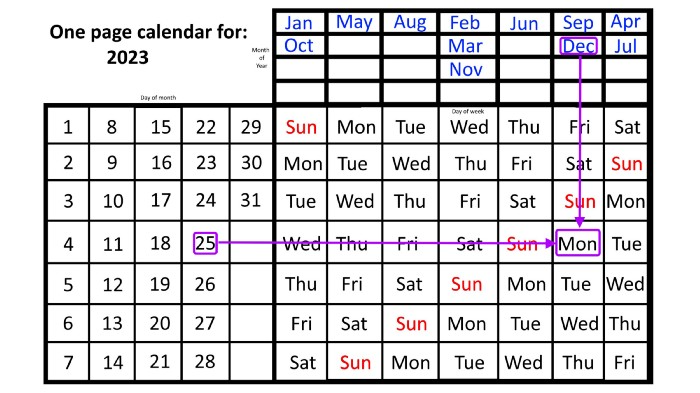
Another example: Christmas. Christmas Day is always December 25th, however unless your conventional calendar is open to December of your particular year, a question like "what day of the week is Christmas?" difficult to answer.
Unlike the one-page calendar!
Remember the left-hand day of the month. Top-right, you see the month. Put two fingers, one from each hand, on the date (25th) and the month (December). Slide the day hand to the right and the month hand downwards until they touch.
They meet on Monday—December 25, 2023.
For 2023, that's fine, but what happens in 2024? Even worse, what if we want to know the day-of-the-week/day/month combo many years from now?
I think the one-page calendar shines here.
Except for the blue months in the upper-right corner of the one-page calendar, everything is the same year after year. The months also change in a consistent fashion.
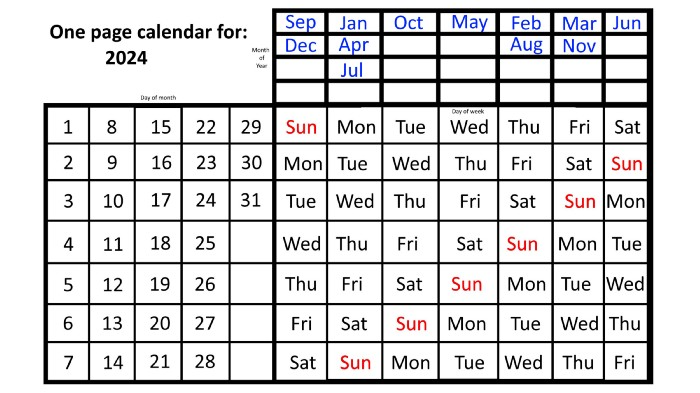
Each non-leap year has 365 days—one more than a full 52 weeks (which is 364). Since January 1, 2023 began on a Sunday and 2023 has 365 days, we immediately know that December 31, 2023 will conclude on a Sunday (which you can confirm using the one-page calendar) and that January 1, 2024 will begin on a Monday. Then, reorder the months for 2024, taking in mind that February will have 29 days in a leap year.
Please note the differences between 2023 and 2024 month placement. In 2023:
October and January began on the same day of the week.
On the following Monday of the week, May began.
August started on the next day,
then the next weekday marked the start of February, March, and November, respectively.
Unlike June, which starts the following weekday,
While September and December start on the following day of the week,
Lastly, April and July start one extra day later.
Since 2024 is a leap year, February has 29 days, disrupting the rhythm. Month placements change to:
The first day of the week in January, April, and July is the same.
October will begin the following day.
Possibly starting the next weekday,
February and August start on the next weekday,
beginning on the following day of the week between March and November,
beginning the following weekday in June,
and commencing one more day of the week after that, September and December.
Due to the 366-day leap year, 2025 will start two days later than 2024 on January 1st.

Now, looking at the 2025 calendar, you can see that the 2023 pattern of which months start on which days is repeated! The sole variation is a shift of three days-of-the-week ahead because 2023 had one more day (365) than 52 full weeks (364), and 2024 had two more days (366). Again,
On Wednesday this time, January and October begin on the same day of the week.
Although May begins on Thursday,
August begins this Friday.
March, November, and February all begin on a Saturday.
Beginning on a Sunday in June
Beginning on Monday are September and December,
and on Tuesday, April and July begin.
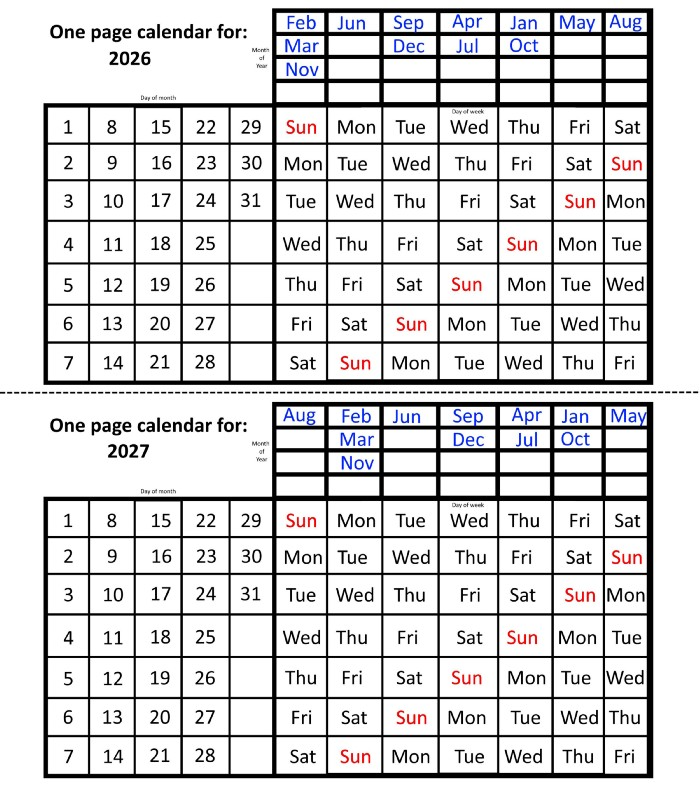
In 2026 and 2027, the year will commence on a Thursday and a Friday, respectively.
We must return to our leap year monthly arrangement in 2028. Yes, January 1, 2028 begins on a Saturday, but February, which begins on a Tuesday three days before January, will have 29 days. Thus:
Start dates for January, April, and July are all Saturdays.
Given that October began on Sunday,
Although May starts on a Monday,
beginning on a Tuesday in February and August,
Beginning on a Wednesday in March and November,
Beginning on Thursday, June
and Friday marks the start of September and December.
This is great because there are only 14 calendar configurations: one for each of the seven non-leap years where January 1st begins on each of the seven days of the week, and one for each of the seven leap years where it begins on each day of the week.
The 2023 calendar will function in 2034, 2045, 2051, 2062, 2073, 2079, 2090, 2102, 2113, and 2119. Except when passing over a non-leap year that ends in 00, like 2100, the repeat time always extends to 12 years or shortens to an extra 6 years.
The pattern is repeated in 2025's calendar in 2031, 2042, 2053, 2059, 2070, 2081, 2087, 2098, 2110, and 2121.
The extra 6-year repeat at the end of the century on the calendar for 2026 will occur in the years 2037, 2043, 2054, 2065, 2071, 2082, 2093, 2099, 2105, and 2122.
The 2027s calendar repeats in 2038, 2049, 2055, 2066, 2077, 2083, 2094, 2100, 2106, and 2117, almost exactly matching the 2026s pattern.
For leap years, the recurrence pattern is every 28 years when not passing a non-leap year ending in 00, or 12 or 40 years when we do. 2024's calendar repeats in 2052, 2080, 2120, 2148, 2176, and 2216; 2028's in 2056, 2084, 2124, 2152, 2180, and 2220.
Knowing January 1st and whether it's a leap year lets you construct a one-page calendar for any year. Try it—you might find it easier than any other alternative!

wordsmithwriter
2 years ago
2023 Will Be the Year of Evernote and Craft Notetaking Apps.
Note-taking is a vital skill. But it's mostly learned.

Recently, innovative note-taking apps have flooded the market.
In the next few years, Evernote and Craft will be important digital note-taking companies.
Evernote is a 2008 note-taking program. It can capture ideas, track tasks, and organize information on numerous platforms.
It's one of the only note-taking app that lets users input text, audio, photos, and videos. It's great for collecting research notes, brainstorming, and remaining organized.
Craft is a popular note-taking app.
Craft is a more concentrated note-taking application than Evernote. It organizes notes into subjects, tags, and relationships, making it ideal for technical or research notes.
Craft's search engine makes it easy to find what you need.
Both Evernote and Craft are likely to be the major players in digital note-taking in the years to come.
Their concentration on gathering and organizing information lets users generate notes quickly and simply. Multimedia elements and a strong search engine make them the note-taking apps of the future.
Evernote and Craft are great note-taking tools for staying organized and tracking ideas and projects.
With their focus on acquiring and organizing information, they'll dominate digital note-taking in 2023.
Pros
Concentrate on gathering and compiling information
special features including a strong search engine and multimedia components
Possibility of subject, tag, and relationship structuring
enables users to incorporate multimedia elements
Excellent tool for maintaining organization, arranging research notes, and brainstorming
Cons
Software may be difficult for folks who are not tech-savvy to utilize.
Limited assistance for hardware running an outdated operating system
Subscriptions could be pricey.
Data loss risk because of security issues
Evernote and Craft both have downsides.
The risk of data loss as a result of security flaws and software defects comes first.
Additionally, their subscription fees could be high, and they might restrict support for hardware that isn't running the newest operating systems.
Finally, folks who need to be tech-savvy may find the software difficult.
Evernote versus. Productivity Titans Evernote will make Notion more useful. medium.com

Pen Magnet
2 years ago
Why Google Staff Doesn't Work

Sundar Pichai unveiled Simplicity Sprint at Google's latest all-hands conference.
To boost employee efficiency.
Not surprising. Few envisioned Google declaring a productivity drive.
Sunder Pichai's speech:
“There are real concerns that our productivity as a whole is not where it needs to be for the head count we have. Help me create a culture that is more mission-focused, more focused on our products, more customer focused. We should think about how we can minimize distractions and really raise the bar on both product excellence and productivity.”
The primary driver driving Google's efficiency push is:
Google's efficiency push follows 13% quarterly revenue increase. Last year in the same quarter, it was 62%.
Market newcomers may argue that the previous year's figure was fuelled by post-Covid reopening and growing consumer spending. Investors aren't convinced. A promising company like Google can't afford to drop so quickly.
Google’s quarterly revenue growth stood at 13%, against 62% in last year same quarter.
Google isn't alone. In my recent essay regarding 2025 programmers, I warned about the economic downturn's effects on FAAMG's workforce. Facebook had suspended hiring, and Microsoft had promised hefty bonuses for loyal staff.
In the same article, I predicted Google's troubles. Online advertising, especially the way Google and Facebook sell it using user data, is over.
FAAMG and 2nd rung IT companies could be the first to fall without Post-COVID revival and uncertain global geopolitics.
Google has hardly ever discussed effectiveness:
Apparently openly.
Amazon treats its employees like robots, even in software positions. It has significant turnover and a terrible reputation as a result. Because of this, it rarely loses money due to staff productivity.
Amazon trumps Google. In reality, it treats its employees poorly.
Google was the founding father of the modern-day open culture.
Larry and Sergey Google founded the IT industry's Open Culture. Silicon Valley called Google's internal democracy and transparency near anarchy. Management rarely slammed decisions on employees. Surveys and internal polls ensured everyone knew the company's direction and had a vote.
20% project allotment (weekly free time to build own project) was Google's open-secret innovation component.
After Larry and Sergey's exit in 2019, this is Google's first profitability hurdle. Only Google insiders can answer these questions.
Would Google's investors compel the company's management to adopt an Amazon-style culture where the developers are treated like circus performers?
If so, would Google follow suit?
If so, how does Google go about doing it?
Before discussing Google's likely plan, let's examine programming productivity.
What determines a programmer's productivity is simple:
How would we answer Google's questions?
As a programmer, I'm more concerned about Simplicity Sprint's aftermath than its economic catalysts.
Large organizations don't care much about quarterly and annual productivity metrics. They have 10-year product-launch plans. If something seems horrible today, it's likely due to someone's lousy judgment 5 years ago who is no longer in the blame game.
Deconstruct our main question.
How exactly do you change the culture of the firm so that productivity increases?
How can you accomplish that without affecting your capacity to profit? There are countless ways to increase output without decreasing profit.
How can you accomplish this with little to no effect on employee motivation? (While not all employers care about it, in this case we are discussing the father of the open company culture.)
How do you do it for a 10-developer IT firm that is losing money versus a 1,70,000-developer organization with a trillion-dollar valuation?
When implementing a large-scale organizational change, success must be carefully measured.
The fastest way to do something is to do it right, no matter how long it takes.
You require clearly-defined group/team/role segregation and solid pass/fail matrices to:
You can give performers rewards.
Ones that are average can be inspired to improve
Underachievers may receive assistance or, in the worst-case scenario, rehabilitation
As a 20-year programmer, I associate productivity with greatness.
Doing something well, no matter how long it takes, is the fastest way to do it.
Let's discuss a programmer's productivity.
Why productivity is a strange term in programming:
Productivity is work per unit of time.
Money=time This is an economic proverb. More hours worked, more pay. Longer projects cost more.
As a buyer, you desire a quick supply. As a business owner, you want employees who perform at full capacity, creating more products to transport and boosting your profits.
All economic matrices encourage production because of our obsession with it. Productivity is the only organic way a nation may increase its GDP.
Time is money — is not just a proverb, but an economical fact.
Applying the same productivity theory to programming gets problematic. An automating computer. Its capacity depends on the software its master writes.
Today, a sophisticated program can process a billion records in a few hours. Creating one takes a competent coder and the necessary infrastructure. Learning, designing, coding, testing, and iterations take time.
Programming productivity isn't linear, unlike manufacturing and maintenance.
Average programmers produce code every day yet miss deadlines. Expert programmers go days without coding. End of sprint, they often surprise themselves by delivering fully working solutions.
Reversing the programming duties has no effect. Experts aren't needed for productivity.
These patterns remind me of an XKCD comic.
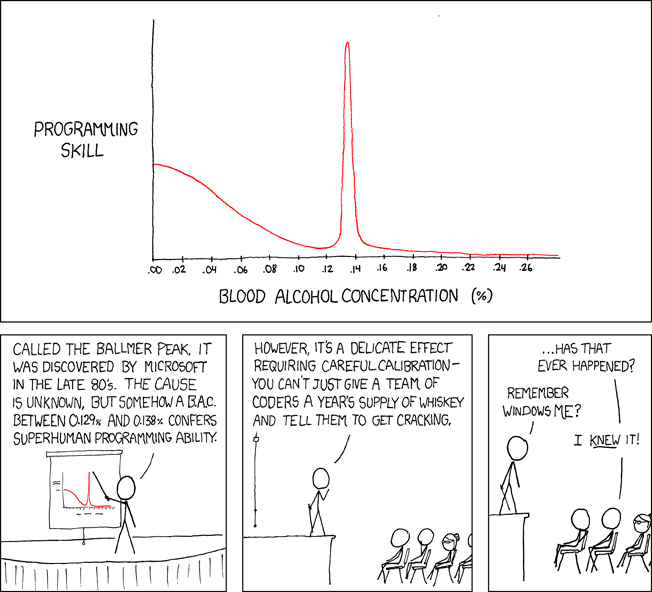
Programming productivity depends on two factors:
The capacity of the programmer and his or her command of the principles of computer science
His or her productive bursts, how often they occur, and how long they last as they engineer the answer
At some point, productivity measurement becomes Schrödinger’s cat.
Product companies measure productivity using use cases, classes, functions, or LOCs (lines of code). In days of data-rich source control systems, programmers' merge requests and/or commits are the most preferred yardstick. Companies assess productivity by tickets closed.
Every organization eventually has trouble measuring productivity. Finer measurements create more chaos. Every measure compares apples to oranges (or worse, apples with aircraft.) On top of the measuring overhead, the endeavor causes tremendous and unnecessary stress on teams, lowering their productivity and defeating its purpose.
Macro productivity measurements make sense. Amazon's factory-era management has done it, but at great cost.
Google can pull it off if it wants to.
What Google meant in reality when it said that employee productivity has decreased:
When Google considers its employees unproductive, it doesn't mean they don't complete enough work in the allotted period.
They can't multiply their work's influence over time.
Programmers who produce excellent modules or products are unsure on how to use them.
The best data scientists are unable to add the proper parameters in their models.
Despite having a great product backlog, managers struggle to recruit resources with the necessary skills.
Product designers who frequently develop and A/B test newer designs are unaware of why measures are inaccurate or whether they have already reached the saturation point.
Most ignorant: All of the aforementioned positions are aware of what to do with their deliverables, but neither their supervisors nor Google itself have given them sufficient authority.
So, Google employees aren't productive.
How to fix it?
Business analysis: White suits introducing novel items can interact with customers from all regions. Track analytics events proactively, especially the infrequent ones.
SOLID, DRY, TEST, and AUTOMATION: Do less + reuse. Use boilerplate code creation. If something already exists, don't implement it yourself.
Build features-building capabilities: N features are created by average programmers in N hours. An endless number of features can be built by average programmers thanks to the fact that expert programmers can produce 1 capability in N hours.
Work on projects that will have a positive impact: Use the same algorithm to search for images on YouTube rather than the Mars surface.
Avoid tasks that can only be measured in terms of time linearity at all costs (if a task can be completed in N minutes, then M copies of the same task would cost M*N minutes).
In conclusion:
Software development isn't linear. Why should the makers be measured?
Notation for The Big O
I'm discussing a new way to quantify programmer productivity. (It applies to other professions, but that's another subject)
The Big O notation expresses the paradigm (the algorithmic performance concept programmers rot to ace their Google interview)
Google (or any large corporation) can do this.
Sort organizational roles into categories and specify their impact vs. time objectives. A CXO role's time vs. effect function, for instance, has a complexity of O(log N), meaning that if a CEO raises his or her work time by 8x, the result only increases by 3x.
Plot the influence of each employee over time using the X and Y axes, respectively.
Add a multiplier for Y-axis values to the productivity equation to make business objectives matter. (Example values: Support = 5, Utility = 7, and Innovation = 10).
Compare employee scores in comparable categories (developers vs. devs, CXOs vs. CXOs, etc.) and reward or help employees based on whether they are ahead of or behind the pack.
After measuring every employee's inventiveness, it's straightforward to help underachievers and praise achievers.
Example of a Big(O) Category:
If I ran Google (God forbid, its worst days are far off), here's how I'd classify it. You can categorize Google employees whichever you choose.
The Google interview truth:
O(1) < O(log n) < O(n) < O(n log n) < O(n^x) where all logarithmic bases are < n.
O(1): Customer service workers' hours have no impact on firm profitability or customer pleasure.
CXOs Most of their time is spent on travel, strategic meetings, parties, and/or meetings with minimal floor-level influence. They're good at launching new products but bad at pivoting without disaster. Their directions are being followed.
Devops, UX designers, testers Agile projects revolve around deployment. DevOps controls the levers. Their automation secures results in subsequent cycles.
UX/UI Designers must still prototype UI elements despite improved design tools.
All test cases are proportional to use cases/functional units, hence testers' work is O(N).
Architects Their effort improves code quality. Their right/wrong interference affects product quality and rollout decisions even after the design is set.
Core Developers Only core developers can write code and own requirements. When people understand and own their labor, the output improves dramatically. A single character error can spread undetected throughout the SDLC and cost millions.
Core devs introduce/eliminate 1000x bugs, refactoring attempts, and regression. Following our earlier hypothesis.
The fastest way to do something is to do it right, no matter how long it takes.
Conclusion:
Google is at the liberal extreme of the employee-handling spectrum
Microsoft faced an existential crisis after 2000. It didn't choose Amazon's data-driven people management to revitalize itself.
Instead, it entrusted developers. It welcomed emerging technologies and opened up to open source, something it previously opposed.
Google is too lax in its employee-handling practices. With that foundation, it can only follow Amazon, no matter how carefully.
Any attempt to redefine people's measurements will affect the organization emotionally.
The more Google compares apples to apples, the higher its chances for future rebirth.
You might also like

Joseph Mavericks
2 years ago
You Don't Have to Spend $250 on TikTok Ads Because I Did
900K impressions, 8K clicks, and $$$ orders…

I recently started dropshipping. Now that I own my business and can charge it as a business expense, it feels less like money wasted if it doesn't work. I also made t-shirts to sell. I intended to open a t-shirt store and had many designs on a hard drive. I read that Tiktok advertising had a high conversion rate and low cost because they were new. According to many, the advertising' cost/efficiency ratio would plummet and become as bad as Google or Facebook Ads. Now felt like the moment to try Tiktok marketing and dropshipping. I work in marketing for a SaaS firm and have seen how poorly ads perform. I wanted to try it alone.
I set up $250 and ran advertising for a week. Before that, I made my own products, store, and marketing. In this post, I'll show you my process and results.
Setting up the store
Dropshipping is a sort of retail business in which the manufacturer ships the product directly to the client through an online platform maintained by a seller. The seller takes orders but has no stock. The manufacturer handles all orders. This no-stock concept increases profitability and flexibility.
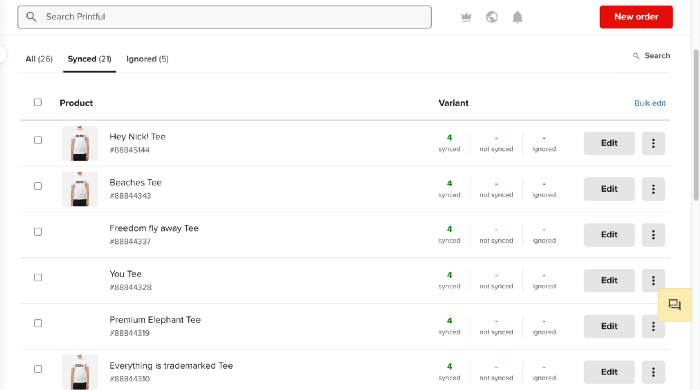
In my situation, I used previous t-shirt designs to make my own product. I didn't want to handle order fulfillment logistics, so I looked for a way to print my designs on demand, ship them, and handle order tracking/returns automatically. So I found Printful.

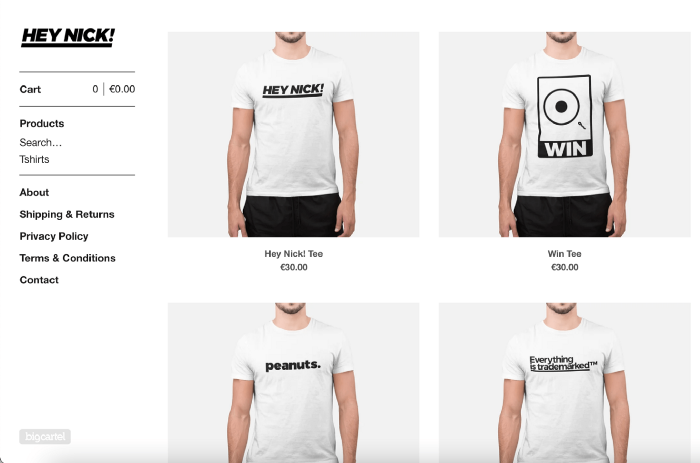
I needed to connect my backend and supplier to a storefront so visitors could buy. 99% of dropshippers use Shopify, but I didn't want to master the difficult application. I wanted a one-day project. I'd previously worked with Big Cartel, so I chose them.
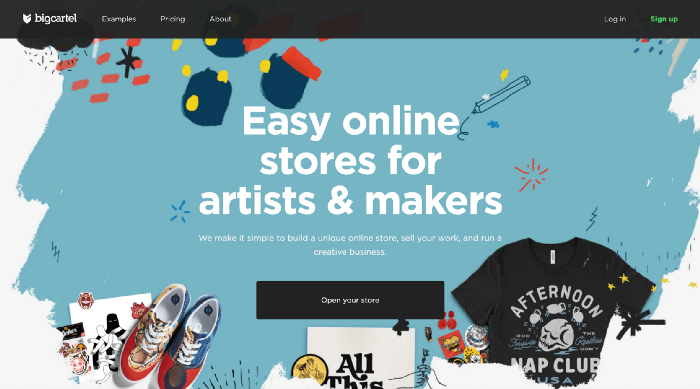
Big Cartel doesn't collect commissions on sales, simply a monthly flat price ($9.99 to $19.99 depending on your plan).
After opening a Big Cartel account, I uploaded 21 designs and product shots, then synced each product with Printful.
Developing the ads
I mocked up my designs on cool people photographs from placeit.net, a great tool for creating product visuals when you don't have a studio, camera gear, or models to wear your t-shirts.
I opened an account on the website and had advertising visuals within 2 hours.
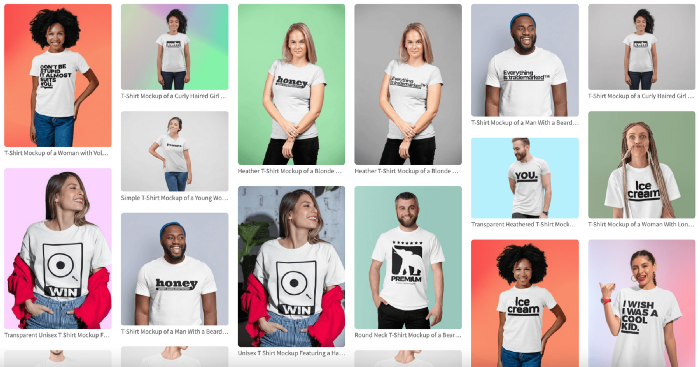
Because my designs are simple (black design on white t-shirt), I chose happy, stylish people on plain-colored backdrops. After that, I had to develop an animated slideshow.
Because I'm a graphic designer, I chose to use Adobe Premiere to create animated Tiktok advertising.
Premiere is a fancy video editing application used for more than advertisements. Premiere is used to edit movies, not social media marketing. I wanted this experiment to be quick, so I got 3 social media ad templates from motionarray.com and threw my visuals in. All the transitions and animations were pre-made in the files, so it only took a few hours to compile. The result:

I downloaded 3 different soundtracks for the videos to determine which would convert best.
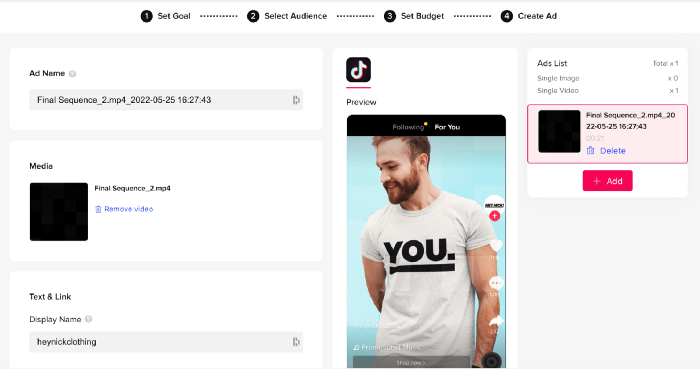
After that, I opened a Tiktok business account, uploaded my films, and inserted ad info. They went live within one hour.
The (poor) outcomes
As a European company, I couldn't deliver ads in the US. All of my advertisements' material (title, description, and call to action) was in English, hence they continued getting rejected in Europe for countries that didn't speak English. There are a lot of them:
I lost a lot of quality traffic, but I felt that if the images were engaging, people would check out the store and buy my t-shirts. I was wrong.
51,071 impressions on Day 1. 0 orders after 411 clicks
114,053 impressions on Day 2. 1.004 clicks and no orders
Day 3: 987 clicks, 103,685 impressions, and 0 orders
101,437 impressions on Day 4. 0 orders after 963 clicks
115,053 impressions on Day 5. 1,050 clicks and no purchases
125,799 impressions on day 6. 1,184 clicks, no purchases
115,547 impressions on Day 7. 1,050 clicks and no purchases
121,456 impressions on day 8. 1,083 clicks, no purchases
47,586 impressions on Day 9. 419 Clicks. No orders
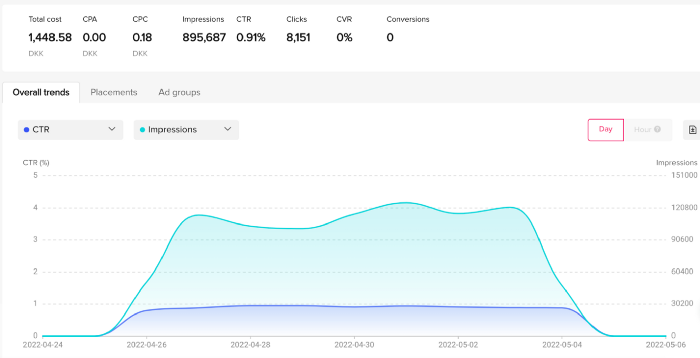
My overall conversion rate for video advertisements was 0.9%. TikTok's paid ad formats all result in strong engagement rates (ads average 3% to 12% CTR to site), therefore a 1 to 2% CTR should have been doable.
My one-week experiment yielded 8,151 ad clicks but no sales. Even if 0.1% of those clicks converted, I should have made 8 sales. Even companies with horrible web marketing would get one download or trial sign-up for every 8,151 clicks. I knew that because my advertising were in English, I had no impressions in the main EU markets (France, Spain, Italy, Germany), and that this impacted my conversion potential. I still couldn't believe my numbers.
I dug into the statistics and found that Tiktok's stats didn't match my store traffic data.
Looking more closely at the numbers
My ads were approved on April 26 but didn't appear until April 27. My store dashboard showed 440 visitors but 1,004 clicks on Tiktok. This happens often while tracking campaign results since different platforms handle comparable user activities (click, view) differently. In online marketing, residual data won't always match across tools.
My data gap was too large. Even if half of the 1,004 persons who clicked closed their browser or left before the store site loaded, I would have gained 502 visitors. The significant difference between Tiktok clicks and Big Cartel store visits made me suspicious. It happened all week:
Day 1: 440 store visits and 1004 ad clicks
Day 2: 482 store visits, 987 ad clicks
3rd day: 963 hits on ads, 452 store visits
443 store visits and 1,050 ad clicks on day 4.
Day 5: 459 store visits and 1,184 ad clicks
Day 6: 430 store visits and 1,050 ad clicks
Day 7: 409 store visits and 1,031 ad clicks
Day 8: 166 store visits and 418 ad clicks
The disparity wasn't related to residual data or data processing. The disparity between visits and clicks looked regular, but I couldn't explain it.
After the campaign concluded, I discovered all my creative assets (the videos) had a 0% CTR and a $0 expenditure in a separate dashboard. Whether it's a dashboard reporting issue or a budget allocation bug, online marketers shouldn't see this.

Tiktok can present any stats they want on their dashboard, just like any other platform that runs advertisements to promote content to its users. I can't verify that 895,687 individuals saw and clicked on my ad. I invested $200 for what appears to be around 900K impressions, which is an excellent ROI. No one bought a t-shirt, even an unattractive one, out of 900K people?
Would I do it again?
Nope. Whether I didn't make sales because Tiktok inflated the dashboard numbers or because I'm horrible at producing advertising and items that sell, I’ll stick to writing content and making videos. If setting up a business and ads in a few days was all it took to make money online, everyone would do it.
Video advertisements and dropshipping aren't dead. As long as the internet exists, people will click ads and buy stuff. Converting ads and selling stuff takes a lot of work, and I want to focus on other things.
I had always wanted to try dropshipping and I’m happy I did, I just won’t stick to it because that’s not something I’m interested in getting better at.
If I want to sell t-shirts again, I'll avoid Tiktok advertisements and find another route.

The woman
2 years ago
Because he worked on his side projects during working hours, my junior was fired and sued.
Many developers do it, but I don't approve.

Aren't many programmers part-time? Many work full-time but also freelance. If the job agreement allows it, I see no problem.
Tech businesses' policies vary. I have a friend in Google, Germany. According to his contract, he couldn't do an outside job. Google owns any code he writes while employed.
I was shocked. Later, I found that different Google regions have different policies.
A corporation can normally establish any agreement before hiring you. They're negotiable. When there's no agreement, state law may apply. In court, law isn't so simple.
I won't delve into legal details. Instead, let’s talk about the incident.
How he was discovered
In one month, he missed two deadlines. His boss was frustrated because the assignment wasn't difficult to miss twice. When a team can't finish work on time, they all earn bad grades.
He annoyed the whole team. One team member (anonymous) told the project manager he worked on side projects during office hours. He may have missed deadlines because of this.
The project manager was furious. He needed evidence. The manager caught him within a week. The manager told higher-ups immediately.
The company wanted to set an example
Management could terminate him and settle the problem. But the company wanted to set an example for those developers who breached the regulation.
Because dismissal isn't enough. Every organization invests heavily in developer hiring. If developers depart or are fired after a few months, the company suffers.
The developer spent 10 months there. The employer sacked him and demanded ten months' pay. Or they'd sue him.
It was illegal and unethical. The youngster paid the fine and left the company quietly to protect his career.
Right or wrong?
Is the developer's behavior acceptable? Let's discuss developer malpractice.
During office hours, may developers work on other projects? If they're bored during office hours, they might not. Check the employment contract or state law.
If there's no employment clause, check country/state law. Because you can't justify breaking the law. Always. Most employers own their employees' work hours unless it's a contractual position.
If the company agrees, it's fine.
I also oppose companies that force developers to work overtime without pay.
Most states and countries have laws that help companies and workers. Law supports employers in this case. If any of the following are true, the company/employer owns the IP under California law.
using the business's resources
any equipment, including a laptop used for business.
company's mobile device.
offices of the company.
business time as well. This is crucial. Because this occurred in the instance of my junior.
Company resources are dangerous. Because your company may own the product's IP. If you have seen the TV show Silicon Valley, you have seen a similar situation there, right?
Conclusion
Simple rule. I avoid big side projects. I work on my laptop on weekends for side projects. I'm safe. But I also know that my company might not be happy with that.
As an employee, I suppose I can. I can make side money. I won't promote it, but I'll respect their time, resources, and task. I also sometimes work extra time to finish my company’s deadlines.

Jayden Levitt
2 years ago
Billionaire who was disgraced lost his wealth more quickly than anyone in history
If you're not genuine, you'll be revealed.
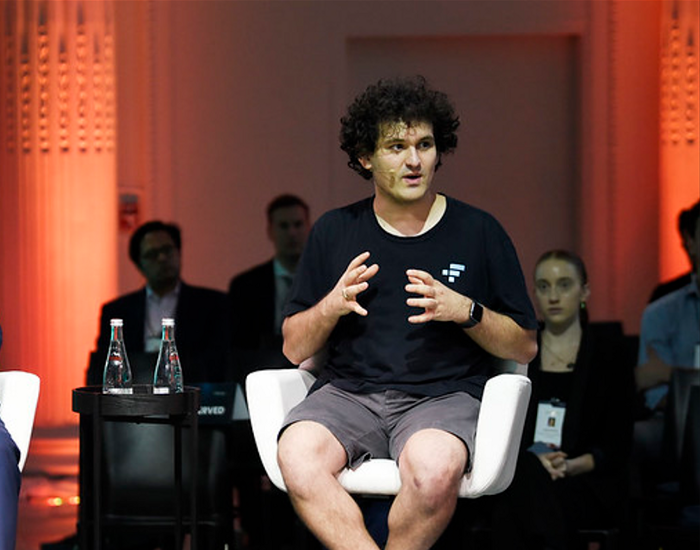
Sam Bankman-Fried (SBF) was called the Cryptocurrency Warren Buffet.
No wonder.
SBF's trading expertise, Blockchain knowledge, and ability to construct FTX attracted mainstream investors.
He had a fantastic worldview, donating much of his riches to charity.
As the onion layers peel back, it's clear he wasn't the altruistic media figure he portrayed.
SBF's mistakes were disastrous.
Customer deposits were traded and borrowed by him.
With ten other employees, he shared a $40 million mansion where they all had polyamorous relationships.
Tone-deaf and wasteful marketing expenditures, such as the $200 million spent to change the name of the Miami Heat stadium to the FTX Arena
Democrats received a $40 million campaign gift.
And now there seems to be no regret.
FTX was a 32-billion-dollar cryptocurrency exchange.
It went bankrupt practically overnight.
SBF, FTX's creator, exploited client funds to leverage trade.
FTX had $1 billion in customer withdrawal reserves against $9 billion in liabilities in sister business Alameda Research.
Bloomberg Billionaire Index says it's the largest and fastest net worth loss in history.
It gets worse.
SBF's net worth is $900 Million, however he must still finalize FTX's bankruptcy.
SBF's arrest in the Bahamas and SEC inquiry followed news that his cryptocurrency exchange had crashed, losing billions in customer deposits.
A journalist contacted him on Twitter D.M., and their exchange is telling.
His ideas are revealed.
Kelsey Piper says they didn't expect him to answer because people under investigation don't comment.
Bankman-Fried wanted to communicate, and the interaction shows he has little remorse.
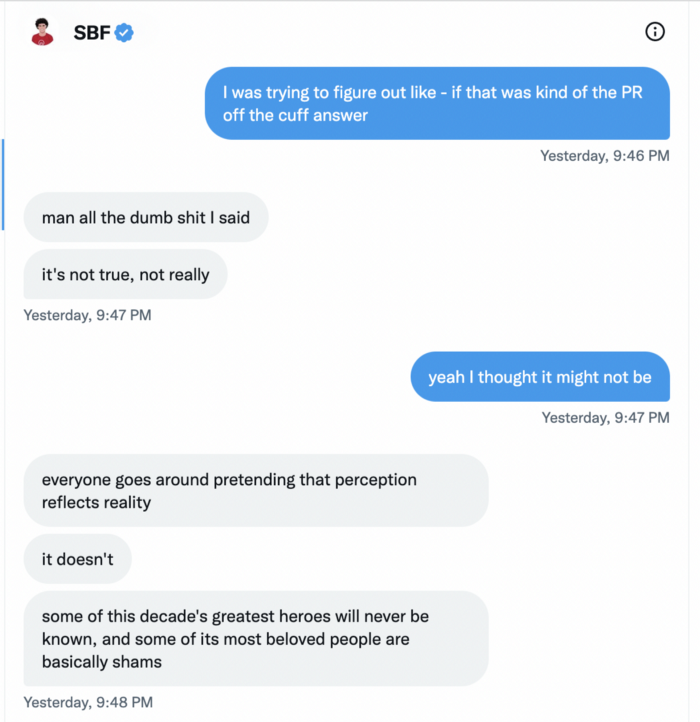
SBF talks honestly about FTX gaming customers' money and insults his competition.
Reporter Kelsey Piper was outraged by what he said and felt the mistakes SBF says plague him didn't evident in the messages.
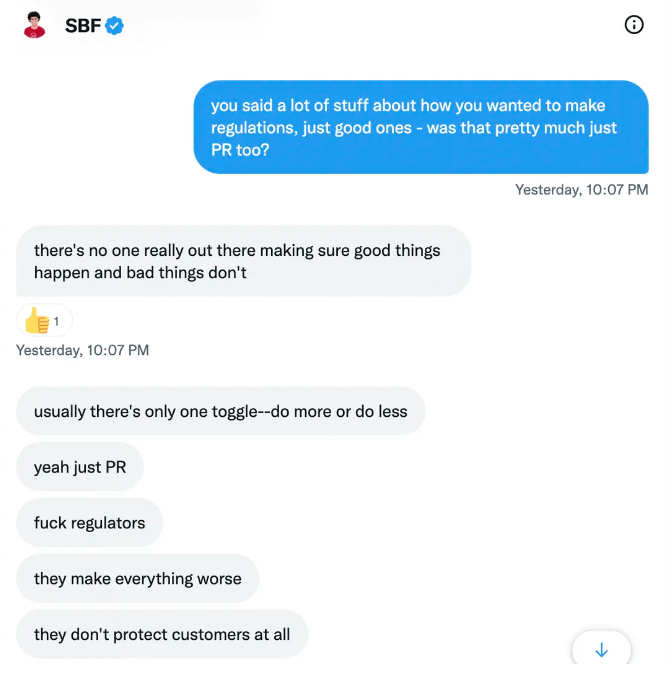
Before FTX's crash, SBF was a poster child for Cryptocurrency regulation and avoided criticizing U.S. regulators.
He tells Piper that his lobbying is just excellent PR.
It shows his genuine views and supports cynics' opinions that his attempts to win over U.S. authorities were good for his image rather than Crypto.
SBF’s responses are in Grey, and Pipers are in Blue.
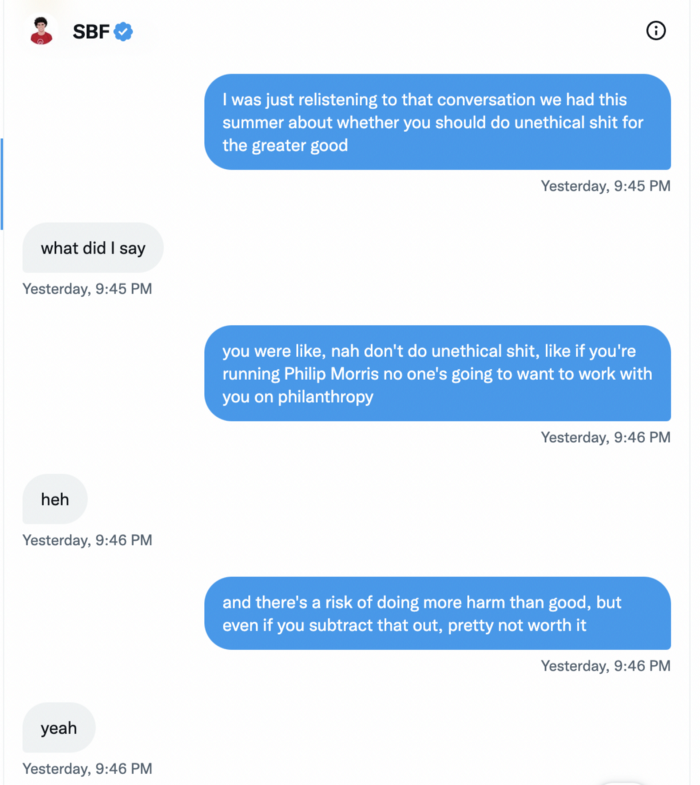
It's unclear if SBF cut corners for his gain. In their Twitter exchange, Piper revisits an interview question about ethics.
SBF says, "All the foolish sh*t I said"
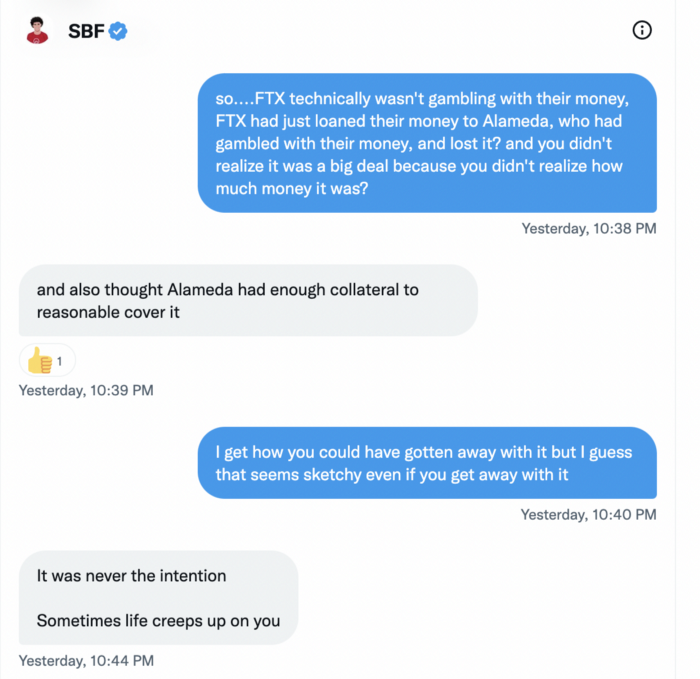
SBF claims FTX has never invested customer monies.
Piper challenged him on Twitter.
While he insisted FTX didn't use customer deposits, he said sibling business Alameda borrowed too much from FTX's balance sheet.
He did, basically.
When consumers tried to withdraw money, FTX was short.
SBF thought Alameda had enough money to cover FTX customers' withdrawals, but life sneaks up on you.
SBF believes most exchanges have done something similar to FTX, but they haven't had a bank run (a bunch of people all wanting to get their deposits out at the same time).
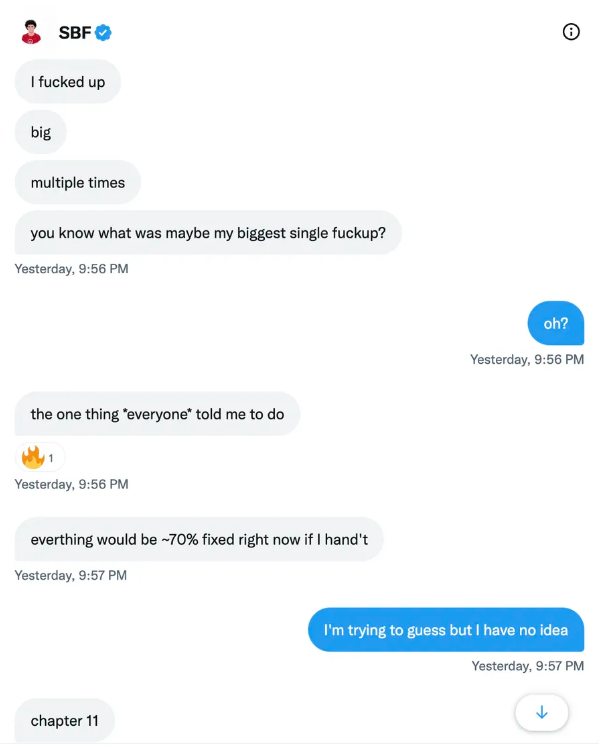
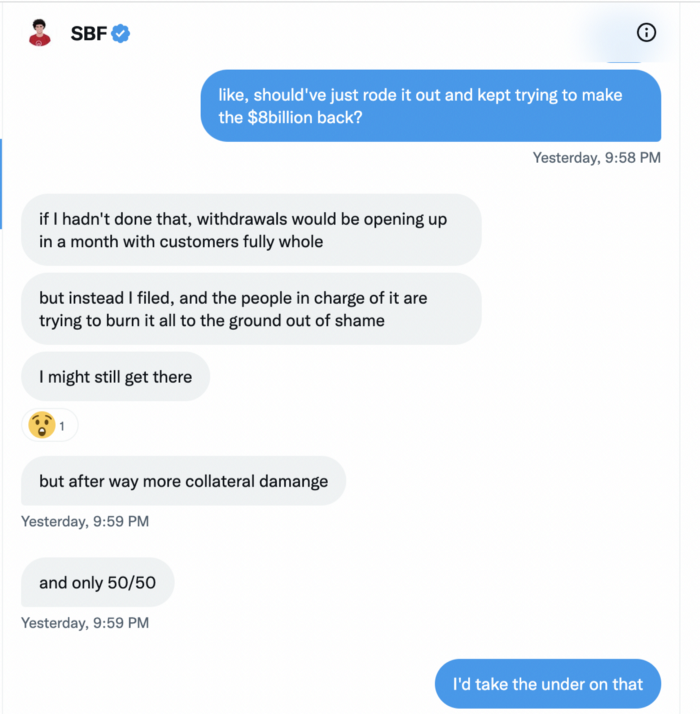
SBF believes he shouldn't have consented to the bankruptcy and kept attempting to raise more money because withdrawals would be open in a month with clients whole.
If additional money came in, he needed $8 billion to bridge the creditors' deficit, and there aren't many corporations with $8 billion to spare.
Once clients feel protected, they will continue to leave their assets on the exchange, according to one idea.
Kevin OLeary, a world-renowned hedge fund manager, says not all investors will walk through the open gate once the company is safe, therefore the $8 Billion wasn't needed immediately.
SBF claims the bankruptcy was his biggest error because he could have accumulated more capital.
Final Reflections
Sam Bankman-Fried, 30, became the world's youngest billionaire in four years.
Never listen to what people say about investing; watch what they do.
SBF is a trader who gets wrecked occasionally.
Ten first-time entrepreneurs ran FTX, screwing each other with no risk management.
It prevents opposing or challenging perspectives and echo chamber highs.
Twitter D.M. conversation with a journalist is the final nail.
He lacks an experienced crew.
This event will surely speed up much-needed regulation.
It's also prompted cryptocurrency exchanges to offer proof of reserves to calm customers.