


More on Entrepreneurship/Creators

Victoria Kurichenko
3 years ago
Updates From Google For Content Producers What You Should Know Is This
People-first update.

Every Google upgrade causes website owners to panic.
Some have just recovered from previous algorithm tweaks and resumed content development.
If you follow Google's Webmaster rules, you shouldn't fear its adjustments.
Everyone has a view of them. Miscommunication and confusion result.
Now, for some (hopefully) exciting news.
Google tweeted on August 18, 2022 about a fresh content update.
This change is another Google effort to remove low-quality, repetitive, and AI-generated content.
The algorithm generates and analyzes search results, not humans.
Google spends a lot to teach its algorithm what searchers want. Intent isn't always clear.
Google's content update aims to:
“… ensure people see more original, helpful content written by people, for people, in search results.”
Isn't it a noble goal?
However, what does it mean for content creators and website owners?
How can you ensure you’re creating content that will be successful after the updates roll out?
Let's first define people-first content.
What does "people-first-content" mean?
If asked, I'd say information written to answer queries and solve problems.
Like others, I read it from the term.
Content creators and marketers disagree. They need more information to follow recommendations.
Google gives explicit instructions for creating people-first content.
According to Google, if you answer yes to the following questions, you have a people-first attitude.
Do you have customers who might find your content useful if they contacted you directly?
Does your content show the breadth of your knowledge?
Do you have a niche or a focus for your website?
After reading your content, will readers learn something new to aid them in achieving their goals?
Are readers happy after reading your content?
Have you been adhering to Google's fundamental updates and product reviews?
As an SEO writer, I'm not scared.
I’ve been following these rules consciously while creating content for my website. That’s why it’s been steadily growing despite me publishing just one or two stories a month.
If you avoid AI-generated text and redundant, shallow material, your website won't suffer.
If you use unscrupulous methods to boost your website's traffic, including link buying or keyword stuffing, stop. Google is getting smarter and will find and punish your site eventually.
For those who say, “SEO is no longer working,” I dedicated the whole paragraph below.
This does not imply that SEO is obsolete.
Google:
“People-first content creators focus on creating satisfying content, while also utilizing SEO best practices to bring searchers additional value.”
The official helpful content update page lists two people-first content components:
meeting user needs
best practices for SEO
Always read official guidelines, not unsolicited suggestions.
SEO will work till search engines die.
How to use the update
Google said the changes will arrive in August 2022.
They pledged to post updates on Google's search ranking updates page.
Google also tweets this info. If you haven't followed it already, I recommend it.
Ranking adjustments could take two weeks and will affect English searches internationally initially.
Google affirmed plans to extend to other languages.
If you own a website, monitor your rankings and traffic to see if it's affected.

Dani Herrera
3 years ago
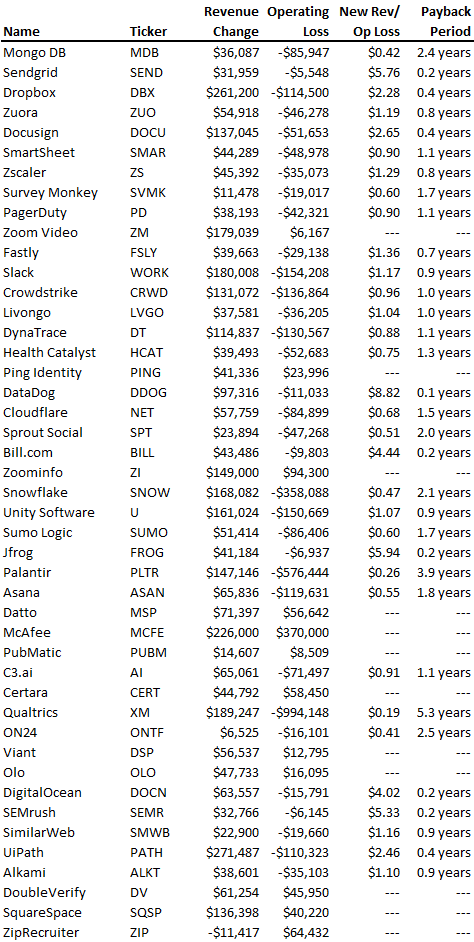
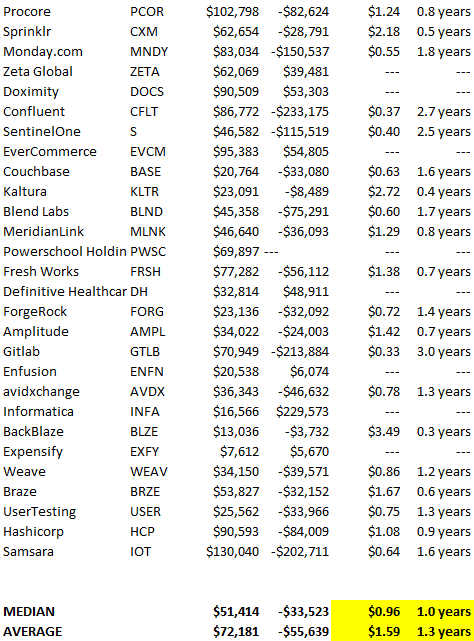
What prevents companies from disclosing salary information?
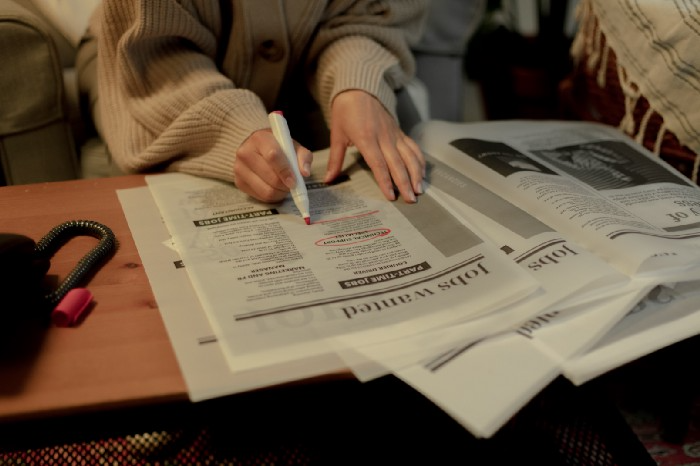
Yes, salary details ought to be mentioned in job postings. Recruiters and candidates both agree, so why doesn't it happen?
The short answer is “Unfortunately, it’s not the Recruiter’s decision”. The longer answer is well… A LOT.
Starting in November 2022, NYC employers must include salary ranges in job postings. It should have started in May, but companies balked.
I'm thrilled about salary transparency. This decision will promote fair, inclusive, and equitable hiring practices, and I'm sure other states will follow suit. Good news!
Candidates, recruiters, and ED&I practitioners have advocated for pay transparency for years. Why the opposition?
Let's quickly review why companies have trouble sharing salary bands.
💰 Pay Parity
Many companies and leaders still oppose pay parity. Yes, even in 2022.
💰 Pay Equity
Many companies believe in pay parity and have reviewed their internal processes and systems to ensure equality.
However, Pay Equity affects who gets roles/promotions/salary raises/bonuses and when. Enter the pay gap!
💰Pay Transparency and its impact on Talent Retention
Sharing salary bands with external candidates (and the world) means current employees will have access to that information, which is one of the main reasons companies don't share salary data.
If a company has Pay Parity and Pay Equity issues, they probably have a Pay Transparency policy as well.
Sharing salary information with external candidates without ensuring current employees understand their own salary bands and how promotions/raises are decided could impact talent retention strategies.
This information should help clarify recent conversations.

Eve Arnold
3 years ago
Your Ideal Position As a Part-Time Creator
Inspired by someone I never met

Inspiration is good and bad.
Paul Jarvis inspires me. He's a web person and writer who created his own category by being himself.
Paul said no thank you when everyone else was developing, building, and assuming greater responsibilities. This isn't success. He rewrote the rules. Working for himself, expanding at his own speed, and doing what he loves were his definitions of success.
Play with a problem that you have
The biggest problem can be not recognizing a problem.
Acceptance without question is deception. When you don't push limits, you forget how. You start thinking everything must be as it is.
For example: working. Paul worked a 9-5 agency work with little autonomy. He questioned whether the 9-5 was a way to live, not the way.
Another option existed. So he chipped away at how to live in this new environment.
Don't simply jump
Internet writers tell people considering quitting 9-5 to just quit. To throw in the towel. To do what you like.
The advice is harmful, despite the good intentions. People think quitting is hard. Like courage is the issue. Like handing your boss a resignation letter.
Nope. The tough part comes after. It’s easy to jump. Landing is difficult.
The landing
Paul didn't quit. Intelligent individuals don't. Smart folks focus on landing. They imagine life after 9-5.
Paul had been a web developer for a long time, had solid clients, and was respected. Hence if he pushed the limits and discovered another route, he had the potential to execute.
Working on the side
Society loves polarization. It’s left or right. Either way. Or chaos. It's 9-5 or entrepreneurship.
But like Paul, you can stretch polarization's limits. In-between exists.
You can work a 9-5 and side jobs (as I do). A mix of your favorites. The 9-5's stability and creativity. Fire and routine.
Remember you can't have everything but anything. You can create and work part-time.
My hybrid lifestyle
Not selling books doesn't destroy my world. My globe keeps spinning if my new business fails or if people don't like my Tweets. Unhappy algorithm? Cool. I'm not bothered (okay maybe a little).
The mix gives me the best of both worlds. To create, hone my skill, and grasp big-business basics. I like routine, but I also appreciate spending 4 hours on Saturdays writing.
Some days I adore leaving work at 5 pm and disconnecting. Other days, I adore having a place to write if inspiration strikes during a run or a discussion.
I’m a part-time creator
I’m a part-time creator. No, I'm not trying to quit. I don't work 5 pm - 2 am on the side. No, I'm not at $10,000 MRR.
I work part-time but enjoy my 9-5. My 9-5 has goodies. My side job as well.
It combines both to meet my lifestyle. I'm satisfied.
Join the Part-time Creators Club for free here. I’ll send you tips to enhance your creative game.
You might also like

Saskia Ketz
2 years ago
I hate marketing for my business, but here's how I push myself to keep going
Start now.

When it comes to building my business, I’m passionate about a lot of things. I love creating user experiences that simplify branding essentials. I love creating new typefaces and color combinations to inspire logo designers. I love fixing problems to improve my product.
Business marketing isn't my thing.
This is shared by many. Many solopreneurs, like me, struggle to advertise their business and drive themselves to work on it.
Without a lot of promotion, no company will succeed. Marketing is 80% of developing a firm, and when you're starting out, it's even more. Some believe that you shouldn't build anything until you've begun marketing your idea and found enough buyers.
Marketing your business without marketing experience is difficult. There are various outlets and techniques to learn. Instead of figuring out where to start, it's easier to return to your area of expertise, whether that's writing, designing product features, or improving your site's back end. Right?
First, realize that your role as a founder is to market your firm. Being a founder focused on product, I rarely work on it.
Secondly, use these basic methods that have helped me dedicate adequate time and focus to marketing. They're all simple to apply, and they've increased my business's visibility and success.
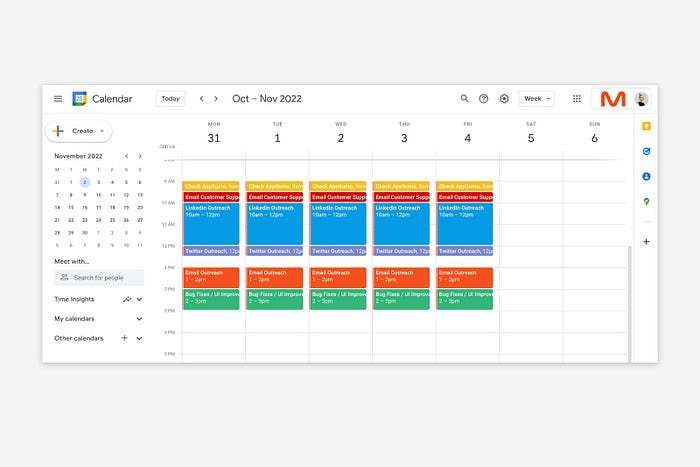
1. Establish buckets for every task.
You've probably heard to schedule tasks you don't like. As simple as it sounds, blocking a substantial piece of my workday for marketing duties like LinkedIn or Twitter outreach, AppSumo customer support, or SEO has forced me to spend time on them.
Giving me lots of room to focus on product development has helped even more. Sure, this means scheduling time to work on product enhancements after my four-hour marketing sprint.
It also involves making space to store product inspiration and ideas throughout the day so I don't get distracted. This is like the advice to keep a notebook beside your bed to write down your insomniac ideas. I keep fonts, color palettes, and product ideas in folders on my desktop. Knowing these concepts won't be lost lets me focus on marketing in the moment. When I have limited time to work on something, I don't have to conduct the research I've been collecting, so I can get more done faster.
2. Look for various accountability systems
Accountability is essential for self-discipline. To keep focused on my marketing tasks, I've needed various streams of accountability, big and little.
Accountability groups are great for bigger things. SaaS Camp, a sales outreach coaching program, is mine. We discuss marketing duties and results every week. This motivates me to do enough each week to be proud of my accomplishments. Yet hearing what works (or doesn't) for others gives me benchmarks for my own marketing outcomes and plenty of fresh techniques to attempt.
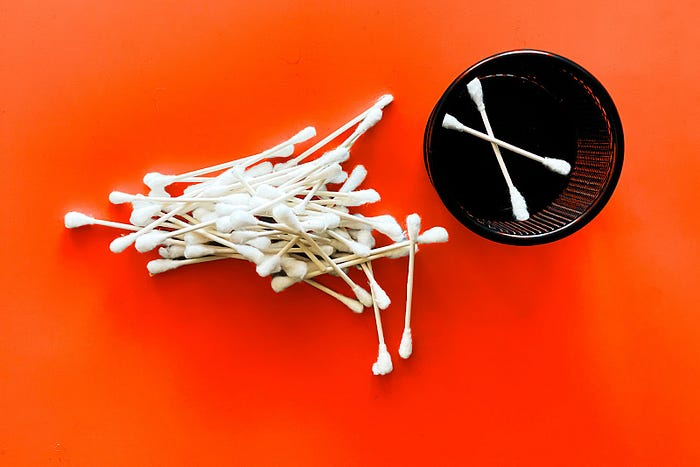
… say, I want to DM 50 people on Twitter about my product — I get that many Q-tips and place them in one pen holder on my desk.
The best accountability group can't watch you 24/7. I use a friend's simple method that shouldn't work (but it does). When I have a lot of marketing chores, like DMing 50 Twitter users about my product, That many Q-tips go in my desk pen holder. After each task, I relocate one Q-tip to an empty pen holder. When you have a lot of minor jobs to perform, it helps to see your progress. You might use toothpicks, M&Ms, or anything else you have a lot of.
3. Continue to monitor your feedback loops
Knowing which marketing methods work best requires monitoring results. As an entrepreneur with little go-to-market expertise, every tactic I pursue is an experiment. I need to know how each trial is doing to maximize my time.
I placed Google and Facebook advertisements on hold since they took too much time and money to obtain Return. LinkedIn outreach has been invaluable to me. I feel that talking to potential consumers one-on-one is the fastest method to grasp their problem areas, figure out my messaging, and find product market fit.
Data proximity offers another benefit. Seeing positive results makes it simpler to maintain doing a work you don't like. Why every fitness program tracks progress.
Marketing's goal is to increase customers and revenues, therefore I've found it helpful to track those metrics and celebrate monthly advances. I provide these updates for extra accountability.
Finding faster feedback loops is also motivating. Marketing brings more clients and feedback, in my opinion. Product-focused founders love that feedback. Positive reviews make me proud that my product is benefitting others, while negative ones provide me with suggestions for product changes that can improve my business.
The best advice I can give a lone creator who's afraid of marketing is to just start. Start early to learn by doing and reduce marketing stress. Start early to develop habits and successes that will keep you going. The sooner you start, the sooner you'll have enough consumers to return to your favorite work.

Dylan Smyth
4 years ago
10 Ways to Make Money Online in 2022
As a tech-savvy person (and software engineer) or just a casual technology user, I'm sure you've had this same question countless times: How do I make money online? and how do I make money with my PC/Mac?
You're in luck! Today, I will list the top 5 easiest ways to make money online. Maybe a top ten in the future? Top 5 tips for 2022.
1. Using the gig economy
There are many websites on the internet that allow you to earn extra money using skills and equipment that you already own.
I'm referring to the gig economy. It's a great way to earn a steady passive income from the comfort of your own home. For some sites, premium subscriptions are available to increase sales and access features like bidding on more proposals.
Some of these are:
- Freelancer
- Upwork
- Fiverr (⭐ my personal favorite)
- TaskRabbit
2. Mineprize
MINEPRIZE is a great way to make money online. What's more, You need not do anything! You earn money by lending your idle CPU power to MINEPRIZE.
To register with MINEPRIZE, all you need is an email address and a password. Let MINEPRIZE use your resources, and watch the money roll in! You can earn up to $100 per month by letting your computer calculate. That's insane.
3. Writing
“O Romeo, Romeo, why art thou Romeo?” Okay, I admit that not all writing is Shakespearean. To be a copywriter, you'll need to be fluent in English. Thankfully, we don't have to use typewriters anymore.
Writing is a skill that can earn you a lot of money (claps for the rhyme).
Here are a few ways you can make money typing on your fancy keyboard:
Self-publish a book
Write scripts for video creators
Write for social media
Book-checking
Content marketing help
What a list within a list!
4. Coding
Yes, kids. You've probably coded before if you understand
You've probably coded before if you understand
print("hello world");
Computational thinking (or coding) is one of the most lucrative ways to earn extra money, or even as a main source of income.
Of course, there are hardcode coders (like me) who write everything line by line, binary di — okay, that last part is a bit exaggerated.
But you can also make money by writing websites or apps or creating low code or no code platforms.
But you can also make money by writing websites or apps or creating low code or no code platforms.
Some low-code platforms
Sheet : spreadsheets to apps :
Loading... We'll install your new app... No-Code Your team can create apps and automate tasks. Agile…
www.appsheet.com
Low-code platform | Business app creator - Zoho Creator
Work is going digital, and businesses of all sizes must adapt quickly. Zoho Creator is a...
www.zoho.com
Sell your data with TrueSource. NO CODE NEEDED
Upload data, configure your product, and earn in minutes.
www.truesource.io
Cool, huh?
5. Created Content
If we use the internet correctly, we can gain unfathomable wealth and extra money. But this one is a bit more difficult. Unlike some of the other items on this list, it takes a lot of time up front.
I'm referring to sites like YouTube and Medium. It's a great way to earn money both passively and actively. With the likes of Jake- and Logan Paul, PewDiePie (a.k.a. Felix Kjellberg) and others, it's never too late to become a millionaire on YouTube. YouTubers are always rising to the top with great content.
6. NFTs and Cryptocurrency
It is now possible to amass large sums of money by buying and selling digital assets on NFTs and cryptocurrency exchanges. Binance's Initial Game Offer rewards early investors who produce the best results.
One awesome game sold a piece of its plot for US$7.2 million! It's Axie Infinity. It's free and available on Google Play and Apple Store.
7. Affiliate Marketing
Affiliate marketing is a form of advertising where businesses pay others (like bloggers) to promote their goods and services. Here's an example. I write a blog (like this one) and post an affiliate link to an item I recommend buying — say, a camera — and if you buy the camera, I get a commission!
These programs pay well:
- Elementor
- AWeber
- Sendinblue
- ConvertKit\sLeadpages
- GetResponse
- SEMRush\sFiverr
- Pabbly
8. Start a blog
Now, if you're a writer or just really passionate about something or a niche, blogging could potentially monetize that passion!
Create a blog about anything you can think of. It's okay to start right here on Medium, as I did.
9. Dropshipping
And I mean that in the best possible way — drop shopping is ridiculously easy to set up, but difficult to maintain for some.
Luckily, Shopify has made setting up an online store a breeze. Drop-shipping from Alibaba and DHGate is quite common. You've got a winner if you can find a local distributor willing to let you drop ship their product!
10. Set up an Online Course
If you have a skill and can articulate it, online education is for you.
Skillshare, Pluralsight, and Coursera have all made inroads in recent years, upskilling people with courses that YOU can create and earn from.
That's it for today! Please share if you liked this post. If not, well —

Patryk Nawrocki
3 years ago
7 things a new UX/UI designer should know

If I could tell my younger self a few rules, they would boost my career.
1. Treat design like medicine; don't get attached.

If it doesn't help, you won't be angry, but you'll try to improve it. Designers blame others if they don't like the design, but the rule is the same: we solve users' problems. You're not your design, and neither are they. Be humble with your work because your assumptions will often be wrong and users will behave differently.
2. Consider your design flawed.

Disagree with yourself, then defend your ideas. Most designers forget to dig deeper into a pattern, screen, button, or copywriting. If someone asked, "Have you considered alternatives? How does this design stack up? Here's a functional UX checklist to help you make design decisions.
3. Codeable solutions.

If your design requires more developer time, consider whether it's worth spending more money to code something with a small UX impact. Overthinking problems and designing abstract patterns is easy. Sometimes you see something on dribbble or bechance and try to recreate it, but it's not worth it. Here's my article on it.
4. Communication changes careers

Designers often talk with users, clients, companies, developers, and other designers. How you talk and present yourself can land you a job. Like driving or swimming, practice it. Success requires being outgoing and friendly. If I hadn't said "hello" to a few people, I wouldn't be where I am now.
5. Ignorance of the law is not an excuse.

Copyright, taxation How often have you used an icon without checking its license? If you use someone else's work in your project, the owner can cause you a lot of problems — paying a lot of money isn't worth it. Spend a few hours reading about copyrights, client agreements, and taxes.
6. Always test your design

If nobody has seen or used my design, it's not finished. Ask friends about prototypes. Testing reveals how wrong your assumptions were. Steve Krug, one of the authorities on this topic will tell you more about how to do testing.
7. Run workshops

A UX designer's job involves talking to people and figuring out what they need, which is difficult because they usually don't know. Organizing teamwork sessions is a powerful skill, but you must also be a good listener. Your job is to help a quiet, introverted developer express his solution and control the group. AJ Smart has more on workshops here.