


More on Productivity

Leonardo Castorina
3 years ago
How to Use Obsidian to Boost Research Productivity
Tools for managing your PhD projects, reading lists, notes, and inspiration.
As a researcher, you have to know everything. But knowledge is useless if it cannot be accessed quickly. An easy-to-use method of archiving information makes taking notes effortless and enjoyable.
As a PhD student in Artificial Intelligence, I use Obsidian (https://obsidian.md) to manage my knowledge.
The article has three parts:
- What is a note, how to organize notes, tags, folders, and links? This section is tool-agnostic, so you can use most of these ideas with any note-taking app.
- Instructions for using Obsidian, managing notes, reading lists, and useful plugins. This section demonstrates how I use Obsidian, my preferred knowledge management tool.
- Workflows: How to use Zotero to take notes from papers, manage multiple projects' notes, create MOCs with Dataview, and more. This section explains how to use Obsidian to solve common scientific problems and manage/maintain your knowledge effectively.
This list is not perfect or complete, but it is my current solution to problems I've encountered during my PhD. Please leave additional comments or contact me if you have any feedback. I'll try to update this article.
Throughout the article, I'll refer to your digital library as your "Obsidian Vault" or "Zettelkasten".
Other useful resources are listed at the end of the article.
1. Philosophy: Taking and organizing notes
Carl Sagan: “To make an apple pie from scratch, you must first create the universe.”
Before diving into Obsidian, let's establish a Personal Knowledge Management System and a Zettelkasten. You can skip to Section 2 if you already know these terms.
Niklas Luhmann, a prolific sociologist who wrote 400 papers and 70 books, inspired this section and much of Zettelkasten. Zettelkasten means “slip box” (or library in this article). His Zettlekasten had around 90000 physical notes, which can be found here.
There are now many tools available to help with this process. Obsidian's website has a good introduction section: https://publish.obsidian.md/hub/
Notes
We'll start with "What is a note?" Although it may seem trivial, the answer depends on the topic or your note-taking style. The idea is that a note is as “atomic” (i.e. You should read the note and get the idea right away.
The resolution of your notes depends on their detail. Deep Learning, for example, could be a general description of Neural Networks, with a few notes on the various architectures (eg. Recurrent Neural Networks, Convolutional Neural Networks etc..).
Limiting length and detail is a good rule of thumb. If you need more detail in a specific section of this note, break it up into smaller notes. Deep Learning now has three notes:
- Deep Learning
- Recurrent Neural Networks
- Convolutional Neural Networks
Repeat this step as needed until you achieve the desired granularity. You might want to put these notes in a “Neural Networks” folder because they are all about the same thing. But there's a better way:
#Tags and [[Links]] over /Folders/
The main issue with folders is that they are not flexible and assume that all notes in the folder belong to a single category. This makes it difficult to make connections between topics.
Deep Learning has been used to predict protein structure (AlphaFold) and classify images (ImageNet). Imagine a folder structure like this:
- /Proteins/
- Protein Folding
- /Deep Learning/
- /Proteins/
Your notes about Protein Folding and Convolutional Neural Networks will be separate, and you won't be able to find them in the same folder.
This can be solved in several ways. The most common one is to use tags rather than folders. A note can be grouped with multiple topics this way. Obsidian tags can also be nested (have subtags).
You can also link two notes together. You can build your “Knowledge Graph” in Obsidian and other note-taking apps like Obsidian.
My Knowledge Graph. Green: Biology, Red: Machine Learning, Yellow: Autoencoders, Blue: Graphs, Brown: Tags.
My Knowledge Graph and the note “Backrpropagation” and its links.
Backpropagation note and all its links
Why use Folders?
Folders help organize your vault as it grows. The main suggestion is to have few folders that "weakly" collect groups of notes or better yet, notes from different sources.
Among my Zettelkasten folders are:
My Zettelkasten's 5 folders
They usually gather data from various sources:
MOC: Map of Contents for the Zettelkasten.
Projects: Contains one note for each side-project of my PhD where I log my progress and ideas. Notes are linked to these.
Bio and ML: These two are the main content of my Zettelkasten and could theoretically be combined.
Papers: All my scientific paper notes go here. A bibliography links the notes. Zotero .bib file
Books: I make a note for each book I read, which I then split into multiple notes.
Keeping images separate from other files can help keep your main folders clean.
I will elaborate on these in the Workflow Section.
My general recommendation is to use tags and links instead of folders.
Maps of Content (MOC)
Making Tables of Contents is a good solution (MOCs).
These are notes that "signposts" your Zettelkasten library, directing you to the right type of notes. It can link to other notes based on common tags. This is usually done with a title, then your notes related to that title. As an example:
An example of a Machine Learning MOC generated with Dataview.
As shown above, my Machine Learning MOC begins with the basics. Then it's on to Variational Auto-Encoders. Not only does this save time, but it also saves scrolling through the tag search section.
So I keep MOCs at the top of my library so I can quickly find information and see my library. These MOCs are generated automatically using an Obsidian Plugin called Dataview (https://github.com/blacksmithgu/obsidian-dataview).
Ideally, MOCs could be expanded to include more information about the notes, their status, and what's left to do. In the absence of this, Dataview does a fantastic job at creating a good structure for your notes.
In the absence of this, Dataview does a fantastic job at creating a good structure for your notes.
2. Tools: Knowing Obsidian
Obsidian is my preferred tool because it is free, all notes are stored in Markdown format, and each panel can be dragged and dropped. You can get it here: https://obsidian.md/
Obsidian interface.
Obsidian is highly customizable, so here is my preferred interface:
The theme is customized from https://github.com/colineckert/obsidian-things
Alternatively, each panel can be collapsed, moved, or removed as desired. To open a panel later, click on the vertical "..." (bottom left of the note panel).
My interface is organized as follows:
How my Obsidian Interface is organized.
Folders/Search:
This is where I keep all relevant folders. I usually use the MOC note to navigate, but sometimes I use the search button to find a note.
Tags:
I use nested tags and look into each one to find specific notes to link.
cMenu:
Easy-to-use menu plugin cMenu (https://github.com/chetachiezikeuzor/cMenu-Plugin)
Global Graph:
The global graph shows all your notes (linked and unlinked). Linked notes will appear closer together. Zoom in to read each note's title. It's a bit overwhelming at first, but as your library grows, you get used to the positions and start thinking of new connections between notes.
Local Graph:
Your current note will be shown in relation to other linked notes in your library. When needed, you can quickly jump to another link and back to the current note.
Links:
Finally, an outline panel and the plugin Obsidian Power Search (https://github.com/aviral-batra/obsidian-power-search) allow me to search my vault by highlighting text.
Start using the tool and worry about panel positioning later. I encourage you to find the best use-case for your library.
Plugins
An additional benefit of using Obsidian is the large plugin library. I use several (Calendar, Citations, Dataview, Templater, Admonition):
Obsidian Calendar Plugin: https://github.com/liamcain
It organizes your notes on a calendar. This is ideal for meeting notes or keeping a journal.
Calendar addon from hans/obsidian-citation-plugin
Obsidian Citation Plugin: https://github.com/hans/
Allows you to cite papers from a.bib file. You can also customize your notes (eg. Title, Authors, Abstract etc..)
Plugin citation from hans/obsidian-citation-plugin
Obsidian Dataview: https://github.com/blacksmithgu/
A powerful plugin that allows you to query your library as a database and generate content automatically. See the MOC section for an example.
Allows you to create notes with specific templates like dates, tags, and headings.
Templater. Obsidian Admonition: https://github.com/valentine195/obsidian-admonition
Blocks allow you to organize your notes.
Plugin warning. Obsidian Admonition (valentine195)
There are many more, but this list should get you started.
3. Workflows: Cool stuff
Here are a few of my workflows for using obsidian for scientific research. This is a list of resources I've found useful for my use-cases. I'll outline and describe them briefly so you can skim them quickly.
3.1 Using Templates to Structure Notes
3.2 Free Note Syncing (Laptop, Phone, Tablet)
3.3 Zotero/Mendeley/JabRef -> Obsidian — Managing Reading Lists
3.4 Projects and Lab Books
3.5 Private Encrypted Diary
3.1 Using Templates to Structure Notes
Plugins: Templater and Dataview (optional).
To take effective notes, you must first make adding new notes as easy as possible. Templates can save you time and give your notes a consistent structure. As an example:
An example of a note using a template.
### [[YOUR MOC]]
# Note Title of your note
**Tags**::
**Links**::
The top line links to your knowledge base's Map of Content (MOC) (see previous sections). After the title, I add tags (and a link between the note and the tag) and links to related notes.
To quickly identify all notes that need to be expanded, I add the tag “#todo”. In the “TODO:” section, I list the tasks within the note.
The rest are notes on the topic.
Templater can help you create these templates. For new books, I use the following template:
### [[Books MOC]]
# Title
**Author**::
**Date::
**Tags::
**Links::
A book template example.
Using a simple query, I can hook Dataview to it.
dataview
table author as Author, date as “Date Finished”, tags as “Tags”, grade as “Grade”
from “4. Books”
SORT grade DESCENDING
using Dataview to query templates.
3.2 Free Note Syncing (Laptop, Phone, Tablet)
No plugins used.
One of my favorite features of Obsidian is the library's self-contained and portable format. Your folder contains everything (plugins included).
Ordinary folders and documents are available as well. There is also a “.obsidian” folder. This contains all your plugins and settings, so you can use it on other devices.
So you can use Google Drive, iCloud, or Dropbox for free as long as you sync your folder (note: your folder should be in your Cloud Folder).
For my iOS and macOS work, I prefer iCloud. You can also use the paid service Obsidian Sync.
3.3 Obsidian — Managing Reading Lists and Notes in Zotero/Mendeley/JabRef
Plugins: Quotes (required).
3.3 Zotero/Mendeley/JabRef -> Obsidian — Taking Notes and Managing Reading Lists of Scientific Papers
My preferred reference manager is Zotero, but this workflow should work with any reference manager that produces a .bib file. This file is exported to my cloud folder so I can access it from any platform.
My Zotero library is tagged as follows:
My reference manager's tags
For readings, I usually search for the tags “!!!” and “To-Read” and select a paper. Annotate the paper next (either on PDF using GoodNotes or on physical paper).
Then I make a paper page using a template in the Citations plugin settings:
An example of my citations template.
Create a new note, open the command list with CMD/CTRL + P, and find the Citations “Insert literature note content in the current pane” to see this lovely view.
Citation generated by the article https://doi.org/10.1101/2022.01.24.22269144
You can then convert your notes to digital. I found that transcribing helped me retain information better.
3.4 Projects and Lab Books
Plugins: Tweaker (required).
PhD students offering advice on thesis writing are common (read as regret). I started asking them what they would have done differently or earlier.
“Deep stuff Leo,” one person said. So my main issue is basic organization, losing track of my tasks and the reasons for them.
As a result, I'd go on other experiments that didn't make sense, and have to reverse engineer my logic for thesis writing. - PhD student now wise Postdoc
Time management requires planning. Keeping track of multiple projects and lab books is difficult during a PhD. How I deal with it:
- One folder for all my projects
- One file for each project
I use a template to create each project
### [[Projects MOC]]
# <% tp.file.title %>
**Tags**::
**Links**::
**URL**::
**Project Description**::## Notes:
### <% tp.file.last_modified_date(“dddd Do MMMM YYYY”) %>
#### Done:
#### TODO:
#### Notes
You can insert a template into a new note with CMD + P and looking for the Templater option.
I then keep adding new days with another template:
### <% tp.file.last_modified_date("dddd Do MMMM YYYY") %>
#### Done:
#### TODO:
#### Notes:
This way you can keep adding days to your project and update with reasonings and things you still have to do and have done. An example below:
Example of project note with timestamped notes.
3.5 Private Encrypted Diary
This is one of my favorite Obsidian uses.
Mini Diary's interface has long frustrated me. After the author archived the project, I looked for a replacement. I had two demands:
- It had to be private, and nobody had to be able to read the entries.
- Cloud syncing was required for editing on multiple devices.
Then I learned about encrypting the Obsidian folder. Then decrypt and open the folder with Obsidian. Sync the folder as usual.
Use CryptoMator (https://cryptomator.org/). Create an encrypted folder in Cryptomator for your Obsidian vault, set a password, and let it do the rest.
If you need a step-by-step video guide, here it is:
Conclusion
So, I hope this was helpful!
In the first section of the article, we discussed notes and note-taking techniques. We discussed when to use tags and links over folders and when to break up larger notes.
Then we learned about Obsidian, its interface, and some useful plugins like Citations for citing papers and Templater for creating note templates.
Finally, we discussed workflows and how to use Zotero to take notes from scientific papers, as well as managing Lab Books and Private Encrypted Diaries.
Thanks for reading and commenting :)
Read original post here

Simon Egersand
3 years ago
Working from home for more than two years has taught me a lot.
Since the pandemic, I've worked from home. It’s been +2 years (wow, time flies!) now, and during this time I’ve learned a lot. My 4 remote work lessons.
I work in a remote distributed team. This team setting shaped my experience and teachings.
Isolation ("I miss my coworkers")
The most obvious point. I miss going out with my coworkers for coffee, weekend chats, or just company while I work. I miss being able to go to someone's desk and ask for help. On a remote world, I must organize a meeting, share my screen, and avoid talking over each other in Zoom - sigh!
Social interaction is more vital for my health than I believed.
Online socializing stinks
My company used to come together every Friday to play Exploding Kittens, have food and beer, and bond over non-work things.
Different today. Every Friday afternoon is for fun, but it's not the same. People with screen weariness miss meetings, which makes sense. Sometimes you're too busy on Slack to enjoy yourself.
We laugh in meetings, but it's not the same as face-to-face.
Digital social activities can't replace real-world ones
Improved Work-Life Balance, if You Let It
At the outset of the pandemic, I recognized I needed to take better care of myself to survive. After not leaving my apartment for a few days and feeling miserable, I decided to walk before work every day. This turned into a passion for exercise, and today I run or go to the gym before work. I use my commute time for healthful activities.
Working from home makes it easier to keep working after hours. I sometimes forget the time and find myself writing coding at dinnertime. I said, "One more test." This is a disadvantage, therefore I keep my office schedule.
Spend your commute time properly and keep to your office schedule.
Remote Pair Programming Is Hard
As a software developer, I regularly write code. My team sometimes uses pair programming to write code collaboratively. One person writes code while another watches, comments, and asks questions. I won't list them all here.
Internet pairing is difficult. My team struggles with this. Even with Tuple, it's challenging. I lose attention when I get a notification or check my computer.
I miss a pen and paper to rapidly sketch down my thoughts for a colleague or a whiteboard for spirited talks with others. Best answers are found through experience.
Real-life pair programming beats the best remote pair programming tools.
Lessons Learned
Here are 4 lessons I've learned working remotely for 2 years.
-
Socializing is more vital to my health than I anticipated.
-
Digital social activities can't replace in-person ones.
-
Spend your commute time properly and keep your office schedule.
-
Real-life pair programming beats the best remote tools.
Conclusion
Our era is fascinating. Remote labor has existed for years, but software companies have just recently had to adapt. Companies who don't offer remote work will lose talent, in my opinion.
We're still figuring out the finest software development approaches, programming language features, and communication methods since the 1960s. I can't wait to see what advancements assist us go into remote work.
I'll certainly work remotely in the next years, so I'm interested to see what I've learnt from this post then.
This post is a summary of this one.
Jumanne Rajabu Mtambalike
3 years ago
10 Years of Trying to Manage Time and Improve My Productivity.
I've spent the last 10 years of my career mastering time management. I've tried different approaches and followed multiple people and sources. My knowledge is summarized.
Great people, including entrepreneurs, master time management. I learned time management in college. I was studying Computer Science and Finance and leading Tanzanian students in Bangalore, India. I had 24 hours per day to do this and enjoy campus. I graduated and received several awards. I've learned to maximize my time. These tips and tools help me finish quickly.
Eisenhower-Box
I don't remember when I read the article. James Clear, one of my favorite bloggers, introduced me to the Eisenhower Box, which I've used for years. Eliminate waste to master time management. By grouping your activities by importance and urgency, the tool helps you prioritize what matters and drop what doesn't. If it's urgent, do it. Delegate if it's urgent but not necessary. If it's important but not urgent, reschedule it; otherwise, drop it. I integrated the tool with Trello to manage my daily tasks. Since 2007, I've done this.
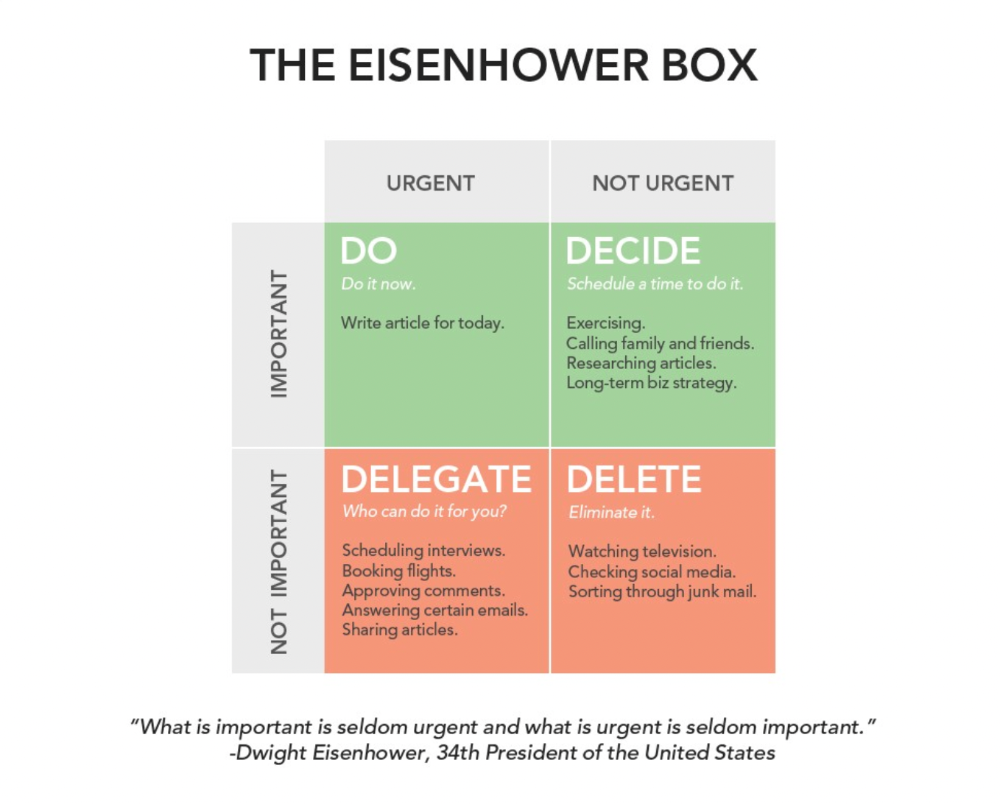
James Clear's article mentions Eisenhower Box.
Essentialism rules
Greg McKeown's book Essentialism introduced me to disciplined pursuit of less. I once wrote about this. I wasn't sure what my career's real opportunities and distractions were. A non-essentialist thinks everything is essential; you want to be everything to everyone, and your life lacks satisfaction. Poor time management starts it all. Reading and applying this book will change your life.
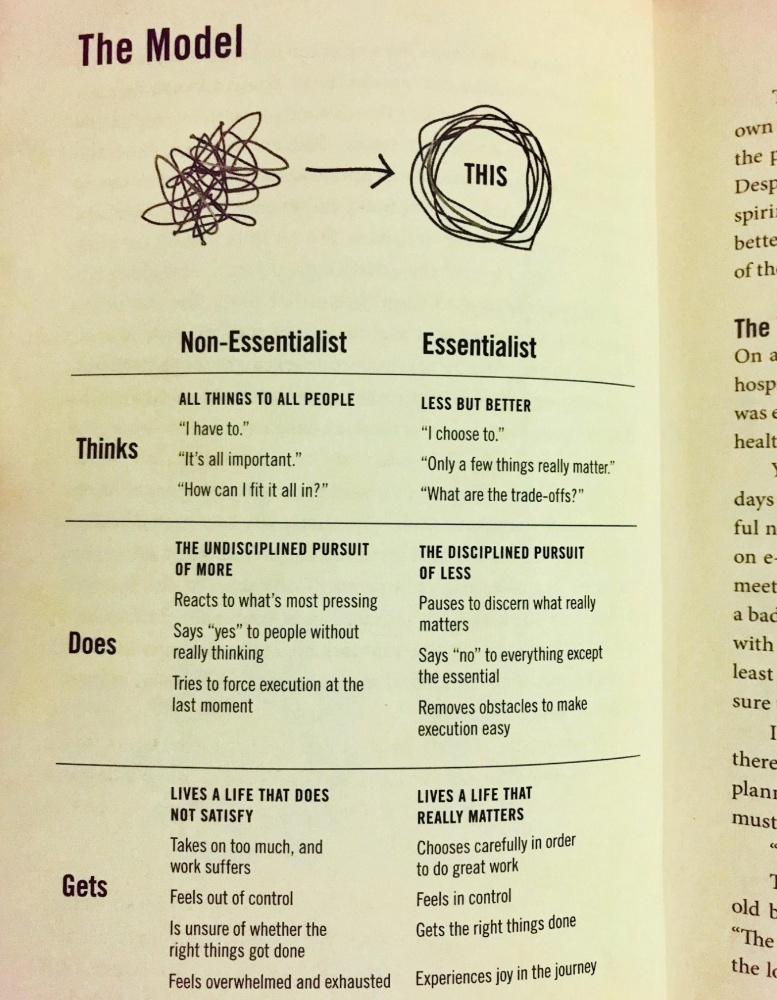
Essential vs non-essential
Life Calendar
Most of us make corporate calendars. Peter Njonjo, founder of Twiga Foods, said he manages time by putting life activities in his core calendars. It includes family retreats, weddings, and other events. He joked that his wife always complained to him to avoid becoming a calendar item. It's key. "Time Masters" manages life's four burners, not just work and corporate life. There's no "work-life balance"; it's life.
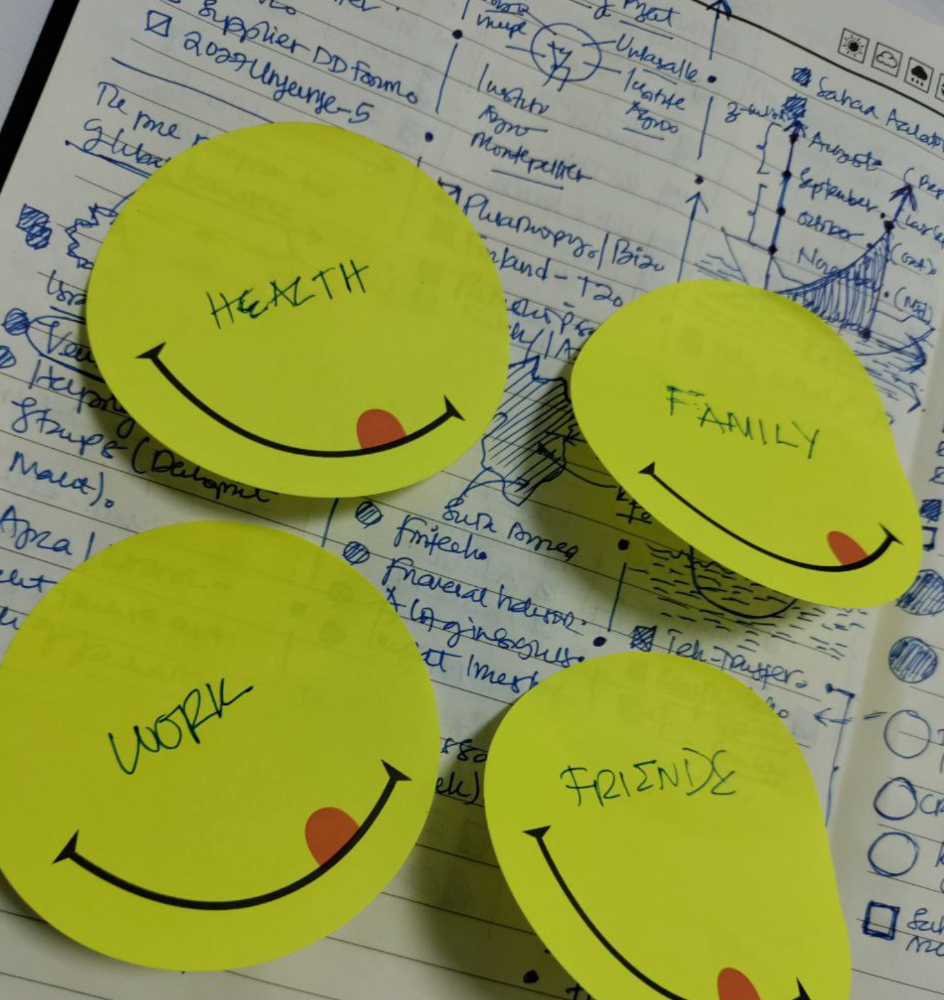
Health, Family, Work, and Friends.
The Brutal No
In a culture where people want to look good, saying "NO" to a favor request seems rude. In reality, the crime is breaking a promise. "Time Masters" have mastered "NO". More "YES" means less time, and more "NO" means more time for tasks and priorities. Brutal No doesn't mean being mean to your coworkers; it means explaining kindly and professionally that you have other priorities.
To-Do vs. MITs
Most people are productive with a routine to-do list. You can't be effective by just checking boxes on a To-do list. When was the last time you completed all of your daily tasks? Never. You must replace the to-do list with Most Important Tasks (MITs). MITs allow you to focus on the most important tasks on your list. You feel progress and accomplishment when you finish these tasks. MITs don't include ad-hoc emails, meetings, etc.
Journal Mapped
Most people don't journal or plan their day in the developing South. I've learned to plan my day in my journal over time. I have multiple sections on one page: MITs (things I want to accomplish that day), Other Activities (stuff I can postpone), Life (health, faith, and family issues), and Pop-Ups (things that just pop up). I leave the next page blank for notes. I reflected on the blocks to identify areas to improve the next day. You will have bad days, but at least you'll realize it was due to poor time management.
Buy time/delegate
Time or money? When you make enough money, you lose time to make more. The smart buy "Time." I resisted buying other people's time for years. I regret not hiring an assistant sooner. Learn to buy time from others and pay for time-consuming tasks. Sometimes you think you're saving money by doing things yourself, but you're actually losing money.
This post is a summary. See the full post here.
You might also like

Ajay Shrestha
2 years ago
Bitcoin's technical innovation: addressing the issue of the Byzantine generals
The 2008 Bitcoin white paper solves the classic computer science consensus problem.
Issue Statement
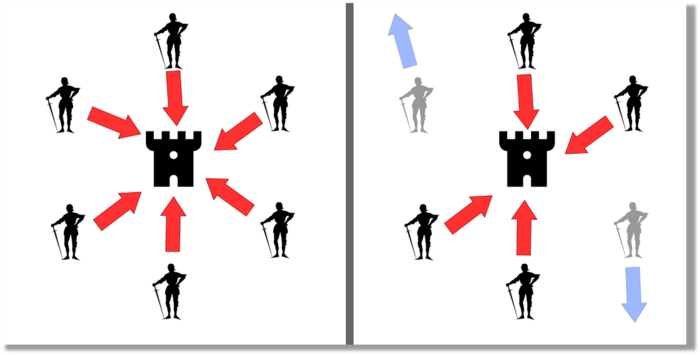
The Byzantine Generals Problem (BGP) is called after an allegory in which several generals must collaborate and attack a city at the same time to win (figure 1-left). Any general who retreats at the last minute loses the fight (figure 1-right). Thus, precise messengers and no rogue generals are essential. This is difficult without a trusted central authority.
In their 1982 publication, Leslie Lamport, Robert Shostak, and Marshall Please termed this topic the Byzantine Generals Problem to simplify distributed computer systems.
Consensus in a distributed computer network is the issue. Reaching a consensus on which systems work (and stay in the network) and which don't makes maintaining a network tough (i.e., needs to be removed from network). Challenges include unreliable communication routes between systems and mis-reporting systems.
Solving BGP can let us construct machine learning solutions without single points of failure or trusted central entities. One server hosts model parameters while numerous workers train the model. This study describes fault-tolerant Distributed Byzantine Machine Learning.
Bitcoin invented a mechanism for a distributed network of nodes to agree on which transactions should go into the distributed ledger (blockchain) without a trusted central body. It solved BGP implementation. Satoshi Nakamoto, the pseudonymous bitcoin creator, solved the challenge by cleverly combining cryptography and consensus mechanisms.
Disclaimer
This is not financial advice. It discusses a unique computer science solution.
Bitcoin
Bitcoin's white paper begins:
“A purely peer-to-peer version of electronic cash would allow online payments to be sent directly from one party to another without going through a financial institution.” Source: https://www.ussc.gov/sites/default/files/pdf/training/annual-national-training-seminar/2018/Emerging_Tech_Bitcoin_Crypto.pdf
Bitcoin's main parts:
The open-source and versioned bitcoin software that governs how nodes, miners, and the bitcoin token operate.
The native kind of token, known as a bitcoin token, may be created by mining (up to 21 million can be created), and it can be transferred between wallet addresses in the bitcoin network.
Distributed Ledger, which contains exact copies of the database (or "blockchain") containing each transaction since the first one in January 2009.
distributed network of nodes (computers) running the distributed ledger replica together with the bitcoin software. They broadcast the transactions to other peer nodes after validating and accepting them.
Proof of work (PoW) is a cryptographic requirement that must be met in order for a miner to be granted permission to add a new block of transactions to the blockchain of the cryptocurrency bitcoin. It takes the form of a valid hash digest. In order to produce new blocks on average every 10 minutes, Bitcoin features a built-in difficulty adjustment function that modifies the valid hash requirement (length of nonce). PoW requires a lot of energy since it must continually generate new hashes at random until it satisfies the criteria.
The competing parties known as miners carry out continuous computing processing to address recurrent cryptography issues. Transaction fees and some freshly minted (mined) bitcoin are the rewards they receive. The amount of hashes produced each second—or hash rate—is a measure of mining capacity.
Cryptography, decentralization, and the proof-of-work consensus method are Bitcoin's most unique features.
Bitcoin uses encryption
Bitcoin employs this established cryptography.
Hashing
digital signatures based on asymmetric encryption
Hashing (SHA-256) (SHA-256)
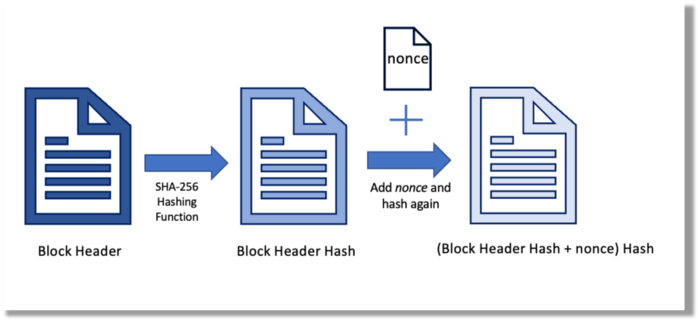
Hashing converts unique plaintext data into a digest. Creating the plaintext from the digest is impossible. Bitcoin miners generate new hashes using SHA-256 to win block rewards.
A new hash is created from the current block header and a variable value called nonce. To achieve the required hash, mining involves altering the nonce and re-hashing.
The block header contains the previous block hash and a Merkle root, which contains hashes of all transactions in the block. Thus, a chain of blocks with increasing hashes links back to the first block. Hashing protects new transactions and makes the bitcoin blockchain immutable. After a transaction block is mined, it becomes hard to fabricate even a little entry.
Asymmetric Cryptography Digital Signatures
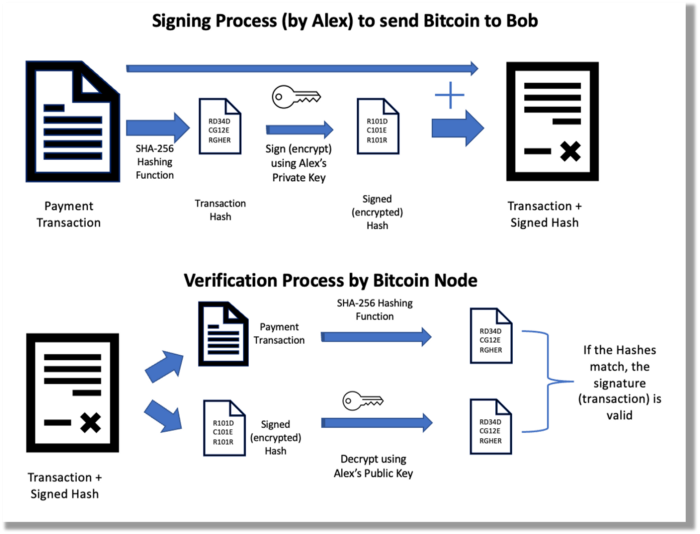
Asymmetric cryptography (public-key encryption) requires each side to have a secret and public key. Public keys (wallet addresses) can be shared with the transaction party, but private keys should not. A message (e.g., bitcoin payment record) can only be signed by the owner (sender) with the private key, but any node or anybody with access to the public key (visible in the blockchain) can verify it. Alex will submit a digitally signed transaction with a desired amount of bitcoin addressed to Bob's wallet to a node to send bitcoin to Bob. Alex alone has the secret keys to authorize that amount. Alex's blockchain public key allows anyone to verify the transaction.
Solution
Now, apply bitcoin to BGP. BGP generals resemble bitcoin nodes. The generals' consensus is like bitcoin nodes' blockchain block selection. Bitcoin software on all nodes can:
Check transactions (i.e., validate digital signatures)
2. Accept and propagate just the first miner to receive the valid hash and verify it accomplished the task. The only way to guess the proper hash is to brute force it by repeatedly producing one with the fixed/current block header and a fresh nonce value.
Thus, PoW and a dispersed network of nodes that accept blocks from miners that solve the unfalsifiable cryptographic challenge solve consensus.
Suppose:
Unreliable nodes
Unreliable miners
Bitcoin accepts the longest chain if rogue nodes cause divergence in accepted blocks. Thus, rogue nodes must outnumber honest nodes in accepting/forming the longer chain for invalid transactions to reach the blockchain. As of November 2022, 7000 coordinated rogue nodes are needed to takeover the bitcoin network.
Dishonest miners could also try to insert blocks with falsified transactions (double spend, reverse, censor, etc.) into the chain. This requires over 50% (51% attack) of miners (total computational power) to outguess the hash and attack the network. Mining hash rate exceeds 200 million (source). Rewards and transaction fees encourage miners to cooperate rather than attack. Quantum computers may become a threat.
Visit my Quantum Computing post.
Quantum computers—what are they? Quantum computers will have a big influence. towardsdatascience.com
Nodes have more power than miners since they can validate transactions and reject fake blocks. Thus, the network is secure if honest nodes are the majority.
Summary
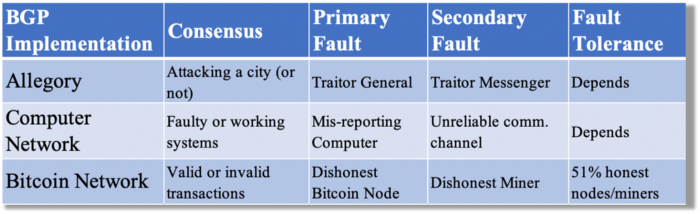
Table 1 compares three Byzantine Generals Problem implementations.
Bitcoin white paper and implementation solved the consensus challenge of distributed systems without central governance. It solved the illusive Byzantine Generals Problem.
Resources
Resources
Source-code for Bitcoin Core Software — https://github.com/bitcoin/bitcoin
Bitcoin white paper — https://bitcoin.org/bitcoin.pdf
https://www.microsoft.com/en-us/research/publication/byzantine-generals-problem/
https://www.microsoft.com/en-us/research/uploads/prod/2016/12/The-Byzantine-Generals-Problem.pdf
Genuinely Distributed Byzantine Machine Learning, El-Mahdi El-Mhamdi et al., 2020. ACM, New York, NY, https://doi.org/10.1145/3382734.3405695
CyberPunkMetalHead
3 years ago
195 countries want Terra Luna founder Do Kwon
Interpol has issued a red alert on Terraform Labs' CEO, South Korean prosecutors said.

After the May crash of Terra Luna revealed tax evasion issues, South Korean officials filed an arrest warrant for Do Kwon, but he is missing.
Do Kwon is now a fugitive in 195 countries after Seoul prosecutors placed him to Interpol's red list. Do Kwon hasn't commented since then. The red list allows any country's local authorities to apprehend Do Kwon.
Do Dwon and Terraform Labs were believed to have moved to Singapore days before the $40 billion wipeout, but Singapore authorities said he fled the country on September 17. Do Kwon tweeted that he wasn't on the run and cited privacy concerns.
Do Kwon was not on the red list at the time and said he wasn't "running," only to reply to his own tweet saying he hasn't jogged in a while and needed to trim calories.
Whether or not it makes sense to read too much into this, the reality is that Do Kwon is now on Interpol red list, despite the firmly asserts on twitter that he does absolutely nothing to hide.
UPDATE:
South Korean authorities are investigating alleged withdrawals of over $60 million U.S. and seeking to freeze these assets. Korean authorities believe a new wallet exchanged over 3000 BTC through OKX and Kucoin.
Do Kwon and the Luna Foundation Guard (of whom Do Kwon is a key member of) have declined all charges and dubbed this disinformation.
Singapore's Luna Foundation Guard (LFG) manages the Terra Ecosystem.
The Legal Situation
Multiple governments are searching for Do Kwon and five other Terraform Labs employees for financial markets legislation crimes.
South Korean authorities arrested a man suspected of tax fraud and Ponzi scheme.
The U.S. SEC is also examining Terraform Labs on how UST was advertised as a stablecoin. No legal precedent exists, so it's unclear what's illegal.
The future of Terraform Labs, Terra, and Terra 2 is unknown, and despite what Twitter shills say about LUNC, the company remains in limbo awaiting a decision that will determine its fate. This project isn't a wise investment.

Michelle Teheux
3 years ago
Get Real, All You Grateful Laid-Off LinkedIn Users
WTF is wrong with you people?

When I was laid off as editor of my town's daily newspaper, I went silent on social media. I knew it was coming and had been quietly removing personal items each day, but the pain was intense.
I posted a day later. I didn't bad-mouth GateHouse Media but expressed my sadness at leaving the newspaper industry, pride in my accomplishments, and hope for success in another industry.
Normal job-loss response.
What do you recognize as abnormal?
The bullshit I’ve been reading from laid-off folks on LinkedIn.
If you're there, you know. Many Twitter or Facebook/Meta employees recently lost their jobs.
Well, many of them did not “lose their job,” actually. They were “impacted by the layoffs” at their former employer. I keep seeing that phrase.
Why don’t they want to actually say it? Why the euphemism?
Many are excited about the opportunities ahead. The jobless deny being sad.
They're ecstatic! They have big plans.
Hope so. Sincerely! Being laid off stinks, especially if, like me, your skills are obsolete. It's worse if, like me, you're too old to start a new career. Ageism exists despite denials.
Nowadays, professionalism seems to demand psychotic levels of fake optimism.
Why? Life is unpredictable. That's indisputable. You shouldn't constantly complain or cry in public, but you also shouldn't pretend everything's great.
It makes you look psychotic, not positive. It's like saying at work:
“I was impacted by the death of my spouse of 20 years this week, and many of you have reached out to me, expressing your sympathy. However, I’m choosing to remember the amazing things we shared. I feel confident that there is another marriage out there for me, and after taking a quiet weekend trip to reset myself, I’ll be out there looking for the next great marital adventure! #staypositive #available #opentolove
Also:
“Now looking for our next #dreamhome after our entire neighborhood was demolished by a wildfire last night. We feel so lucky to have lived near so many amazing and inspirational neighbors, all of whom we will miss as we go on our next housing adventure. The best house for us is yet to come! If you have a great neighborhood you’d recommend, please feel free to reach out and touch base with us! #newhouse #newneighborhood #newlife
Admit it. That’s creepy.
The constant optimism makes me feel sick to my stomach.
Viscerally.
I hate fakes.
Imagine a fake wood grain desk. Wouldn't it be better if the designer accepted that it's plastic and went with that?
Real is better but not always nice. When something isn't nice, you don't have to go into detail, but you also shouldn't pretend it's great.
How to announce your job loss to the world.
Do not pretend to be happy, but don't cry and drink vodka all afternoon.
Say you loved your job, and that you're looking for new opportunities.
Yes, if you'll miss your coworkers. Otherwise, don't badmouth. No bridge-burning!
Please specify the job you want. You may want to pivot.
Alternatively, try this.
You could always flame out.
If you've pushed yourself too far into toxic positivity, you may be ready to burn it all down. If so, make it worthwhile by writing something like this:
Well, I was shitcanned by the losers at #Acme today. That bitch Linda in HR threw me under the bus just because she saw that one of my “friends” tagged me in some beach pics on social media after I called in sick with Covid. The good thing is I will no longer have to watch my ass around that #asspincher Ron in accounting, but I’m sad that I will no longer have a cushy job with high pay or access to the primo office supplies I’ve been sneaking home for the last five years. (Those gel pens were the best!) I am going to be taking some time off to enjoy my unemployment and hammer down shots of Jägermeister but in about five months I’ll be looking for anything easy with high pay and great benefits. Reach out if you can help! #officesupplies #unemploymentrocks #drinkinglikeagirlboss #acmesucks
It beats the fake positivity.