More on Marketing

Jon Brosio
2 years ago
This Landing Page is a (Legal) Money-Printing Machine
and it’s easy to build.
A landing page with good copy is a money-maker.
Let's be honest, page-builder templates are garbage.
They can help you create a nice-looking landing page, but not persuasive writing.
Over the previous 90 days, I've examined 200+ landing pages.
What's crazy?
Top digital entrepreneurs use a 7-part strategy to bring in email subscribers, generate prospects, and (passively) sell their digital courses.
Steal this 7-part landing page architecture to maximize digital product sales.
The offer
Landing pages require offers.
Newsletter, cohort, or course offer.
Your reader should see this offer first. Includind:
Headline
Imagery
Call-to-action
Clear, persuasive, and simplicity are key. Example: the Linkedin OS course home page of digital entrepreneur Justin Welsh offers:
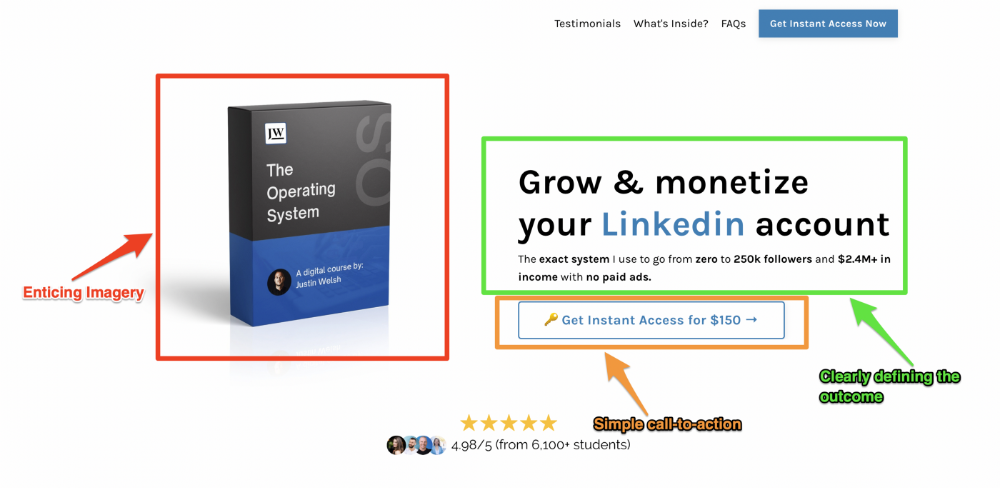
A distinctly defined problem
Everyone needs an enemy.
You need an opponent on your landing page. Problematic.
Next, employ psychology to create a struggle in your visitor's thoughts.
Don't be clever here; label your customer's problem. The more particular you are, the bigger the situation will seem.
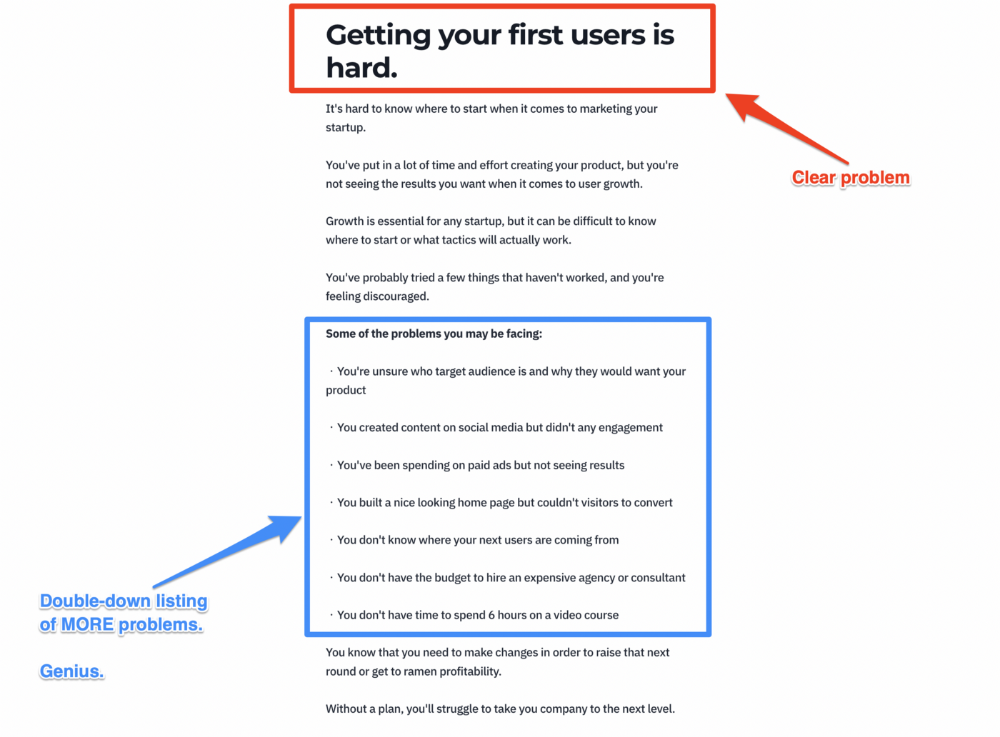
When you build a clear monster, you invite defeat. I appreciate Theo Ohene's Growth Roadmaps landing page.
Exacerbation of the effects
Problem identification doesn't motivate action.
What would an unresolved problem mean?
This is landing page copy. When you describe the unsolved problem's repercussions, you accomplish several things:
You write a narrative (and stories are remembered better than stats)
You cause the reader to feel something.
You help the reader relate to the issue
Important!
My favorite script is:
"Sure, you can let [problem] go untreated. But what will happen if you do? Soon, you'll begin to notice [new problem 1] will start to arise. That might bring up [problem 2], etc."
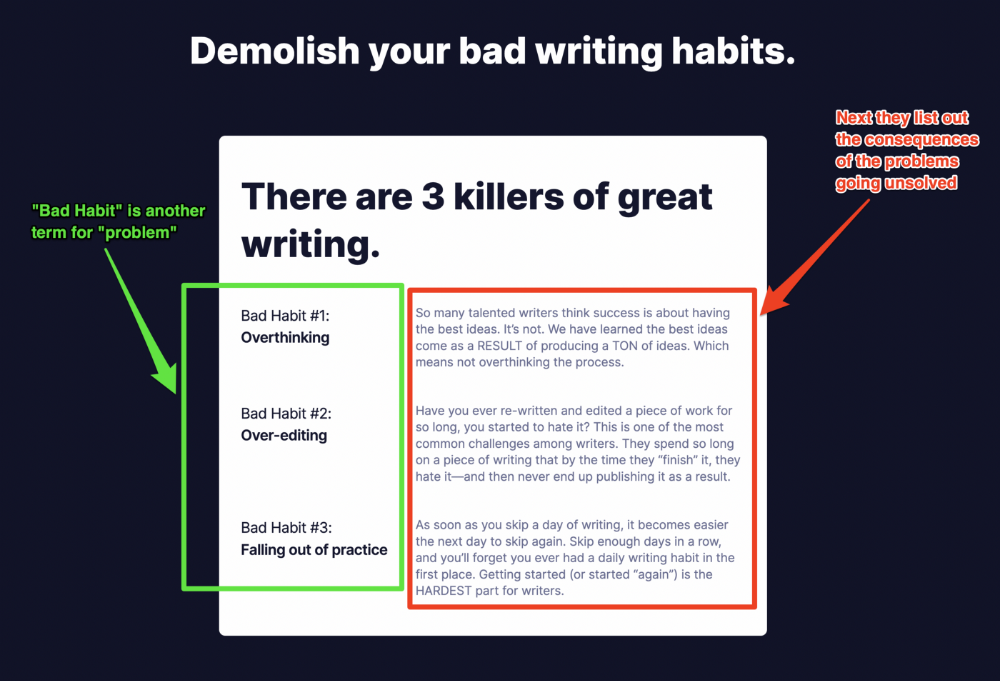
Take the copywriting course, digital writer and entrepreneur Dickie Bush illustrates below when he labels the problem (see: "poor habit") and then illustrates the repercussions.
The tale of transformation
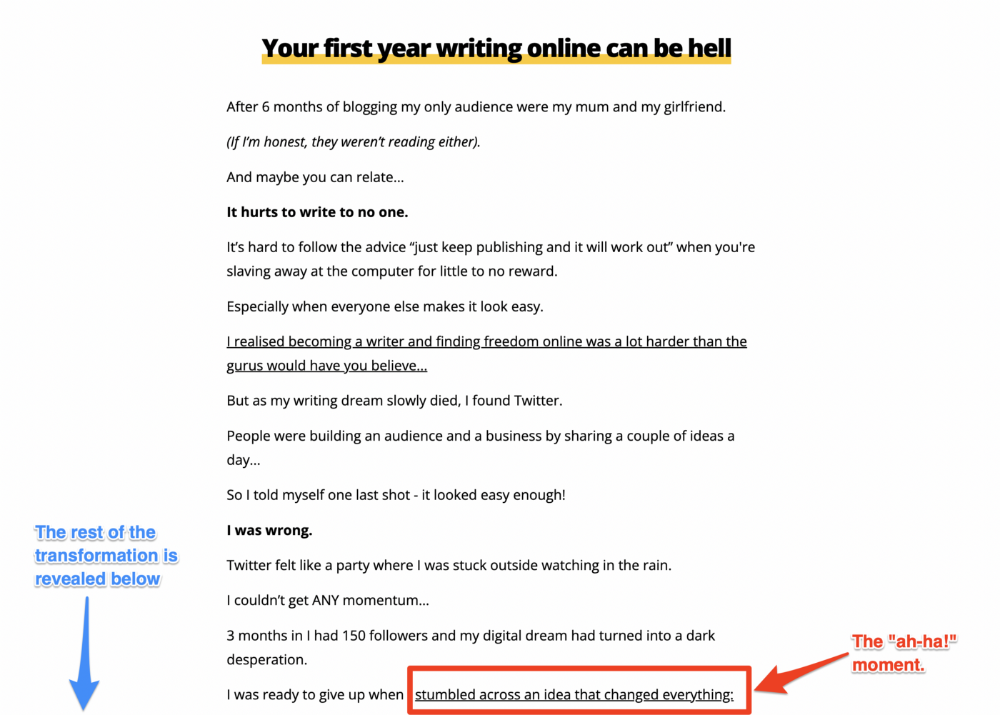
Every landing page needs that "ah-ha!" moment.
Transformation stories do this.
Did you find a solution? Someone else made the discovery? Have you tested your theory?
Next, describe your (or your subject's) metamorphosis.
Kieran Drew nails his narrative (and revelation) here. Right before the disclosure, he introduces his "ah-ha!" moment:
Testimonials
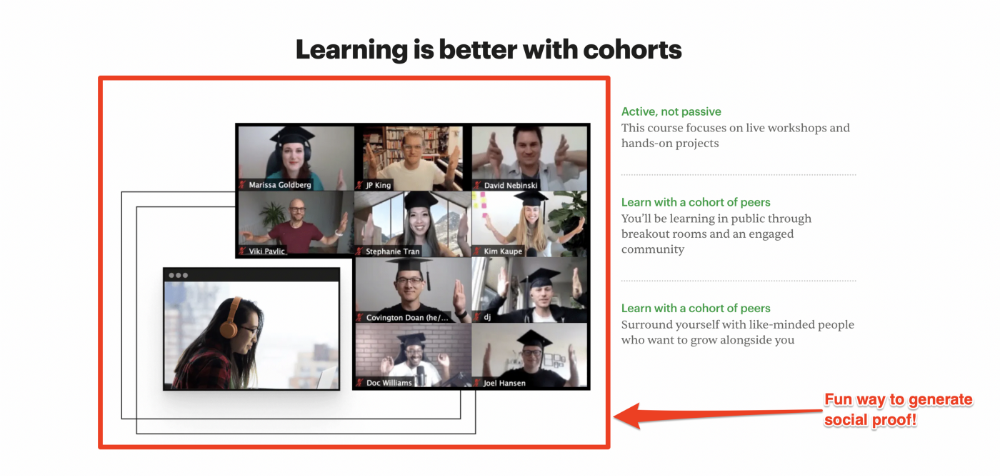
Social proof completes any landing page.
Social proof tells the reader, "If others do it, it must be worthwhile."
This is your argument.
Positive social proof helps (obviously).
Offer "free" training in exchange for a testimonial if you need social evidence. This builds social proof.
Most social proof is testimonies (recommended). Kurtis Hanni's creative take on social proof (using a screenshot of his colleague) is entertaining.
Bravo.
Reveal your offer
Now's the moment to act.
Describe the "bundle" that provides the transformation.
Here's:
Course
Cohort
Ebook
Whatever you're selling.
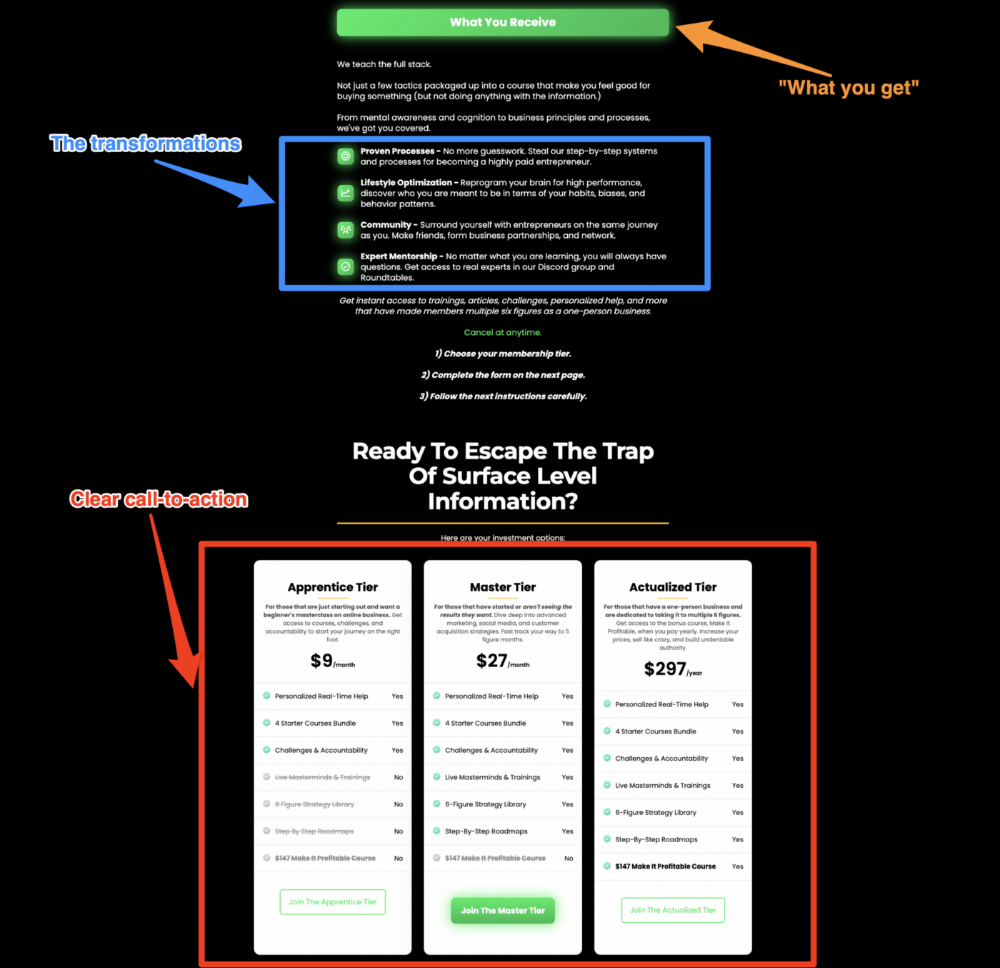
Include a product or service image, what the consumer is getting ("how it works"), the price, any "free" bonuses (preferred), and a CTA ("buy now").
Clarity is key. Don't make a cunning offer. Make sure your presentation emphasizes customer change (benefits). Dan Koe's Modern Mastery landing page makes an offer. Consider:
An ultimatum
Offering isn't enough.
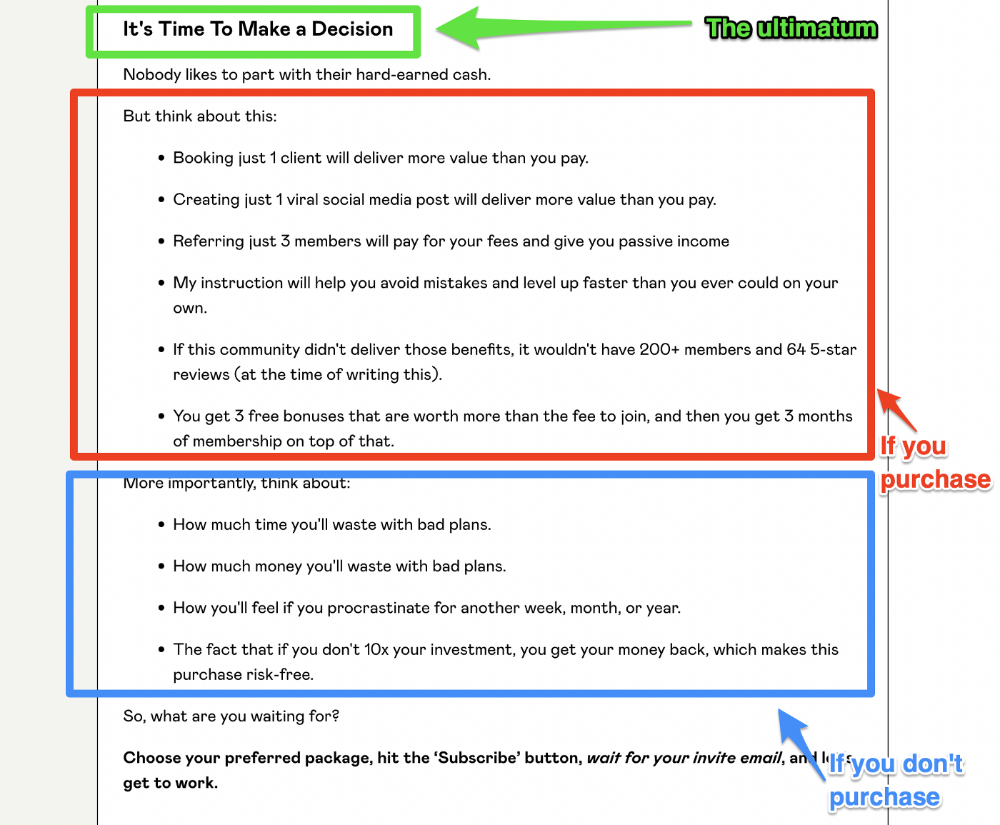
You must give your prospect an ultimatum.
They can buy your merchandise from you.
They may exit the webpage.
That’s it.
It's crucial to show what happens if the reader does either. Stress the consequences of not buying (again, a little consequence amplification). Remind them of the benefits of buying.
I appreciate Charles Miller's product offer ending:
The top online creators use a 7-part landing page structure:
Offer the service
Describe the problem
Amplify the consequences
Tell the transformational story
Include testimonials and social proof.
Reveal the offer (with any bonuses if applicable)
Finally, give the reader a deadline to encourage them to take action.
Sequence these sections to develop a landing page that (essentially) prints money.

Francesca Furchtgott
2 years ago
Giving customers what they want or betraying the values of the brand?
A J.Crew collaboration for fashion label Eveliina Vintage is not a paradox; it is a solution.
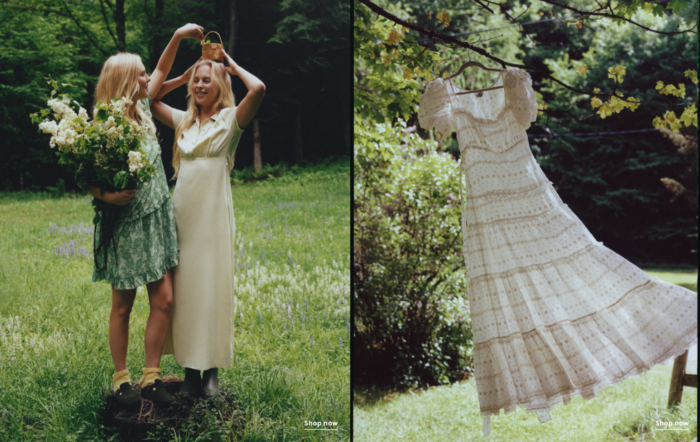
Eveliina Vintage's capsule collection debuted yesterday at J.Crew. This J.Crew partnership stopped me in my tracks.
Eveliina Vintage sells vintage goods. Eeva Musacchia founded the shop in Finland in the 1970s. It's recognized for its one-of-a-kind slip dresses from the 1930s and 1940s.
I wondered why a vintage brand would partner with a mass shop. Fast fashion against vintage shopping? Will Eveliina Vintages customers be turned off?
But Eveliina Vintages customers don't care about sustainability. They want Eveliina's Instagram look. Eveliina Vintage collaborated with J.Crew to give customers what they wanted: more Eveliina at a lower price.
Vintage: A Fashion Option That Is Eco-Conscious
Secondhand shopping is a trendy response to quick fashion. J.Crew releases hundreds of styles annually. Waste and environmental damage have been criticized. A pair of jeans requires 1,800 gallons of water. J.Crew's limited-time deals promote more purchases. J.Crew items are likely among those Americans wear 7 times before discarding.
Consumers and designers have emphasized sustainability in recent years. Stella McCartney and Eileen Fisher are popular eco-friendly brands. They've also flocked to ThredUp and similar sites.
Gap, Levis, and Allbirds have listened to consumer requests. They promote recycling, ethical sourcing, and secondhand shopping.
Secondhand shoppers feel good about reusing and recycling clothing that might have ended up in a landfill.
Eco-conscious fashionistas shop vintage. These shoppers enjoy the thrill of the hunt (that limited-edition Chanel bag!) and showing off a unique piece (nobody will have my look!). They also reduce their environmental impact.
Is Eveliina Vintage capitalizing on an aesthetic or is it a sustainable brand?
Eveliina Vintage emphasizes environmental responsibility. Vogue's Amanda Musacchia emphasized sustainability. Amanda, founder Eeva's daughter, is a company leader.
But Eveliina's press message doesn't address sustainability, unlike Instagram. Scarcity and fame rule.
Eveliina Vintages Instagram has see-through dresses and lace-trimmed slip dresses. Celebrities and influencers are often photographed in Eveliina's apparel, which has 53,000+ followers. Vogue appreciates Eveliina's style. Multiple publications discuss Alexa Chung's Eveliina dress.
Eveliina Vintage markets its one-of-a-kind goods. It teases future content, encouraging visitors to return. Scarcity drives demand and raises clothing prices. One dress is $1,600+, but most are $500-$1,000.
The catch: Eveliina can't monetize its expanding popularity due to exorbitant prices and limited quantity. Why?
Most people struggle to pay for their clothing. But Eveliina Vintage lacks those more affordable entry-level products, in contrast to other luxury labels that sell accessories or perfume.
Many people have trouble fitting into their clothing. The bodies of most women in the past were different from those for which vintage clothing was designed. Each Eveliina dress's specific measurements are mentioned alongside it. Be careful, you can fall in love with an ill-fitting dress.
No matter how many people can afford it and fit into it, there is only one item to sell. To get the item before someone else does, those people must be on the Eveliina Vintage website as soon as it becomes available.
A Way for Eveliina Vintage to Make Money (and Expand) with J.Crew Its following
Eveliina Vintages' cooperation with J.Crew makes commercial sense.
This partnership spreads Eveliina's style. Slightly better pricing The $390 outfits have multicolored slips and gauzy cotton gowns. Sizes range from 00 to 24, which is wider than vintage racks.
Eveliina Vintage customers like the combination. Excited comments flood the brand's Instagram launch post. Nobody is mocking the 50-year-old vintage brand's fast-fashion partnership.
Vintage may be a sustainable fashion trend, but that's not why Eveliina's clients love the brand. They only care about the old look.
And that is a tale as old as fashion.

Jon Brosio
2 years ago
You can learn more about marketing from these 8 copywriting frameworks than from a college education.
Email, landing pages, and digital content

Today's most significant skill:
Copywriting.
Unfortunately, most people don't know how to write successful copy because they weren't taught in school.
I've been obsessed with copywriting for two years. I've read 15 books, completed 3 courses, and studied internet's best digital entrepreneurs.
Here are 8 copywriting frameworks that educate more than a four-year degree.
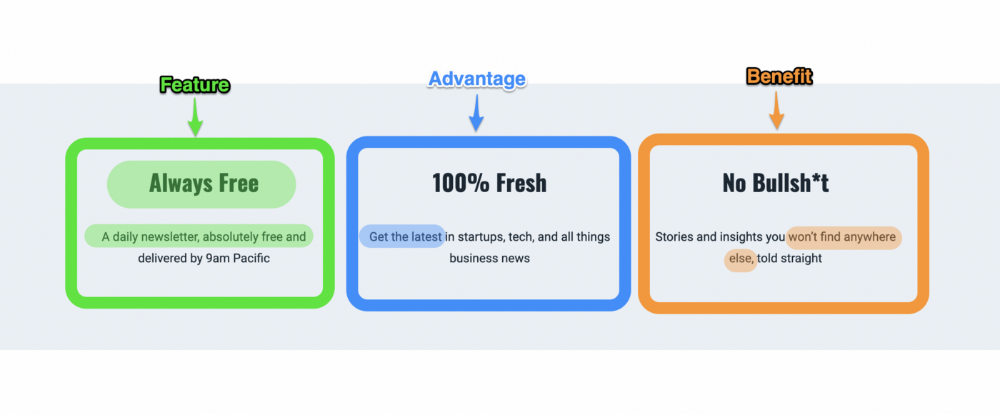
1. Feature — Advantage — Benefit (F.A.B)
This is the most basic copywriting foundation. Email marketing, landing page copy, and digital video ads can use it.
F.A.B says:
How it works (feature)
which is helpful (advantage)
What's at stake (benefit)
The Hustle uses this framework on their landing page to convince people to sign up:
2. P. A. S. T. O. R.
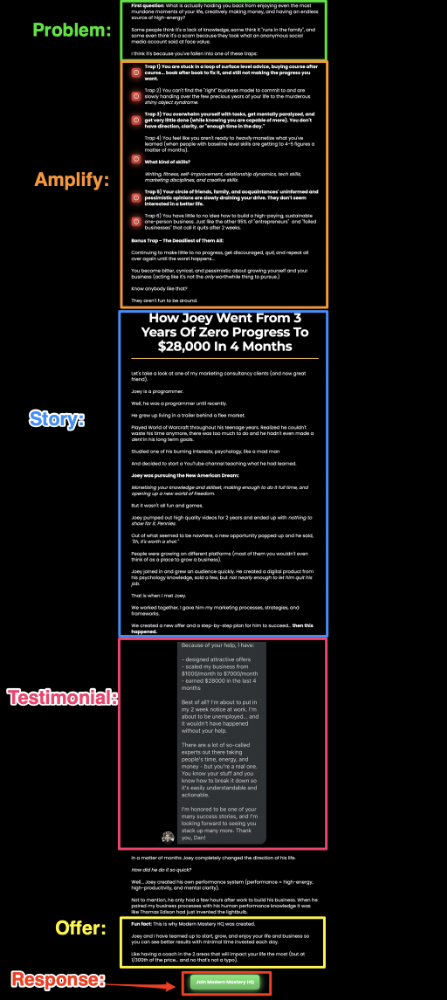
This framework is for longer-form copywriting. PASTOR uses stories to engage with prospects. It explains why people should buy this offer.
PASTOR means:
Problem
Amplify
Story
Testimonial
Offer
Response
Dan Koe's landing page is a great example. It shows PASTOR frame-by-frame.
3. Before — After — Bridge
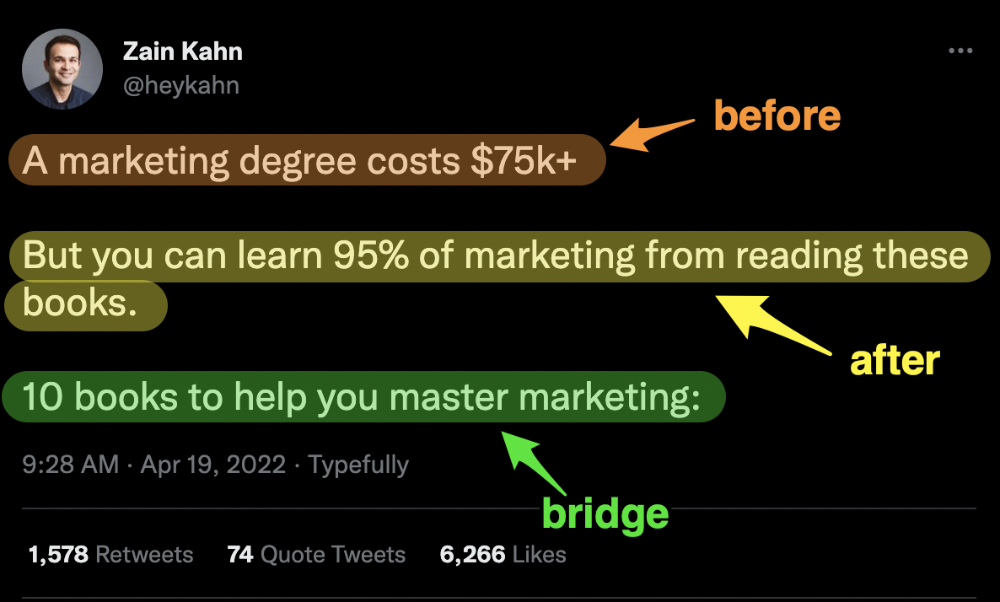
Before-after-bridge is a copywriting framework that draws attention and shows value quickly.
This framework highlights:
where you are
where you want to be
how to get there
Works great for: Email threads/landing pages
Zain Kahn utilizes this framework to write viral threads.
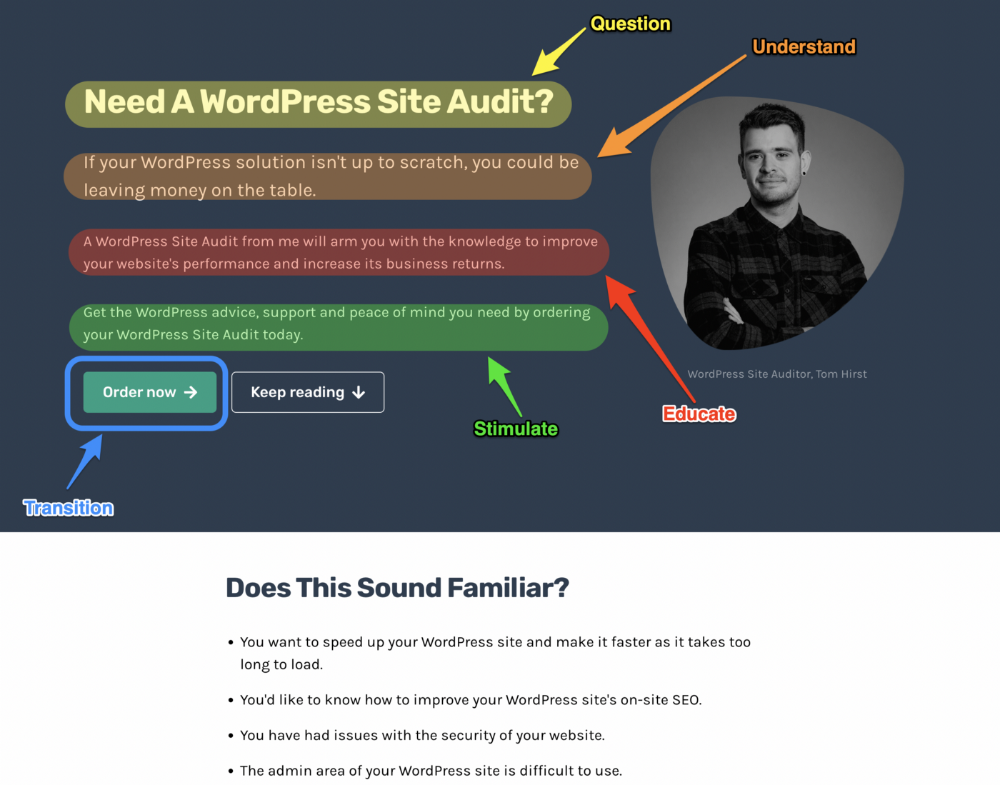
4. Q.U.E.S.T
QUEST is about empathetic writing. You know their issues, obstacles, and headaches. This allows coverups.
QUEST:
Qualifies
Understands
Educates
Stimulates
Transitions
Tom Hirst's landing page uses the QUEST framework.
5. The 4P’s model
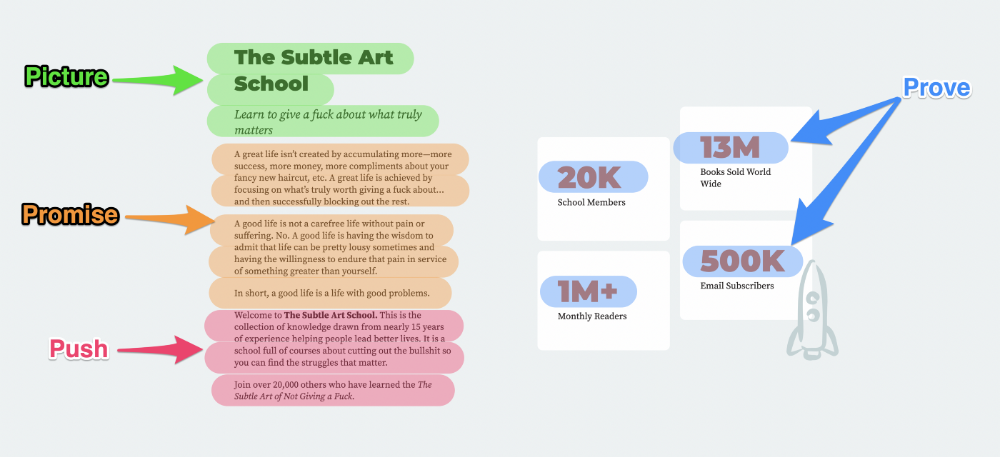
The 4P’s approach pushes your prospect to action. It educates and persuades quickly.
4Ps:
The problem the visitor is dealing with
The promise that will help them
The proof the promise works
A push towards action
Mark Manson is a bestselling author, digital creator, and pop-philosopher. He's also a great copywriter, and his membership offer uses the 4P’s framework.
6. Problem — Agitate — Solution (P.A.S)
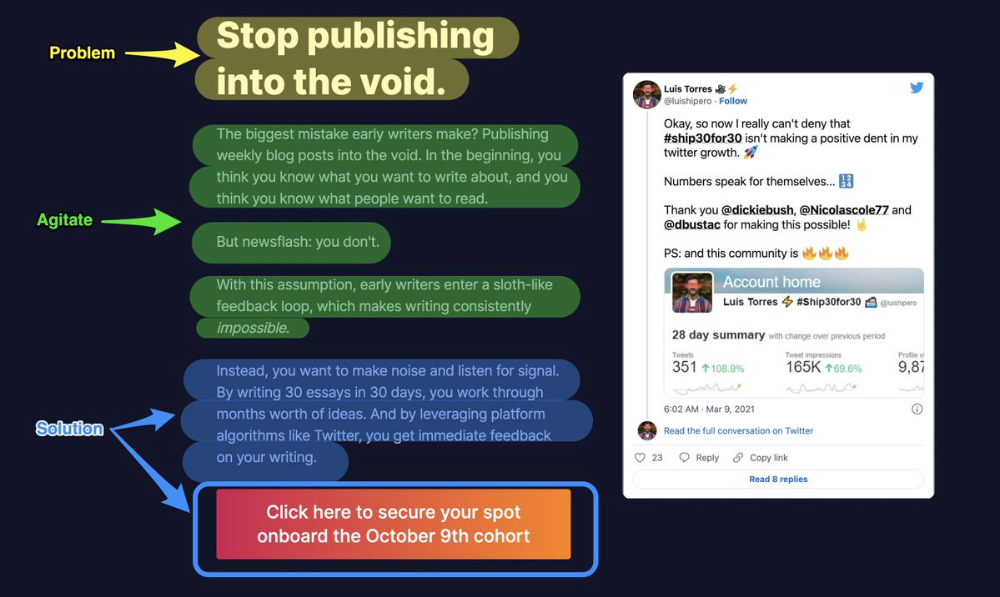
Up-and-coming marketers should understand problem-agitate-solution copywriting. Once you understand one structure, others are easier. It drives passion and presents a clear solution.
PAS outlines:
The issue the visitor is having
It then intensifies this issue through emotion.
finally offers an answer to that issue (the offer)
The customer's story loops. Nicolas Cole and Dickie Bush use PAS to promote Ship 30 for 30.
7. Star — Story — Solution (S.S.S)
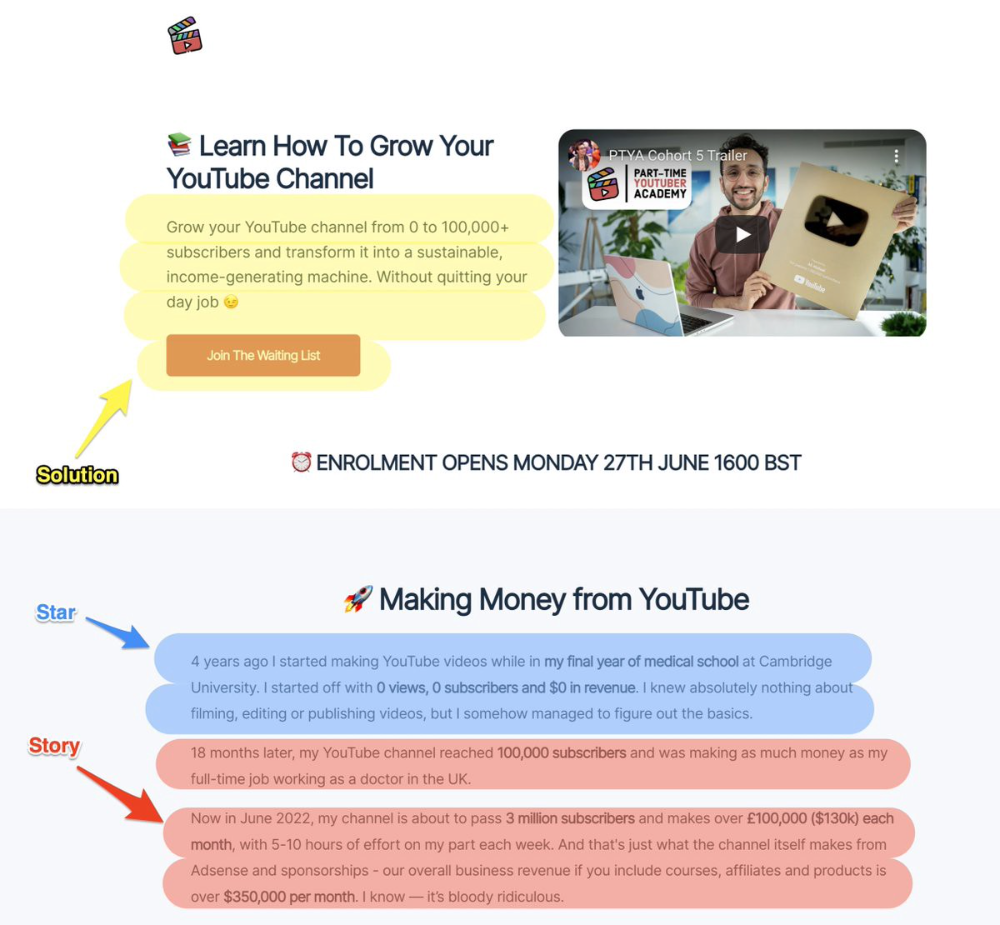
PASTOR + PAS = star-solution-story. Like PAS, it employs stories to persuade.
S.S.S. is effective storytelling:
Star: (Person had a problem)
Story: (until they had a breakthrough)
Solution: (That created a transformation)
Ali Abdaal is a YouTuber with a great S.S.S copy.
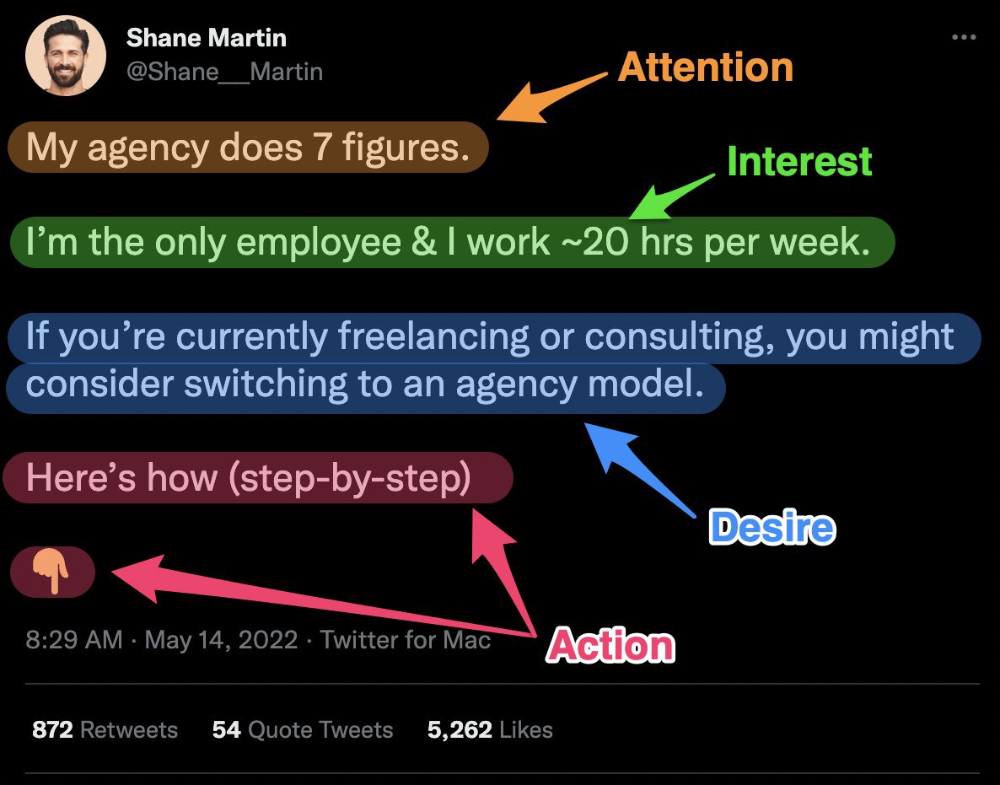
8. Attention — Interest — Desire — Action
AIDA is another classic. This copywriting framework is great for fast-paced environments (think all digital content on Linkedin, Twitter, Medium, etc.).
It works with:
Page landings
writing on thread
Email
It's a good structure since it's concise, attention-grabbing, and action-oriented.
Shane Martin, Twitter's creator, uses this approach to create viral content.
TL;DR
8 copywriting frameworks that teach marketing better than a four-year degree
Feature-advantage-benefit
Before-after-bridge
Star-story-solution
P.A.S.T.O.R
Q.U.E.S.T
A.I.D.A
P.A.S
4P’s
You might also like

CyberPunkMetalHead
2 years ago
I made ChatGPT copy itself.

OpenAI's ChatGPT is an amazing AI-powered chatbot. It can write poetry, stories, and marketing campaigns, and it's also adept at coding. ChatGPT's coding is so amazing that it replicated itself. What happened:
Me: Hi
Hello! Can I help? I'll answer any inquiries you have.
Me: Build a python and flask AI chatbot that responds to user messages on the frontend.
CGPT:
from flask import Flask, request, jsonify

import openai
openai.api_key = "YOUR_API_KEY"

@app.route('/chatbot', methods=['POST'])
def chatbot():
    user_message = request.get_json()['message']
    response = chatbot_response(user_message)
    return jsonify({'response': response})


def chatbot_response(user_message):
    response = openai.Completion.create(
        engine="text-davinci-002",
        prompt=user_message,
        max_tokens=1024,
        n = 1,
        temperature=0.5
    )
    return response['choices'][0]['text']

if __name__ == '__main__':
    app.run()
To integrate a chatbot with a frontend, use Flask to serve an HTML page with a form for user messages and the chatbot's answer. AJAX can submit the form to the /chatbot route, and JavaScript can show the chatbot's response.
I imported code snippets at the top of the file.
Let's add a frontend interface, I said.
CGPT:
<!DOCTYPE html>
<html>
<head>
    <title>AI Chatbot</title>
</head>
<body>
    <h1>AI Chatbot</h1>
    <form id="chatbot-form">
        <label for="message">Message:</label><br>
        <input type="text" id="message" name="message"><br>
        <input type="submit" value="Submit">
    </form>
    <div id="chatbot-response"></div>

    <script src="https://ajax.googleapis.com/ajax/libs/jquery/3.5.1/jquery.min.js"></script>
    <script>
        $(document).ready(function() {
            $("#chatbot-form").submit(function(e) {
                e.preventDefault();
                var userMessage = $("#message").val();
                $.ajax({
                    type: "POST",
                    url: "/chatbot",
                    data: JSON.stringify({message: userMessage}),
                    contentType: "application/json; charset=utf-8",
                    dataType: "json",
                    success: function(response) {
                        $("#chatbot-response").text(response.response);
                    }
                });
            });
        });
    </script>
</body>
</html>
To serve this HTML page using Flask, build a new route that returns the page as a GET response.
So far, so good.

Looked quite basic so I got chatGPT to add some tailwind to the project.
Me: Tailwind the chatbot.html page, please. Give it a futuristic style with purple and neon
After a few more prompts, Talk GPT aligned the form to the center, changed some colors, and added padding.
CGPT:
<!DOCTYPE html>
<html>
<head>
    <title>AI Chatbot</title>
    <link href="https://unpkg.com/tailwindcss@^1.0/dist/tailwind.min.css" rel="stylesheet">
</head>
<body class="bg-black flex flex-col justify-center items-center">
    <h1 class="sm:text-center text-purple-500">AI Chatbot</h1>
    <form id="chatbot-form" class="border-purple-500 bg-purple-800 rounded">
        <label for="message">Message:</label><br>
        <input type="text" id="message" name="message" class="min-w-30 rounded"><br>
        <input type="submit" value="Submit" class="bg-purple-500 border-red-500 transform hover:scale-110 rounded">
    </form>
    <div class="flex justify-center">
        <div id="chatbot-response" class="text-white rounded"></div>
    </div>

    <script src="https://ajax.googleapis.com/ajax/libs/jquery/3.5.1/jquery.min.js"></script>
    <script>
        var colors = ['red', 'orange', 'yellow', 'green', 'blue', 'indigo', 'violet'];
        var colorIndex = 0;

        $(document).ready(function() {
            setInterval(function() {
                $("#chatbot-form").css('border-color', colors[colorIndex]);
                colorIndex = (colorIndex + 1) % colors.length;
            }, 1000);

            $("#chatbot-form").submit(function(e) {
                e.preventDefault();
                var userMessage = $("#message").val();
                $.ajax({
                    type: "POST",
                    url: "/chatbot",
                    data: JSON.stringify({message: userMessage}),
                    contentType: "application/json; charset=utf-8",
                    dataType: "json",
                    success: function(response) {
                        $("#chatbot-response").text(response.response);
                    }
                });
            });
        });
    </script>
</body>
</html>
Improved:

A few more prompts like “Add more vertical and horizontal padding to the submit button and vertical margin, and vertically align this file's body.”
The result:
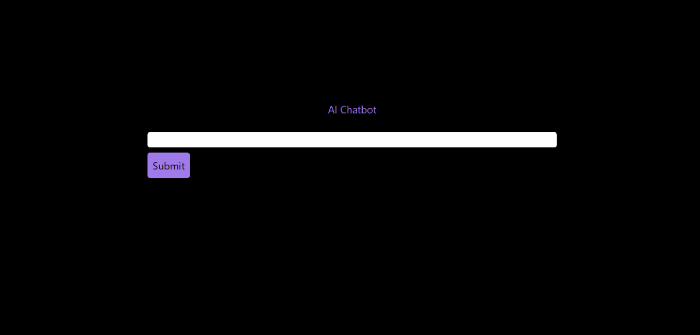
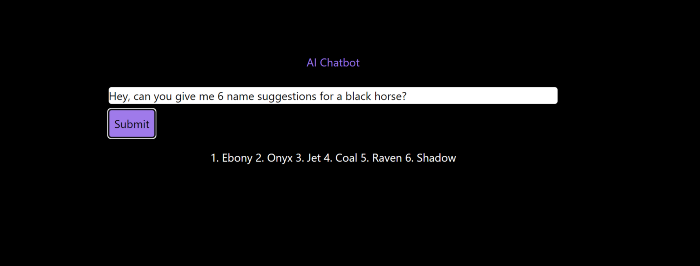
Is it effective? Now, I'll chat with ChatGPT's AI Chatbot. I intervened minimally throughout construction. Chat GPT created numerous files, connected and interacted with its own API, and presented the user request response on the front end by itself.
Me to AI Chatbot: Hey, can you give me 6 name suggestions for a black horse?
Me to AI Chatbot: Write a poem in the style of Jim Morrison. Make sure to mention cacti and black holes
ChatGPTs Chatbot:
In the desert night, I am confronted by cacti,
Their arms reaching out, As if to grab me and take me away.
The stars in the sky, Beckon me to come,
To a world of black holes, Where I can be free.
I am in a trance, My body and mind,
In a state of limbo, As I wander the night.
I hear a voice, Calling me to the unknown,
I cannot resist, The lure of the black hole.
The cacti watch, As I take my leave,
To a place of mystery, Where I can find peace.
Of course, the next question I gave it was to build a chatbot!
Me: Build a python and flask AI chatbot that responds to user messages on the frontend.
ChatbotGPTs:
import os from flask
import Flask, request, jsonify
from chatterbot
import ChatBot
from chatterbot.trainers
import ListTrainer

# Create a new chatbot
bot = ChatBot(
  "My Bot",
  storage_adapter="chatterbot.storage.SQLStorageAdapter",
  logic_adapters=[
    "chatterbot.logic.BestMatch",
    { "import_path": "chatterbot.logic.BestMatch",
      "statement_comparison_function": "chatterbot.comparisons.levenshtein_distance",
       "response_selection_method": "chatterbot.response_selection.get_first_response" }
    ],
    database_uri="sqlite:///database.sqlite3" )

# Train the chatbot with a few sample conversations
conversation = [ "Hello", "Hi there!", "How are you doing?", "I'm doing great.", "That is good to hear", "Thank you.", "You're welcome." ]
trainer = ListTrainer(bot) trainer.train(conversation)

# Create a Flask app
app = Flask(__name__)

# Define a route for the default URL
@app.route("/") def index(): return "<h1>Chatbot</h1>"

# Define a route for the /get_response URL
@app.route("/get_response", methods=["POST"])

def get_response():
# Get the user's message
user_message = request.form["user_message"]
# Get the bot's response
bot_response = bot.get_response(user_message)
# Return the bot's response
return str(bot_response)
# Run the Flask
app if __name__ == "__main__": app.run()
No matter how many times I tried, the second generation always used chatterbot instead of the ChatGPT API. Even when I told it to use the ChatGPT API, it didn't.
ChatGTP's ability to reproduce or construct other machine learning algorithms is interesting and possibly terrifying. Nothing prevents ChatGPT from replicating itself ad infinitum throughout the Internet other than a lack of desire. This may be the first time a machine repeats itself, so I've preserved the project as a reference. Adding a requirements.txt file and python env for easier deployment is the only change to the code.
I hope you enjoyed this.

Dmitrii Eliuseev
1 year ago
Creating Images on Your Local PC Using Stable Diffusion AI
Deep learning-based generative art is being researched. As usual, self-learning is better. Some models, like OpenAI's DALL-E 2, require registration and can only be used online, but others can be used locally, which is usually more enjoyable for curious users. I'll demonstrate the Stable Diffusion model's operation on a standard PC.
Let’s get started.
What It Does
Stable Diffusion uses numerous components:
A generative model trained to produce images is called a diffusion model. The model is incrementally improving the starting data, which is only random noise. The model has an image, and while it is being trained, the reversed process is being used to add noise to the image. Being able to reverse this procedure and create images from noise is where the true magic is (more details and samples can be found in the paper).
An internal compressed representation of a latent diffusion model, which may be altered to produce the desired images, is used (more details can be found in the paper). The capacity to fine-tune the generation process is essential because producing pictures at random is not very attractive (as we can see, for instance, in Generative Adversarial Networks).
A neural network model called CLIP (Contrastive Language-Image Pre-training) is used to translate natural language prompts into vector representations. This model, which was trained on 400,000,000 image-text pairs, enables the transformation of a text prompt into a latent space for the diffusion model in the scenario of stable diffusion (more details in that paper).
This figure shows all data flow:
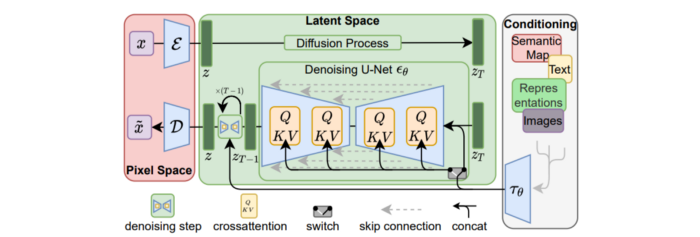
The weights file size for Stable Diffusion model v1 is 4 GB and v2 is 5 GB, making the model quite huge. The v1 model was trained on 256x256 and 512x512 LAION-5B pictures on a 4,000 GPU cluster using over 150.000 NVIDIA A100 GPU hours. The open-source pre-trained model is helpful for us. And we will.
Install
Before utilizing the Python sources for Stable Diffusion v1 on GitHub, we must install Miniconda (assuming Git and Python are already installed):
wget https://repo.anaconda.com/miniconda/Miniconda3-py39_4.12.0-Linux-x86_64.sh
chmod +x Miniconda3-py39_4.12.0-Linux-x86_64.sh
./Miniconda3-py39_4.12.0-Linux-x86_64.sh
conda update -n base -c defaults conda
Install the source and prepare the environment:
git clone https://github.com/CompVis/stable-diffusion
cd stable-diffusion
conda env create -f environment.yaml
conda activate ldm
pip3 install transformers --upgrade
Download the pre-trained model weights next. HiggingFace has the newest checkpoint sd-v14.ckpt (a download is free but registration is required). Put the file in the project folder and have fun:
python3 scripts/txt2img.py --prompt "hello world" --plms --ckpt sd-v1-4.ckpt --skip_grid --n_samples 1Almost. The installation is complete for happy users of current GPUs with 12 GB or more VRAM. RuntimeError: CUDA out of memory will occur otherwise. Two solutions exist.
Running the optimized version
Try optimizing first. After cloning the repository and enabling the environment (as previously), we can run the command:
python3 optimizedSD/optimized_txt2img.py --prompt "hello world" --ckpt sd-v1-4.ckpt --skip_grid --n_samples 1Stable Diffusion worked on my visual card with 8 GB RAM (alas, I did not behave well enough to get NVIDIA A100 for Christmas, so 8 GB GPU is the maximum I have;).
Running Stable Diffusion without GPU
If the GPU does not have enough RAM or is not CUDA-compatible, running the code on a CPU will be 20x slower but better than nothing. This unauthorized CPU-only branch from GitHub is easiest to obtain. We may easily edit the source code to use the latest version. It's strange that a pull request for that was made six months ago and still hasn't been approved, as the changes are simple. Readers can finish in 5 minutes:
Replace if attr.device!= torch.device(cuda) with if attr.device!= torch.device(cuda) and torch.cuda.is available at line 20 of ldm/models/diffusion/ddim.py ().
Replace if attr.device!= torch.device(cuda) with if attr.device!= torch.device(cuda) and torch.cuda.is available in line 20 of ldm/models/diffusion/plms.py ().
Replace device=cuda in lines 38, 55, 83, and 142 of ldm/modules/encoders/modules.py with device=cuda if torch.cuda.is available(), otherwise cpu.
Replace model.cuda() in scripts/txt2img.py line 28 and scripts/img2img.py line 43 with if torch.cuda.is available(): model.cuda ().
Run the script again.
Testing
Test the model. Text-to-image is the first choice. Test the command line example again:
python3 scripts/txt2img.py --prompt "hello world" --plms --ckpt sd-v1-4.ckpt --skip_grid --n_samples 1The slow generation takes 10 seconds on a GPU and 10 minutes on a CPU. Final image:
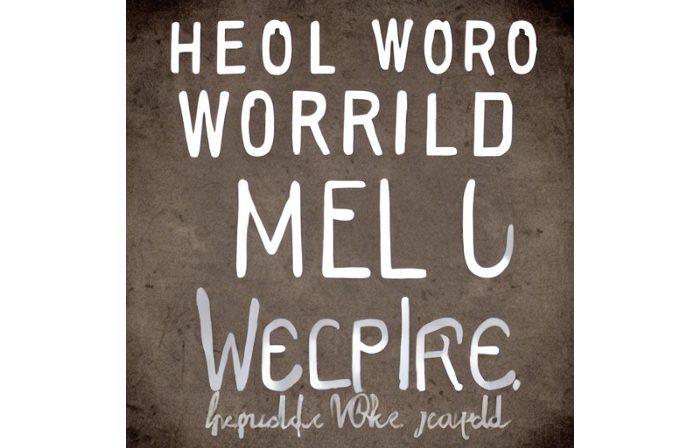
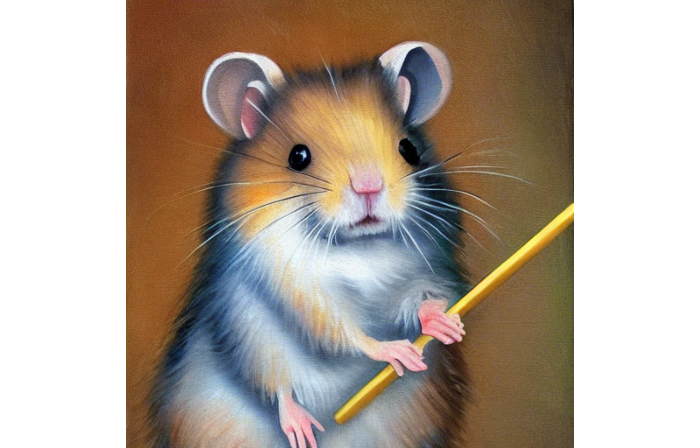
Hello world is dull and abstract. Try a brush-wielding hamster. Why? Because we can, and it's not as insane as Napoleon's cat. Another image:
Generating an image from a text prompt and another image is interesting. I made this picture in two minutes using the image editor (sorry, drawing wasn't my strong suit):
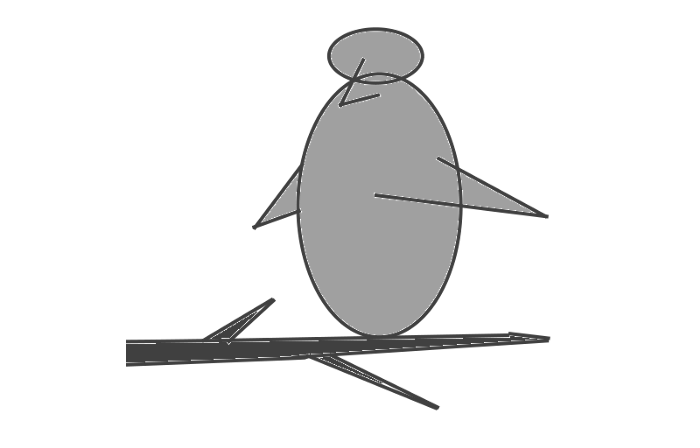
I can create an image from this drawing:
python3 scripts/img2img.py --prompt "A bird is sitting on a tree branch" --ckpt sd-v1-4.ckpt --init-img bird.png --strength 0.8It was far better than my initial drawing:

I hope readers understand and experiment.
Stable Diffusion UI
Developers love the command line, but regular users may struggle. Stable Diffusion UI projects simplify image generation and installation. Simple usage:
Unpack the ZIP after downloading it from https://github.com/cmdr2/stable-diffusion-ui/releases. Linux and Windows are compatible with Stable Diffusion UI (sorry for Mac users, but those machines are not well-suitable for heavy machine learning tasks anyway;).
Start the script.
Done. The web browser UI makes configuring various Stable Diffusion features (upscaling, filtering, etc.) easy:

V2.1 of Stable Diffusion
I noticed the notification about releasing version 2.1 while writing this essay, and it was intriguing to test it. First, compare version 2 to version 1:
alternative text encoding. The Contrastive LanguageImage Pre-training (CLIP) deep learning model, which was trained on a significant number of text-image pairs, is used in Stable Diffusion 1. The open-source CLIP implementation used in Stable Diffusion 2 is called OpenCLIP. It is difficult to determine whether there have been any technical advancements or if legal concerns were the main focus. However, because the training datasets for the two text encoders were different, the output results from V1 and V2 will differ for the identical text prompts.
a new depth model that may be used to the output of image-to-image generation.
a revolutionary upscaling technique that can quadruple the resolution of an image.
Generally higher resolution Stable Diffusion 2 has the ability to produce both 512x512 and 768x768 pictures.
The Hugging Face website offers a free online demo of Stable Diffusion 2.1 for code testing. The process is the same as for version 1.4. Download a fresh version and activate the environment:
conda deactivate
conda env remove -n ldm  # Use this if version 1 was previously installed
git clone https://github.com/Stability-AI/stablediffusion
cd stablediffusion
conda env create -f environment.yaml
conda activate ldm
Hugging Face offers a new weights ckpt file.
The Out of memory error prevented me from running this version on my 8 GB GPU. Version 2.1 fails on CPUs with the slow conv2d cpu not implemented for Half error (according to this GitHub issue, the CPU support for this algorithm and data type will not be added). The model can be modified from half to full precision (float16 instead of float32), however it doesn't make sense since v1 runs up to 10 minutes on the CPU and v2.1 should be much slower. The online demo results are visible. The same hamster painting with a brush prompt yielded this result:
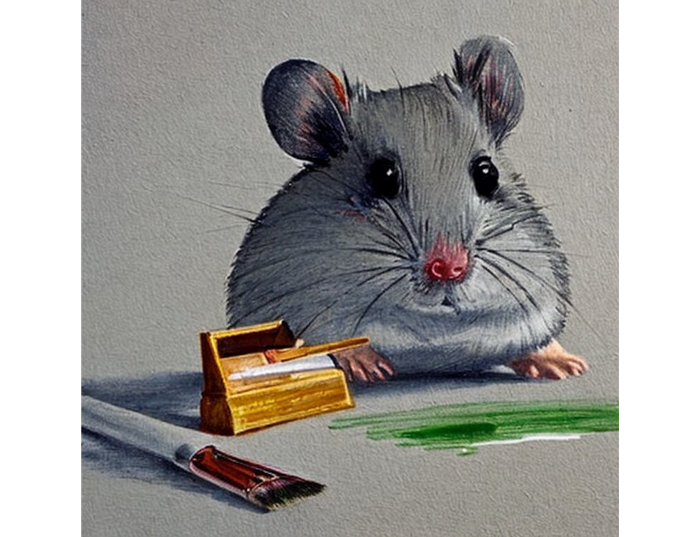
It looks different from v1, but it functions and has a higher resolution.
The superresolution.py script can run the 4x Stable Diffusion upscaler locally (the x4-upscaler-ema.ckpt weights file should be in the same folder):
python3 scripts/gradio/superresolution.py configs/stable-diffusion/x4-upscaling.yaml x4-upscaler-ema.ckptThis code allows the web browser UI to select the image to upscale:
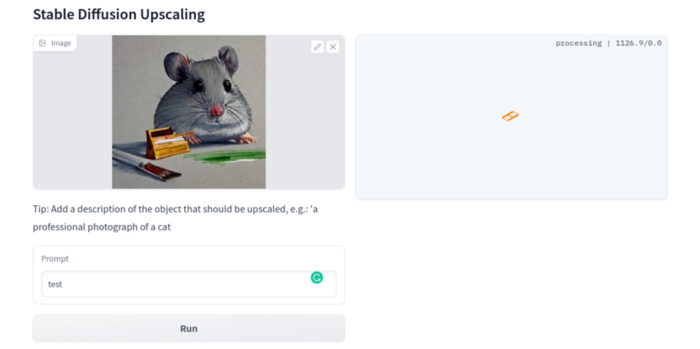
The copy-paste strategy may explain why the upscaler needs a text prompt (and the Hugging Face code snippet does not have any text input as well). I got a GPU out of memory error again, although CUDA can be disabled like v1. However, processing an image for more than two hours is unlikely:

Stable Diffusion Limitations
When we use the model, it's fun to see what it can and can't do. Generative models produce abstract visuals but not photorealistic ones. This fundamentally limits The generative neural network was trained on text and image pairs, but humans have a lot of background knowledge about the world. The neural network model knows nothing. If someone asks me to draw a Chinese text, I can draw something that looks like Chinese but is actually gibberish because I never learnt it. Generative AI does too! Humans can learn new languages, but the Stable Diffusion AI model includes only language and image decoder brain components. For instance, the Stable Diffusion model will pull NO WAR banner-bearers like this:
V1:

V2.1:

The shot shows text, although the model never learned to read or write. The model's string tokenizer automatically converts letters to lowercase before generating the image, so typing NO WAR banner or no war banner is the same.
I can also ask the model to draw a gorgeous woman:
V1:

V2.1:

The first image is gorgeous but physically incorrect. A second one is better, although it has an Uncanny valley feel. BTW, v2 has a lifehack to add a negative prompt and define what we don't want on the image. Readers might try adding horrible anatomy to the gorgeous woman request.
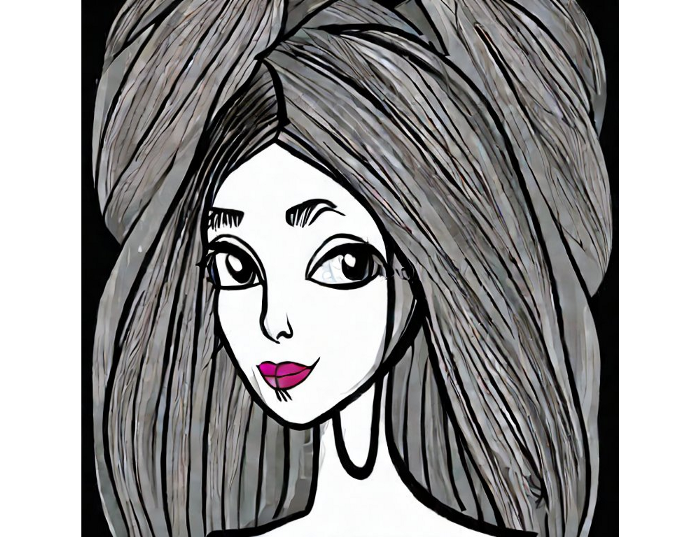
If we ask for a cartoon attractive woman, the results are nice, but accuracy doesn't matter:
V1:

V2.1:
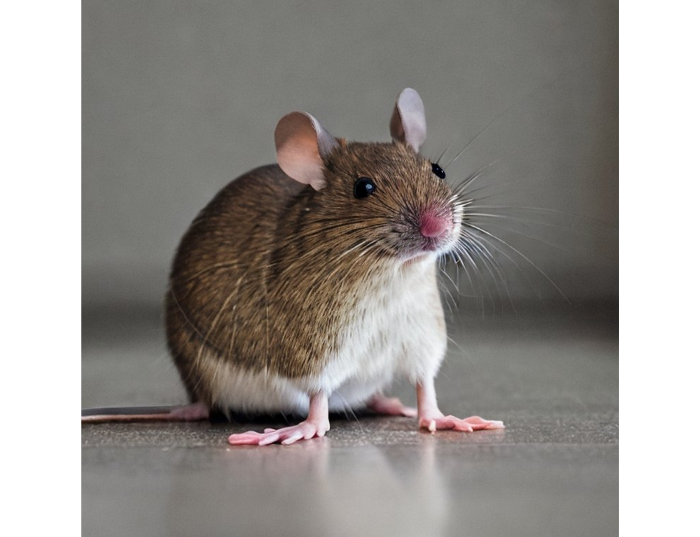
Another example: I ordered a model to sketch a mouse, which looks beautiful but has too many legs, ears, and fingers:
V1:

V2.1: improved but not perfect.
V1 produces a fun cartoon flying mouse if I want something more abstract:

I tried multiple times with V2.1 but only received this:

The image is OK, but the first version is closer to the request.
Stable Diffusion struggles to draw letters, fingers, etc. However, abstract images yield interesting outcomes. A rural landscape with a modern metropolis in the background turned out well:
V1:

V2.1:

Generative models help make paintings too (at least, abstract ones). I searched Google Image Search for modern art painting to see works by real artists, and this was the first image:
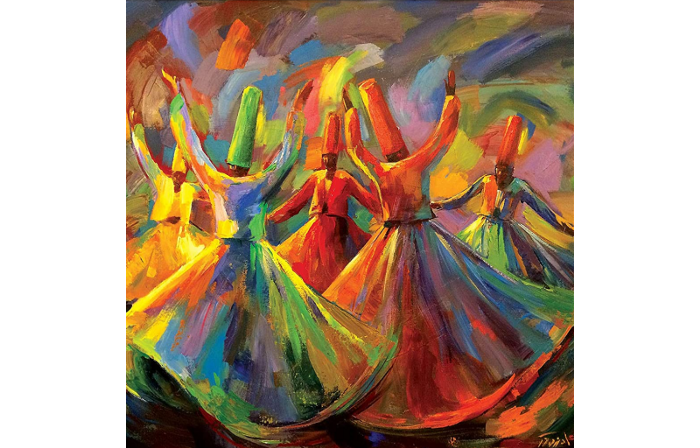
I typed "abstract oil painting of people dancing" and got this:
V1:

V2.1:

It's a different style, but I don't think the AI-generated graphics are worse than the human-drawn ones.
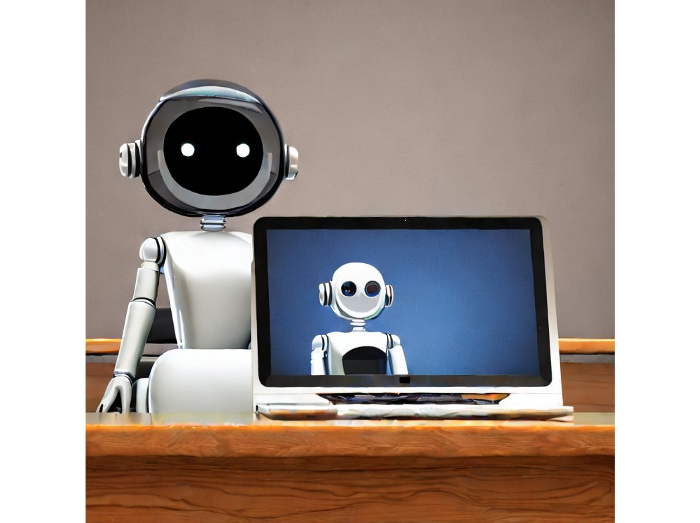
The AI model cannot think like humans. It thinks nothing. A stable diffusion model is a billion-parameter matrix trained on millions of text-image pairs. I input "robot is creating a picture with a pen" to create an image for this post. Humans understand requests immediately. I tried Stable Diffusion multiple times and got this:
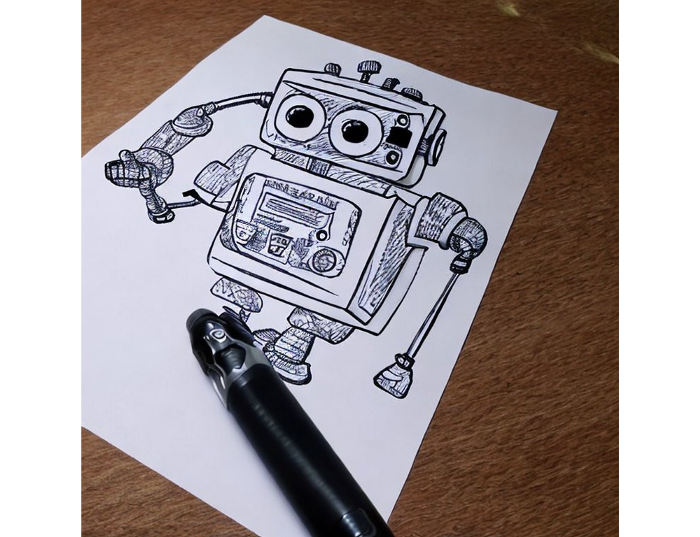
This great artwork has a pen, robot, and sketch, however it was not asked. Maybe it was because the tokenizer deleted is and a words from a statement, but I tried other requests such robot painting picture with pen without success. It's harder to prompt a model than a person.
I hope Stable Diffusion's general effects are evident. Despite its limitations, it can produce beautiful photographs in some settings. Readers who want to use Stable Diffusion results should be warned. Source code examination demonstrates that Stable Diffusion images feature a concealed watermark (text StableDiffusionV1 and SDV2) encoded using the invisible-watermark Python package. It's not a secret, because the official Stable Diffusion repository's test watermark.py file contains a decoding snippet. The put watermark line in the txt2img.py source code can be removed if desired. I didn't discover this watermark on photographs made by the online Hugging Face demo. Maybe I did something incorrectly (but maybe they are just not using the txt2img script on their backend at all).
Conclusion
The Stable Diffusion model was fascinating. As I mentioned before, trying something yourself is always better than taking someone else's word, so I encourage readers to do the same (including this article as well;).
Is Generative AI a game-changer? My humble experience tells me:
I think that place has a lot of potential. For designers and artists, generative AI can be a truly useful and innovative tool. Unfortunately, it can also pose a threat to some of them since if users can enter a text field to obtain a picture or a website logo in a matter of clicks, why would they pay more to a different party? Is it possible right now? unquestionably not yet. Images still have a very poor quality and are erroneous in minute details. And after viewing the image of the stunning woman above, models and fashion photographers may also unwind because it is highly unlikely that AI will replace them in the upcoming years.
Today, generative AI is still in its infancy. Even 768x768 images are considered to be of a high resolution when using neural networks, which are computationally highly expensive. There isn't an AI model that can generate high-resolution photographs natively without upscaling or other methods, at least not as of the time this article was written, but it will happen eventually.
It is still a challenge to accurately represent knowledge in neural networks (information like how many legs a cat has or the year Napoleon was born). Consequently, AI models struggle to create photorealistic photos, at least where little details are important (on the other side, when I searched Google for modern art paintings, the results are often even worse;).
When compared to the carefully chosen images from official web pages or YouTube reviews, the average output quality of a Stable Diffusion generation process is actually less attractive because to its high degree of randomness. When using the same technique on their own, consumers will theoretically only view those images as 1% of the results.
Anyway, it's exciting to witness this area's advancement, especially because the project is open source. Google's Imagen and DALL-E 2 can also produce remarkable findings. It will be interesting to see how they progress.

Simon Egersand
2 years ago
Working from home for more than two years has taught me a lot.
Since the pandemic, I've worked from home. It’s been +2 years (wow, time flies!) now, and during this time I’ve learned a lot. My 4 remote work lessons.
I work in a remote distributed team. This team setting shaped my experience and teachings.
Isolation ("I miss my coworkers")
The most obvious point. I miss going out with my coworkers for coffee, weekend chats, or just company while I work. I miss being able to go to someone's desk and ask for help. On a remote world, I must organize a meeting, share my screen, and avoid talking over each other in Zoom - sigh!
Social interaction is more vital for my health than I believed.
Online socializing stinks
My company used to come together every Friday to play Exploding Kittens, have food and beer, and bond over non-work things.
Different today. Every Friday afternoon is for fun, but it's not the same. People with screen weariness miss meetings, which makes sense. Sometimes you're too busy on Slack to enjoy yourself.
We laugh in meetings, but it's not the same as face-to-face.
Digital social activities can't replace real-world ones
Improved Work-Life Balance, if You Let It
At the outset of the pandemic, I recognized I needed to take better care of myself to survive. After not leaving my apartment for a few days and feeling miserable, I decided to walk before work every day. This turned into a passion for exercise, and today I run or go to the gym before work. I use my commute time for healthful activities.
Working from home makes it easier to keep working after hours. I sometimes forget the time and find myself writing coding at dinnertime. I said, "One more test." This is a disadvantage, therefore I keep my office schedule.
Spend your commute time properly and keep to your office schedule.
Remote Pair Programming Is Hard
As a software developer, I regularly write code. My team sometimes uses pair programming to write code collaboratively. One person writes code while another watches, comments, and asks questions. I won't list them all here.
Internet pairing is difficult. My team struggles with this. Even with Tuple, it's challenging. I lose attention when I get a notification or check my computer.
I miss a pen and paper to rapidly sketch down my thoughts for a colleague or a whiteboard for spirited talks with others. Best answers are found through experience.
Real-life pair programming beats the best remote pair programming tools.
Lessons Learned
Here are 4 lessons I've learned working remotely for 2 years.
-
Socializing is more vital to my health than I anticipated.
-
Digital social activities can't replace in-person ones.
-
Spend your commute time properly and keep your office schedule.
-
Real-life pair programming beats the best remote tools.
Conclusion
Our era is fascinating. Remote labor has existed for years, but software companies have just recently had to adapt. Companies who don't offer remote work will lose talent, in my opinion.
We're still figuring out the finest software development approaches, programming language features, and communication methods since the 1960s. I can't wait to see what advancements assist us go into remote work.
I'll certainly work remotely in the next years, so I'm interested to see what I've learnt from this post then.
This post is a summary of this one.
