


More on Lifestyle

Sneaker News
3 years ago
This Month Will See The Release Of Travis Scott x Nike Footwear
Following the catastrophes at Astroworld, Travis Scott was swiftly vilified by both media outlets and fans alike, and the names who had previously supported him were quickly abandoned. Nike, on the other hand, remained silent, only delaying the release of La Flame's planned collaborations, such as the Air Max 1 and Air Trainer 1, indefinitely. While some may believe it is too soon for the artist to return to the spotlight, the Swoosh has other ideas, as Nice Kicks reveals that these exact sneakers will be released in May.
Both the Travis Scott x Nike Air Max 1 and the Travis Scott x Nike Air Trainer 1 are set to come in two colorways this month. Tinker Hatfield's renowned runner will meet La Flame's "Baroque Brown" and "Saturn Gold" make-ups, which have been altered with backwards Swooshes and outdoors-themed webbing. The high-top trainer is being customized with Hatfield's "Wheat" and "Grey Haze" palettes, both of which include zippers across the heel, co-branded patches, and other details.
See below for a closer look at the four footwear. TravisScott.com is expected to release the shoes on May 20th, according to Nice Kicks. Following that, on May 27th, Nike SNKRS will release the shoe.
Travis Scott x Nike Air Max 1 "Baroque Brown"
Release Date: 2022
Color: Baroque Brown/Lemon Drop/Wheat/Chile Red
Mens: $160
Style Code: DO9392-200
Pre-School: $85
Style Code: DN4169-200
Infant & Toddler: $70
Style Code: DN4170-200
Travis Scott x Nike Air Max 1 "Saturn Gold"
Release Date: 2022
Color: N/A
Mens: $160
Style Code: DO9392-700
Travis Scott x Nike Air Trainer 1 "Wheat"
Restock Date: May 27th, 2022 (Friday)
Original Release Date: May 20th, 2022 (Friday)
Color: N/A
Mens: $140
Style Code: DR7515-200
Travis Scott x Nike Air Trainer 1 "Grey Haze"
Restock Date: May 27th, 2022 (Friday)
Original Release Date: May 20th, 2022 (Friday)
Color: N/A
Mens: $140
Style Code: DR7515-001

Architectural Digest
3 years ago
Take a look at The One, a Los Angeles estate with a whopping 105,000 square feet of living area.
The interiors of the 105,000-square-foot property, which sits on a five-acre parcel in the wealthy Los Angeles suburb of Bel Air and is suitably titled The One, have been a well guarded secret. We got an intimate look inside this world-record-breaking property, as well as the creative and aesthetic geniuses behind it.
The estate appears to float above the city, surrounded on three sides by a moat and a 400-foot-long running track. Completed over eight years—and requiring 600 workers to build—the home was designed by architect Paul McClean and interior designer Kathryn Rotondi, who were enlisted by owner and developer Nile Niami to help it live up to its standard.
"This endeavor seemed both exhilarating and daunting," McClean says. However, the home's remarkable location and McClean's long-standing relationship with Niami persuaded him to "build something unique and extraordinary" rather than just take on the job.
And McClean has more than delivered.
The home's main entrance leads to a variety of meeting places with magnificent 360-degree views of the Pacific Ocean, downtown Los Angeles, and the San Gabriel Mountains, thanks to its 26-foot-high ceilings. There is water at the entrance area, as well as a sculpture and a bridge. "We often employ water in our design approach because it provides a sensory change that helps you acclimatize to your environment," McClean explains.
Niami wanted a neutral palette that would enable the environment and vistas to shine, so she used black, white, and gray throughout the house.
McClean has combined the home's inside with outside "to create that quintessential L.A. lifestyle but on a larger scale," he says, drawing influence from the local environment and history of Los Angeles modernism. "We separated the entertaining spaces from the living portions to make the house feel more livable. The former are on the lowest level, which serves as a plinth for the rest of the house and minimizes its apparent mass."
The home's statistics, in addition to its eye-catching style, are equally impressive. There are 42 bathrooms, 21 bedrooms, a 5,500-square-foot master suite, a 30-car garage gallery with two car-display turntables, a four-lane bowling alley, a spa level, a 30-seat movie theater, a "philanthropy wing (with a capacity of 200) for charity galas, a 10,000-square-foot sky deck, and five swimming pools.
Rotondi, the creator of KFR Design, collaborated with Niami on the interior design to create different spaces that flow into one another despite the house's grandeur. "I was especially driven to 'wow factor' components in the hospitality business," Rotondi says, citing top luxury hotel brands such as Aman, Bulgari, and Baccarat as sources of inspiration. Meanwhile, the home's color scheme, soft textures, and lighting are a nod to Niami and McClean's favorite Tom Ford boutique on Rodeo Drive.
The house boasts an extraordinary collection of art, including a butterfly work by Stephen Wilson on the lower level and a Niclas Castello bespoke panel in black and silver in the office, thanks to a cooperation between Creative Art Partners and Art Angels. There is also a sizable collection of bespoke furniture pieces from byShowroom.
A house of this size will never be erected again in Los Angeles, thanks to recently enacted city rules, so The One will truly be one of a kind. "For all of us, this project has been such a long and instructive trip," McClean says. "It was exciting to develop and approached with excitement, but I don't think any of us knew how much effort and time it would take to finish the project."

Sam Hickmann
3 years ago
The Jordan 6 Rings Reintroduce Classic Bulls
The Jordan 6 Rings return in Bulls colors, a deviation from previous releases. The signature red color is used on the midsole and heel, as well as the chenille patch and pull tab. The rest of the latter fixture is black, matching the outsole and adjacent Jumpman logos. Finally, white completes the look, from the leather mudguard to the lace unit. Here's a closer look at the Jordan 6 Rings. Sizes should be available soon on Nike.com and select retailers. Also, official photos of the Air Jordan 1 Denim have surfaced.
Jordan 6 Rings
Release Date: 2022
Color: N/A
Mens: $130
Style Code: 322992-126
You might also like
Tom Connor
3 years ago
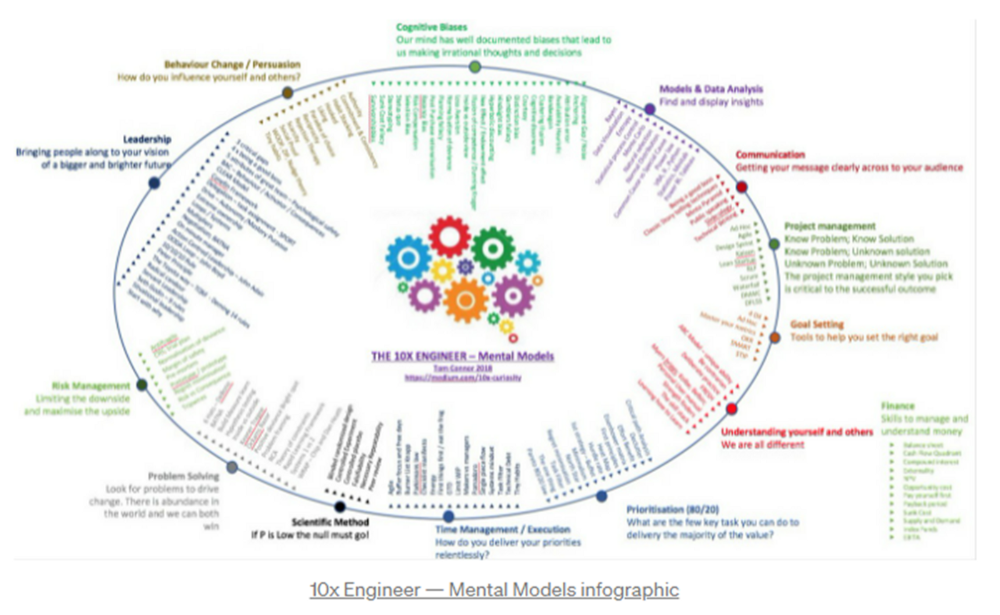
12 mental models that I use frequently
https://tomconnor.me/wp-content/uploads/2021/08/10x-Engineer-Mental-Models.pdf
I keep returning to the same mental models and tricks after writing and reading about a wide range of topics.
Top 12 mental models
12.
Survival bias - We perceive the surviving population as remarkable, yet they may have gotten there through sheer grit.
Survivorship bias affects us in many situations. Our retirement fund; the unicorn business; the winning team. We often study and imitate the last one standing. This can lead to genuine insights and performance improvements, but it can also lead us astray because the leader may just be lucky.
11.
The Helsinki Bus Theory - How to persevere Buss up!
Always display new work, and always be compared to others. Why? Easy. Keep riding. Stay on the fucking bus.
10.
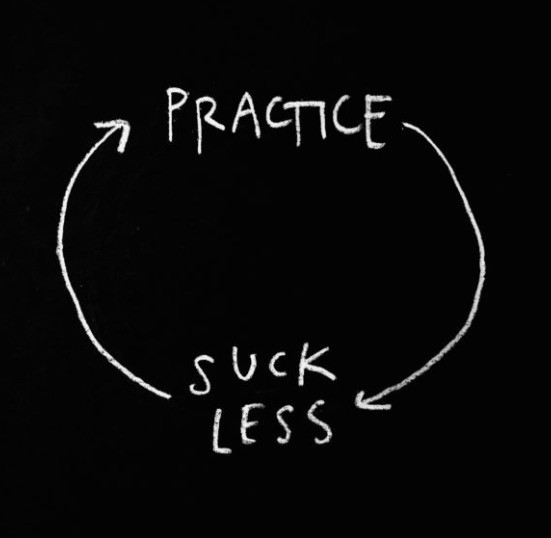
Until it sticks… Turning up every day… — Artists teach engineers plenty. Quality work over a career comes from showing up every day and starting.
9.
WRAP decision making process (Heath Brothers)
Decision-making WRAP Model:
W — Widen your Options
R — Reality test your assumptions
A — Attain Distance
P — Prepare to be wrong or Right
8.
Systems for knowledge worker excellence - Todd Henry and Cal Newport write about techniques knowledge workers can employ to build a creative rhythm and do better work.
Todd Henry's FRESH framework:
Focus: Keep the start in mind as you wrap up.
Relationships: close a loop that's open.
Pruning is an energy.
Set aside time to be inspired by stimuli.
Hours: Spend time thinking.
7.
BBT is learning from mistakes. Science has transformed the world because it constantly updates its theories in light of failures. Complexity guarantees failure. Do we learn or self-justify?
6.
The OODA Loop - Competitive advantage
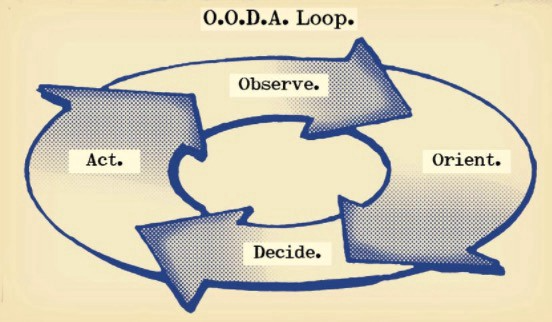
O: Observe: collect the data. Figure out exactly where you are, what’s happening.
O: Orient: analyze/synthesize the data to form an accurate picture.
D: Decide: select an action from possible options
A: Action: execute the action, and return to step (1)
Boyd's approach indicates that speed and agility are about information processing, not physical reactions. They form feedback loops. More OODA loops improve speed.
5.
Leaders who try to impose order in a complex situation fail; those who set the stage, step back, and allow patterns to develop win.
https://vimeo.com/640941172?embedded=true&source=vimeo_logo&owner=11999906
4.
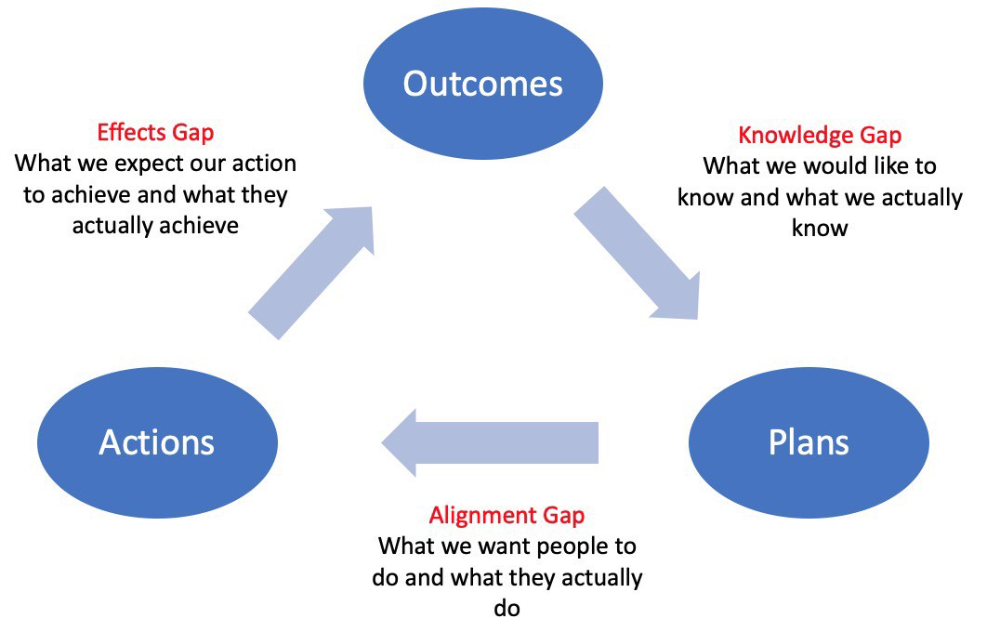
Information Gap - The discrepancy between what we know and what we would like to know
Gap in Alignment - What individuals actually do as opposed to what we wish them to do
Effects Gap - the discrepancy between our expectations and the results of our actions
3.
Theory of Constraints — The Goal - To maximize system production, maximize bottleneck throughput.
Goldratt creates a five-step procedure:
Determine the restriction
Improve the restriction.
Everything else should be based on the limitation.
Increase the restriction
Go back to step 1 Avoid letting inertia become a limitation.
Any non-constraint improvement is an illusion.
2.
Serendipity and the Adjacent Possible - Why do several amazing ideas emerge at once? How can you foster serendipity in your work?
You need specialized abilities to reach to the edge of possibilities, where you can pursue exciting tasks that will change the world. Few people do it since it takes a lot of hard work. You'll stand out if you do.
Most people simply lack the comfort with discomfort required to tackle really hard things. At some point, in other words, there’s no way getting around the necessity to clear your calendar, shut down your phone, and spend several hard days trying to make sense of the damn proof.
1.
Boundaries of failure - Rasmussen's accident model.
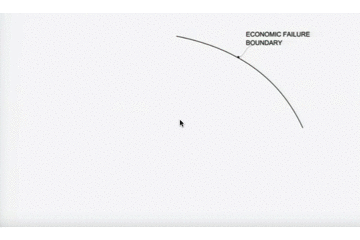
Rasmussen modeled this. It has economic, workload, and performance boundaries.
The economic boundary is a company's profit zone. If the lights are on, you're within the economic boundaries, but there's pressure to cut costs and do more.
Performance limit reflects system capacity. Taking shortcuts is a human desire to minimize work. This is often necessary to survive because there's always more labor.
Both push operating points toward acceptable performance. Personal or process safety, or equipment performance.
If you exceed acceptable performance, you'll push back, typically forcefully.
Isaiah McCall
3 years ago
There is a new global currency emerging, but it is not bitcoin.
America should avoid BRICS
Vladimir Putin has watched videos of Muammar Gaddafi's CIA-backed demise.
Gaddafi...
Thief.
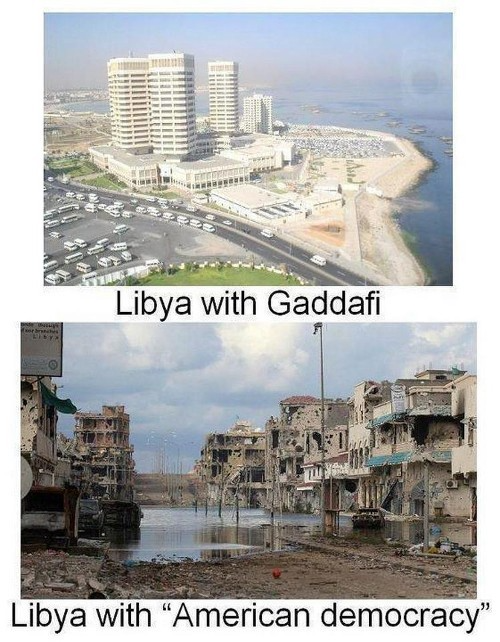
Did you know Gaddafi wanted a gold-backed dinar for Africa? Because he considered our global financial system was a Ponzi scheme, he wanted to discontinue trading oil in US dollars.
Or, Gaddafi's Libya enjoyed Africa's highest quality of living before becoming freed. Pictured:
Vladimir Putin is a nasty guy, but he had his reasons for not mentioning NATO assisting Ukraine in resisting US imperialism. Nobody tells you. Sure.
The US dollar's corruption post-2008, debasement by quantitative easing, and lack of value are key factors. BRICS will replace the dollar.
BRICS aren't bricks.
Economy-related.
Brazil, Russia, India, China, and South Africa have cooperated for 14 years to fight U.S. hegemony with a new international currency: BRICS.
BRICS is mostly comical. Now. Saudi Arabia, the second-largest oil hegemon, wants to join.
So what?
The New World Currency is BRICS
Russia was kicked out of G8 for its aggressiveness in Crimea in 2014.
It's now G7.
No biggie, said Putin, he said, and I quote, “Bon appetite.”
He was prepared. China, India, and Brazil lead the New World Order.
Together, they constitute 40% of the world's population and, according to the IMF, 50% of the world's GDP by 2030.
Here’s what the BRICS president Marcos Prado Troyjo had to say earlier this year about no longer needing the US dollar: “We have implemented the mechanism of mutual settlements in rubles and rupees, and there is no need for our countries to use the dollar in mutual settlements. And today a similar mechanism of mutual settlements in rubles and yuan is being developed by China.”
Ick. That's D.C. and NYC warmongers licking their chops for WW3 nasty.
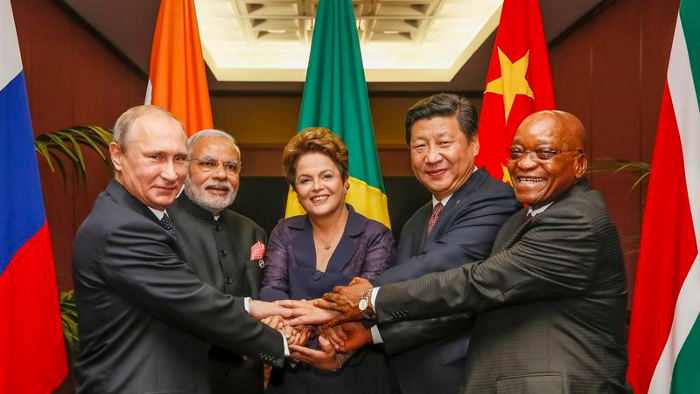
Here's a lovely picture of BRICS to relax you:
If Saudi Arabia joins BRICS, as President Mohammed Bin Salman has expressed interest, a majority of the Middle East will have joined forces to construct a new world order not based on the US currency.
I'm not sure of the new acronym.
SBRICSS? CIRBSS? CRIBSS?
The Reason America Is Harvesting What It Sowed
BRICS began 14 years ago.
14 years ago, what occurred? Concentrate. It involved CDOs, bad subprime mortgages, and Wall Street quants crunching numbers.
2008 recession
When two nations trade, they do so in US dollars, not Euros or gold.
What happened when 2008, an avoidable crisis caused by US banks' cupidity and ignorance, what happened?
Everyone WORLDWIDE felt the pain.
Mostly due to corporate America's avarice.
This should have been a warning that China and Russia had enough of our bs. Like when France sent a battleship to America after Nixon scrapped the gold standard. The US was warned to shape up or be dethroned (or at least try).
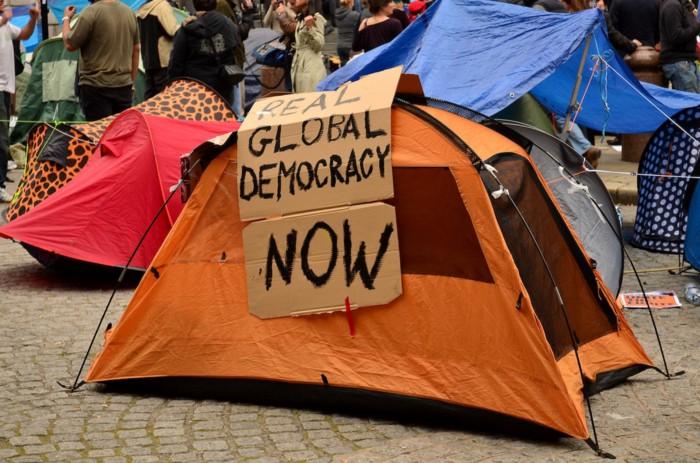
Nixon improved in 1971. Kinda. Invented PetroDollar.
Another BS system that unfairly favors America and possibly pushed Russia, China, and Saudi Arabia into BRICS.
The PetroDollar forces oil-exporting nations to trade in US dollars and invest in US Treasury bonds. Brilliant. Genius evil.
Our misdeeds are:
In conflicts that are not its concern, the USA uses the global reserve currency as a weapon.
Targeted nations abandon the dollar, and rightfully so, as do nations that depend on them for trade in vital resources.
The dollar's position as the world's reserve currency is in jeopardy, which could have disastrous economic effects.
Although we have actually sown our own doom, we appear astonished. According to the Bible, whomever sows to appease his sinful nature will reap destruction from that nature whereas whoever sows to appease the Spirit will reap eternal life from the Spirit.
Americans, even our leaders, lack caution and delayed pleasure. When our unsustainable systems fail, we double down. Bailouts of the banks in 2008 were myopic, puerile, and another nail in America's hegemony.
America has screwed everyone.
We're unpopular.
The BRICS's future
It's happened before.
Saddam Hussein sold oil in Euros in 2000, and the US invaded Iraq a month later. The media has devalued the word conspiracy. The Iraq conspiracy.
There were no WMDs, but NYT journalists like Judy Miller drove Americans into a warmongering frenzy because Saddam would ruin the PetroDollar. Does anyone recall that this war spawned ISIS?
I think America has done good for the world. You can make a convincing case that we're many people's villain.
Learn more in Confessions of an Economic Hitman, The Devil's Chessboard, or Tyranny of the Federal Reserve. Or ignore it. That's easier.
We, America, should extend an olive branch, ask for forgiveness, and learn from our faults, as the Tao Te Ching advises. Unlikely. Our population is apathetic and stupid, and our government is corrupt.
Argentina, Iran, Egypt, and Turkey have also indicated interest in joining BRICS. They're also considering making it gold-backed, making it a new world reserve currency.
You should pay attention.
Thanks for reading!

Percy Bolmér
3 years ago
Ethereum No Longer Consumes A Medium-Sized Country's Electricity To Run
The Merge cut Ethereum's energy use by 99.5%.

The Crypto community celebrated on September 15, 2022. This day, Ethereum Merged. The entire blockchain successfully merged with the Beacon chain, and it was so smooth you barely noticed.
Many have waited, dreaded, and longed for this day.
Some investors feared the network would break down, while others envisioned a seamless merging.
Speculators predict a successful Merge will lead investors to Ethereum. This could boost Ethereum's popularity.
What Has Changed Since The Merge
The merging transitions Ethereum mainnet from PoW to PoS.
PoW sends a mathematical riddle to computers worldwide (miners). First miner to solve puzzle updates blockchain and is rewarded.
The puzzles sent are power-intensive to solve, so mining requires a lot of electricity. It's sent to every miner competing to solve it, requiring duplicate computation.
PoS allows investors to stake their coins to validate a new transaction. Instead of validating a whole block, you validate a transaction and get the fees.
You can validate instead of mine. A validator stakes 32 Ethereum. After staking, the validator can validate future blocks.
Once a validator validates a block, it's sent to a randomly selected group of other validators. This group verifies that a validator is not malicious and doesn't validate fake blocks.
This way, only one computer needs to solve or validate the transaction, instead of all miners. The validated block must be approved by a small group of validators, causing duplicate computation.
PoS is more secure because validating fake blocks results in slashing. You lose your bet tokens. If a validator signs a bad block or double-signs conflicting blocks, their ETH is burned.
Theoretically, Ethereum has one block every 12 seconds, so a validator forging a block risks burning 1 Ethereum for 12 seconds of transactions. This makes mistakes expensive and risky.
What Impact Does This Have On Energy Use?
Cryptocurrency is a natural calamity, sucking electricity and eating away at the earth one transaction at a time.
Many don't know the environmental impact of cryptocurrencies, yet it's tremendous.
A single Ethereum transaction used to use 200 kWh and leave a large carbon imprint. This update reduces global energy use by 0.2%.
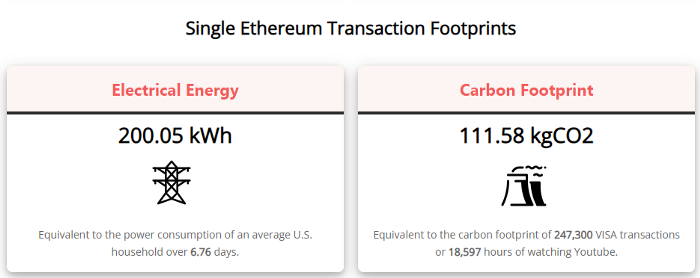
Ethereum will submit a challenge to one validator, and that validator will forward it to randomly selected other validators who accept it.
This reduces the needed computing power.
They expect a 99.5% reduction, therefore a single transaction should cost 1 kWh.
Carbon footprint is 0.58 kgCO2, or 1,235 VISA transactions.
This is a big Ethereum blockchain update.
I love cryptocurrency and Mother Earth.