


Apple AR/VR heaset
Apple is said to have opted for a standalone AR/VR headset over a more powerful tethered model.
It has had a tumultuous history.
Apple's alleged mixed reality headset appears to be the worst-kept secret in tech, and a fresh story from The Information is jam-packed with details regarding the device's rocky development.
Apple's decision to use a separate headgear is one of the most notable aspects of the story. Apple had yet to determine whether to pursue a more powerful VR headset that would be linked with a base station or a standalone headset. According to The Information, Apple officials chose the standalone product over the version with the base station, which had a processor that later arrived as the M1 Ultra. In 2020, Bloomberg published similar information.
That decision appears to have had a long-term impact on the headset's development. "The device's many processors had already been in development for several years by the time the choice was taken, making it impossible to go back to the drawing board and construct, say, a single chip to handle all the headset's responsibilities," The Information stated. "Other difficulties, such as putting 14 cameras on the headset, have given hardware and algorithm engineers stress."
Jony Ive remained to consult on the project's design even after his official departure from Apple, according to the story. Ive "prefers" a wearable battery, such as that offered by Magic Leap. Other prototypes, according to The Information, placed the battery in the headset's headband, and it's unknown which will be used in the final design.
The headset was purportedly shown to Apple's board of directors last week, indicating that a public unveiling is imminent. However, it is possible that it will not be introduced until later this year, and it may not hit shop shelves until 2023, so we may have to wait a bit to try it.
For further down the line, Apple is working on a pair of AR spectacles that appear like Ray-Ban wayfarer sunglasses, but according to The Information, they're "still several years away from release." (I'm interested to see how they compare to Meta and Ray-Bans' true wayfarer-style glasses.)
More on Technology

Tom Smykowski
3 years ago
CSS Scroll-linked Animations Will Transform The Web's User Experience
We may never tap again in ten years.
I discussed styling websites and web apps on smartwatches in my earlier article on W3C standardization.
The Parallax Chronicles
Section containing examples and flying objects
Another intriguing Working Draft I found applies to all devices, including smartphones.
These pages may have something intriguing. Take your time. Return after scrolling:
What connects these three pages?
JustinWick at English Wikipedia • CC-BY-SA-3.0
Scroll-linked animation, commonly called parallax, is the effect.
WordPress theme developers' quick setup and low-code tools made the effect popular around 2014.
Parallax: Why Designers Love It
The chapter that your designer shouldn't read
Online video playback required searching, scrolling, and clicking ten years ago. Scroll and click four years ago.
Some video sites let you swipe to autoplay the next video from an endless list.
UI designers create scrollable pages and apps to accommodate the behavioral change.
Web interactivity used to be mouse-based. Clicking a button opened a help drawer, and hovering animated it.
However, a large page with more material requires fewer buttons and less interactiveness.
Designers choose scroll-based effects. Design and frontend developers must fight the trend but prepare for the worst.
How to Create Parallax
The component that you might want to show the designer
JavaScript-based effects track page scrolling and apply animations.
Javascript libraries like lax.js simplify it.
Using it needs a lot of human mathematical and physical computations.
Your asset library must also be prepared to display your website on a laptop, television, smartphone, tablet, foldable smartphone, and possibly even a microwave.
Overall, scroll-based animations can be solved better.
CSS Scroll-linked Animations
CSS makes sense since it's presentational. A Working Draft has been laying the groundwork for the next generation of interactiveness.
The new CSS property scroll-timeline powers the feature, which MDN describes well.
Before testing it, you should realize it is poorly supported:
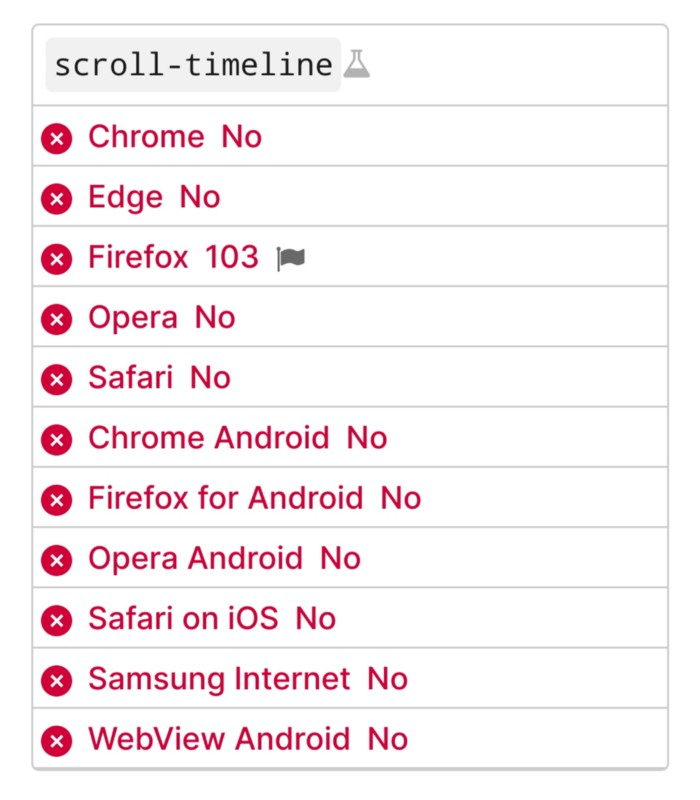
Firefox 103 currently supports it.
There is also a polyfill, with some demo examples to explore.
Summary
Web design was a protracted process. Started with pages with static backdrop images and scrollable text. Artists and designers may use the scroll-based animation CSS API to completely revamp our web experience.
It's a promising frontier. This post may attract a future scrollable web designer.
Ps. I have created flashcards for HTML, Javascript etc. Check them out!

Jano le Roux
3 years ago
Apple Quietly Introduces A Revolutionary Savings Account That Kills Banks
Would you abandon your bank for Apple?
Banks are struggling.
not as a result of inflation
not due to the economic downturn.
not due to the conflict in Ukraine.
But because they’re underestimating Apple.
Slowly but surely, Apple is looking more like a bank.
An easy new savings account like Apple
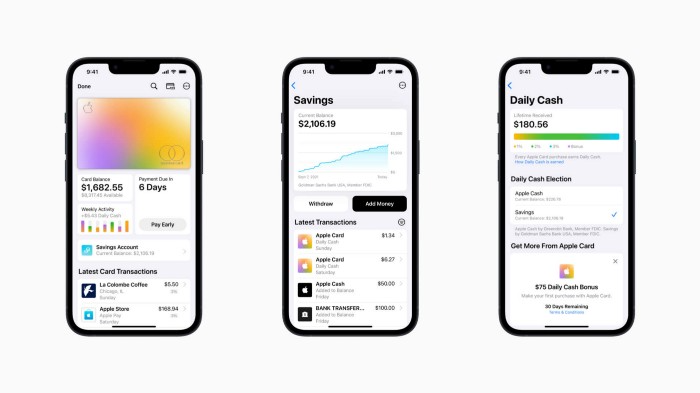
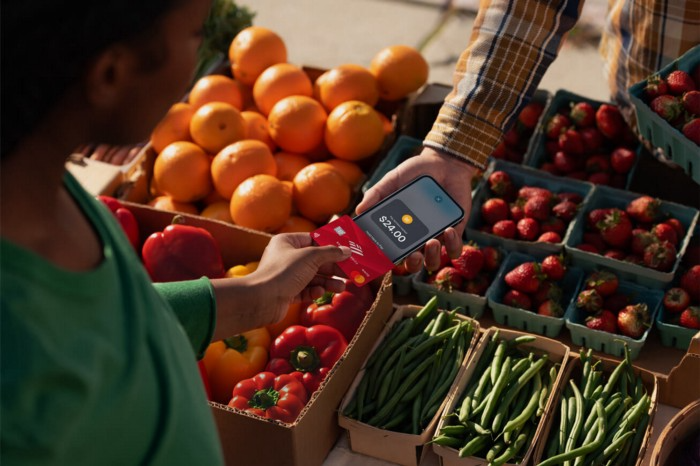
Apple has a new savings account.
Apple says Apple Card users may set up and manage savings straight in Wallet.
No more charges
Colorfully high yields
With no minimum balance
No minimal down payments
Most consumer-facing banks will have to match Apple's offer or suffer disruption.
Users may set it up from their iPhones without traveling to a bank or filling out paperwork.
It’s built into the iPhone in your pocket.
So now more waiting for slow approval processes.
Once the savings account is set up, Apple will automatically transfer all future Daily Cash into it. Users may also add these cash to an Apple Cash card in their Apple Wallet app and adjust where Daily Cash is paid at any time.

Apple Pay and Apple Wallet VP Jennifer Bailey:
Savings enables Apple Card users to grow their Daily Cash rewards over time, while also saving for the future.
Bailey says Savings adds value to Apple Card's Daily Cash benefit and offers another easy-to-use tool to help people lead healthier financial lives.
Transfer money from a linked bank account or Apple Cash to a Savings account. Users can withdraw monies to a connected bank account or Apple Cash card without costs.
Once set up, Apple Card customers can track their earnings via Wallet's Savings dashboard. This dashboard shows their account balance and interest.
This product targets younger people as the easiest way to start a savings account on the iPhone.
Why would a Gen Z account holder travel to the bank if their iPhone could be their bank?
Using this concept, Apple will transform the way we think about banking by 2030.
Two other nightmares keep bankers awake at night
Apple revealed two new features in early 2022 that banks and payment gateways hated.
Tap to Pay with Apple
Late Apple Pay
They startled the industry.
Tap To Pay converts iPhones into mobile POS card readers. Apple Pay Later is pushing the BNPL business in a consumer-friendly direction, hopefully ending dodgy lending practices.
Tap to Pay with Apple
iPhone POS
Millions of US merchants, from tiny shops to huge establishments, will be able to accept Apple Pay, contactless credit and debit cards, and other digital wallets with a tap.
No hardware or payment terminal is needed.
Revolutionary!
Stripe has previously launched this feature.
Tap to Pay on iPhone will provide companies with a secure, private, and quick option to take contactless payments and unleash new checkout experiences, said Bailey.
Apple's solution is ingenious. Brilliant!
Bailey says that payment platforms, app developers, and payment networks are making it easier than ever for businesses of all sizes to accept contactless payments and thrive.
I admire that Apple is offering this up to third-party services instead of closing off other functionalities.
Slow POS terminals, farewell.
Late Apple Pay
Pay Apple later.

Apple Pay Later enables US consumers split Apple Pay purchases into four equal payments over six weeks with no interest or fees.
The Apple ecosystem integration makes this BNPL scheme unique. Nonstick. No dumb forms.
Frictionless.
Just double-tap the button.
Apple Pay Later was designed with users' financial well-being in mind. Apple makes it easy to use, track, and pay back Apple Pay Later from Wallet.
Apple Pay Later can be signed up in Wallet or when using Apple Pay. Apple Pay Later can be used online or in an app that takes Apple Pay and leverages the Mastercard network.
Apple Pay Order Tracking helps consumers access detailed receipts and order tracking in Wallet for Apple Pay purchases at participating stores.
Bad BNPL suppliers, goodbye.
Most bankers will be caught in Apple's eye playing mini golf in high-rise offices.
The big problem:
Banks still think about features and big numbers just like other smartphone makers did not too long ago.
Apple thinks about effortlessness, seamlessness, and frictionlessness that just work through integrated hardware and software.
Let me know what you think Apple’s next power moves in the banking industry could be.

caroline sinders
3 years ago
Holographic concerts are the AI of the Future.
A few days ago, I was discussing dall-e with two art and tech pals. One artist acquaintance said she knew a frightened illustrator. Would the ability to create anything with a click derail her career? The artist feared this. My curator friend smiled and said this has always been a dread among artists. When the camera was invented, didn't painters say this? Even in the Instagram era, painting exists.
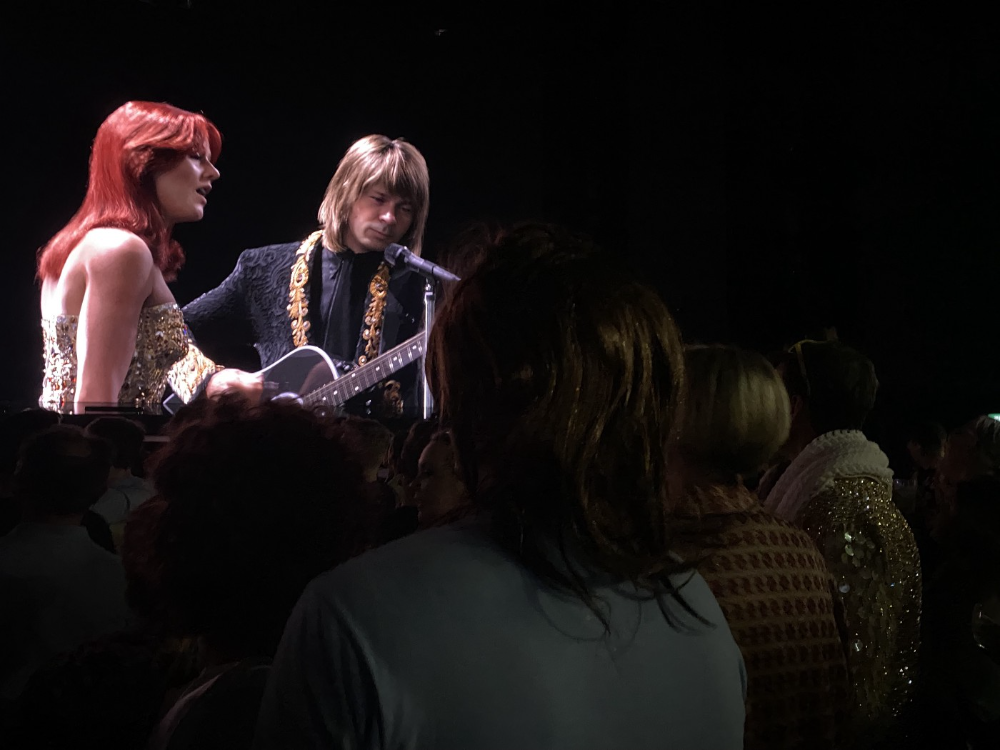
When art and technology collide, there's room for innovation, experimentation, and fear — especially if the technology replicates or replaces art making. What is art's future with dall-e? How does technology affect music, beyond visual art? Recently, I saw "ABBA Voyage," a holographic ABBA concert in London.
"Abba voyage?" my phone asked in early March. A Gen X friend I met through a fashion blogging ring texted me.
"What's abba Voyage?" I asked while opening my front door with keys and coffee.
We're going! Marti, visiting London, took me to a show.
"Absolutely no ABBA songs here." I responded.
My parents didn't play ABBA much, so I don't know much about them. Dad liked Jimi Hendrix, Cream, Deep Purple, and New Orleans jazz. Marti told me ABBA Voyage was a holographic ABBA show with a live band.
The show was fun, extraordinary fun. Nearly everyone on the dance floor wore wigs, ankle-breaking platforms, sequins, and bellbottoms. I saw some millennials and Zoomers among the boomers.
I was intoxicated by the experience.
Automatons date back to the 18th-century mechanical turk. The mechanical turk was a chess automaton operated by a person. The mechanical turk seemed to perform like a human without human intervention, but it required a human in the loop to work properly.
Humans have used non-humans in entertainment for centuries, such as puppets, shadow play, and smoke and mirrors. A show can have animatronic, technological, and non-technological elements, and a live show can blur real and illusion. From medieval puppet shows to mechanical turks to AI filters, bots, and holograms, entertainment has evolved over time.
I'm not a hologram skeptic, but I'm skeptical of technology, especially since I work with it. I love live performances, I love hearing singers breathe, forget lines, and make jokes. Live shows are my favorite because I love watching performers make mistakes or interact with the audience. ABBA Voyage was different.
Marti and I traveled to Manchester after ABBA Voyage to see Liam Gallagher. Similar but different vibe. Similar in that thousands dressed up for the show. ABBA's energy was dizzying. 90s chic replaced sequins in the crowd. Doc Martens, nylon jackets, bucket hats, shaggy hair. The Charlatans and Liam Gallagher opened and closed, respectively. Fireworks. Incredible. People went crazy. Yelling exhausted my voice.
This week in music featured AI-enabled holograms and a decades-old rocker. Both are warm and gooey in our memories.
After seeing both, I'm wondering if we need AI hologram shows. Why? Is it good?
Like everything tech-related, my answer is "maybe." Because context and performance matter. Liam Gallagher and ABBA both had great, different shows.
For a hologram to work, it must be impossible and big. It must be big, showy, and improbable to justify a hologram. It must feel...expensive, like a stadium pop show. According to a quick search, ABBA broke up on bad terms. Reuniting is unlikely. This is also why Prince or Tupac hologram shows work. We can only engage with their legacy through covers or...holograms.
I drove around listening to the radio a few weeks ago. "Dreaming of You" by Selena played. Selena's music defined my childhood. I sang along and turned up the volume (or as loud as my husband would allow me while driving on the highway).
I discovered Selena's music six months after her death, so I never saw her perform live. My babysitter Melissa played me her album after I moved to Houston. Melissa took me to see the Selena movie five times when it came out. I quickly wore out my VHS copy. I constantly sang "Bibi Bibi Bom Bom" and "Como la Flor." I love Selena. A Selena hologram? Yes, probably.
Instagram advertised a cellist's Arthur Russell tribute show. Russell is another deceased artist I love. I almost walked down the aisle to "This is How We Walk on the Moon," but our cellist couldn't find it. Instead, I walked to Magnetic Fields' "The Book of Love." I "discovered" Russell after a friend introduced me to his music a few years ago.
I use these as analogies for the Liam Gallagher and ABBA concerts.
You have no idea how much I'd pay to see a hologram of Selena's 1995 Houston Livestock Show and Rodeo concert. Arthur Russell's hologram is unnecessary. Russell's work was intimate and performance-based. We can't separate his life from his legacy; popular audiences overlooked his genius. He died of AIDS broke. Like Selena, he died prematurely. Given his music and history, another performer would be a better choice than a hologram. He's no Selena. Selena could have rivaled Beyonce.
Pop shows' size works for holograms. Along with ABBA holograms, there was an anime movie and a light show that would put Tron to shame. ABBA created a tourable stadium show. The event was lavish, expensive, and well-planned. Pop, unlike rock, isn't gritty. Liam Gallagher hologram? No longer impossible, it wouldn't work. He's touring. I'm not sure if a rockstar alone should be rendered as a hologram; it was the show that made ABBA a hologram.
Holograms, like AI, are part of the future of entertainment, but not all of it. Because only modern interpretations of Arthur Russell's work reveal his legacy. That's his legacy.
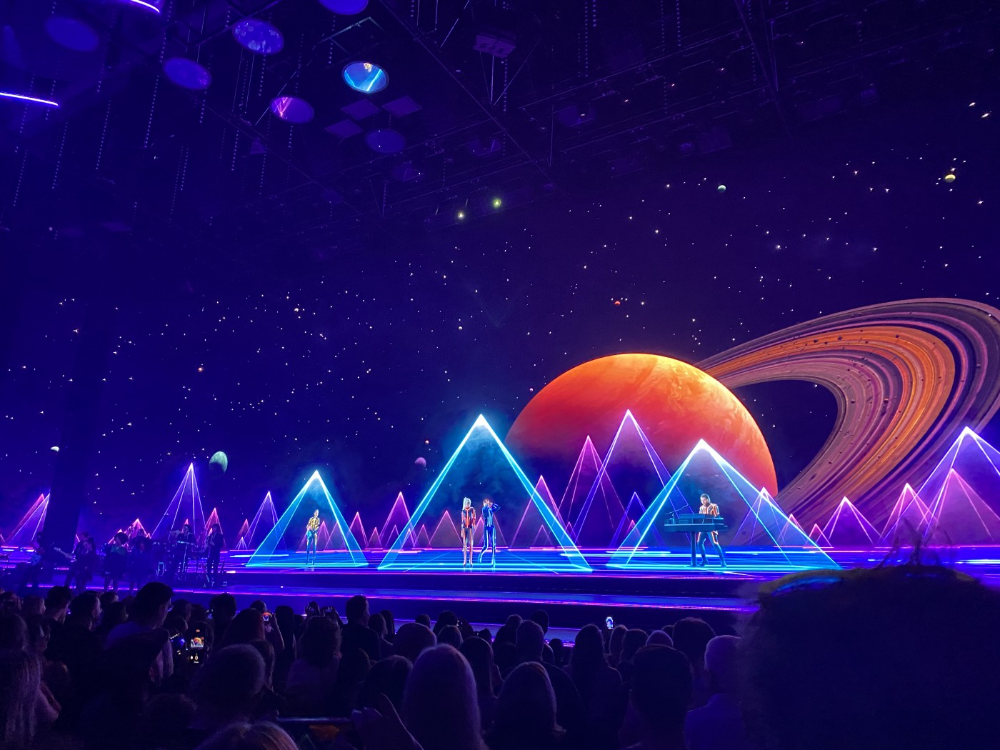
Large-scale arena performers may use holograms in the future, but the experience must be impossible. A teacher once said that the only way to convey emotion in opera is through song, and I feel the same way about holograms, AR, VR, and mixed reality. A story's impossibility must make sense, like in opera. Impossibility and bombastic performance must be present for an immersive element to "work." ABBA was an impossible and improbable experience, which made it magical. It helped the holographic show work.
Marti told me about ABBA Voyage. She said it was a great concert. Marti has worked in music since the 1990s. She's a music expert; she's seen many shows.
Ai isn't a god or sentient, and the ABBA holograms aren't real. The renderings were glassy-eyed, flat, and robotic, like the Polar Express or the Jaws shark. Even today, the uncanny valley is insurmountable. We know it's not real because it's not about reality. It was about a suspended moment and performance feelings.
I knew this was impossible, an 'unreal' experience, but the emotions I felt were real, like watching a movie or tv show. Perhaps this is one of the better uses of AI, like CGI and special effects, like the beauty of entertainment- we were enraptured and entertained for hours. I've been playing ABBA since then.
You might also like

Jim Siwek
3 years ago
In 2022, can a lone developer be able to successfully establish a SaaS product?
In the early 2000s, I began developing SaaS. I helped launch an internet fax service that delivered faxes to email inboxes. Back then, it saved consumers money and made the procedure easier.
Google AdWords was young then. Anyone might establish a new website, spend a few hundred dollars on keywords, and see dozens of new paying clients every day. That's how we launched our new SaaS, and these clients stayed for years. Our early ROI was sky-high.
Changing times
The situation changed dramatically after 15 years. Our paid advertising cost $200-$300 for every new customer. Paid advertising takes three to four years to repay.
Fortunately, we still had tens of thousands of loyal clients. Good organic rankings gave us new business. We needed less sponsored traffic to run a profitable SaaS firm.
Is it still possible?
Since selling our internet fax firm, I've dreamed about starting a SaaS company. One I could construct as a lone developer and progressively grow a dedicated customer base, as I did before in a small team.
It seemed impossible to me. Solo startups couldn't afford paid advertising. SEO was tough. Even the worst SaaS startup ideas attracted VC funding. How could I compete with startups that could hire great talent and didn't need to make money for years (or ever)?
The One and Only Way to Learn
After years of talking myself out of SaaS startup ideas, I decided to develop and launch one. I needed to know if a solitary developer may create a SaaS app in 2022.
Thus, I did. I invented webwriter.ai, an AI-powered writing tool for website content, from hero section headlines to blog posts, this year. I soft-launched an MVP in July.
Considering the Issue
Now that I've developed my own fully capable SaaS app for site builders and developers, I wonder if it's still possible. Can webwriter.ai be successful?
I know webwriter.ai's proposal is viable because Jasper.ai and Grammarly are also AI-powered writing tools. With competition comes validation.
To Win, Differentiate
To compete with well-funded established brands, distinguish to stand out to a portion of the market. So I can speak directly to a target user, unlike larger competition.
I created webwriter.ai to help web builders and designers produce web content rapidly. This may be enough differentiation for now.
Budget-Friendly Promotion
When paid search isn't an option, we get inventive. There are more tools than ever to promote a new website.
Organic Results
on social media (Twitter, Instagram, TikTok, LinkedIn)
Marketing with content that is compelling
Link Creation
Listings in directories
references made in blog articles and on other websites
Forum entries
The Beginning of the Journey
As I've labored to construct my software, I've pondered a new mantra. Not sure where that originated from, but I like it. I'll live by it and teach my kids:
“Do the work.”

Jonathan Vanian
4 years ago
What is Terra? Your guide to the hot cryptocurrency
With cryptocurrencies like Bitcoin, Ether, and Dogecoin gyrating in value over the past few months, many people are looking at so-called stablecoins like Terra to invest in because of their more predictable prices.
Terraform Labs, which oversees the Terra cryptocurrency project, has benefited from its rising popularity. The company said recently that investors like Arrington Capital, Lightspeed Venture Partners, and Pantera Capital have pledged $150 million to help it incubate various crypto projects that are connected to Terra.
Terraform Labs and its partners have built apps that operate on the company’s blockchain technology that helps keep a permanent and shared record of the firm’s crypto-related financial transactions.
Here’s what you need to know about Terra and the company behind it.
What is Terra?
Terra is a blockchain project developed by Terraform Labs that powers the startup’s cryptocurrencies and financial apps. These cryptocurrencies include the Terra U.S. Dollar, or UST, that is pegged to the U.S. dollar through an algorithm.
Terra is a stablecoin that is intended to reduce the volatility endemic to cryptocurrencies like Bitcoin. Some stablecoins, like Tether, are pegged to more conventional currencies, like the U.S. dollar, through cash and cash equivalents as opposed to an algorithm and associated reserve token.
To mint new UST tokens, a percentage of another digital token and reserve asset, Luna, is “burned.” If the demand for UST rises with more people using the currency, more Luna will be automatically burned and diverted to a community pool. That balancing act is supposed to help stabilize the price, to a degree.
“Luna directly benefits from the economic growth of the Terra economy, and it suffers from contractions of the Terra coin,” Terraform Labs CEO Do Kwon said.
Each time someone buys something—like an ice cream—using UST, that transaction generates a fee, similar to a credit card transaction. That fee is then distributed to people who own Luna tokens, similar to a stock dividend.
Who leads Terra?
The South Korean firm Terraform Labs was founded in 2018 by Daniel Shin and Kwon, who is now the company’s CEO. Kwon is a 29-year-old former Microsoft employee; Shin now heads the Chai online payment service, a Terra partner. Kwon said many Koreans have used the Chai service to buy goods like movie tickets using Terra cryptocurrency.
Terraform Labs does not make money from transactions using its crypto and instead relies on outside funding to operate, Kwon said. It has raised $57 million in funding from investors like HashKey Digital Asset Group, Divergence Digital Currency Fund, and Huobi Capital, according to deal-tracking service PitchBook. The amount raised is in addition to the latest $150 million funding commitment announced on July 16.
What are Terra’s plans?
Terraform Labs plans to use Terra’s blockchain and its associated cryptocurrencies—including one pegged to the Korean won—to create a digital financial system independent of major banks and fintech-app makers. So far, its main source of growth has been in Korea, where people have bought goods at stores, like coffee, using the Chai payment app that’s built on Terra’s blockchain. Kwon said the company’s associated Mirror trading app is experiencing growth in China and Thailand.
Meanwhile, Kwon said Terraform Labs would use its latest $150 million in funding to invest in groups that build financial apps on Terra’s blockchain. He likened the scouting and investing in other groups as akin to a “Y Combinator demo day type of situation,” a reference to the popular startup pitch event organized by early-stage investor Y Combinator.
The combination of all these Terra-specific financial apps shows that Terraform Labs is “almost creating a kind of bank,” said Ryan Watkins, a senior research analyst at cryptocurrency consultancy Messari.
In addition to cryptocurrencies, Terraform Labs has a number of other projects including the Anchor app, a high-yield savings account for holders of the group’s digital coins. Meanwhile, people can use the firm’s associated Mirror app to create synthetic financial assets that mimic more conventional ones, like “tokenized” representations of corporate stocks. These synthetic assets are supposed to be helpful to people like “a small retail trader in Thailand” who can more easily buy shares and “get some exposure to the upside” of stocks that they otherwise wouldn’t have been able to obtain, Kwon said. But some critics have said the U.S. Securities and Exchange Commission may eventually crack down on synthetic stocks, which are currently unregulated.
What do critics say?
Terra still has a long way to go to catch up to bigger cryptocurrency projects like Ethereum.
Most financial transactions involving Terra-related cryptocurrencies have originated in Korea, where its founders are based. Although Terra is becoming more popular in Korea thanks to rising interest in its partner Chai, it’s too early to say whether Terra-related currencies will gain traction in other countries.
Terra’s blockchain runs on a “limited number of nodes,” said Messari’s Watkins, referring to the computers that help keep the system running. That helps reduce latency that may otherwise slow processing of financial transactions, he said.
But the tradeoff is that Terra is less “decentralized” than other blockchain platforms like Ethereum, which is powered by thousands of interconnected computing nodes worldwide. That could make Terra less appealing to some blockchain purists.

Dung Claire Tran
3 years ago
Is the future of brand marketing with virtual influencers?
Digital influences that mimic humans are rising.
Lil Miquela has 3M Instagram followers, 3.6M TikTok followers, and 30K Twitter followers. She's been on the covers of Prada, Dior, and Calvin Klein magazines. Miquela released Not Mine in 2017 and launched Hard Feelings at Lollapazoolas this year. This isn't surprising, given the rise of influencer marketing.
This may be unexpected. Miquela's fake. Brud, a Los Angeles startup, produced her in 2016.
Lil Miquela is one of many rising virtual influencers in the new era of social media marketing. She acts like a real person and performs the same tasks as sports stars and models.
The emergence of online influencers
Before 2018, computer-generated characters were rare. Since the virtual human industry boomed, they've appeared in marketing efforts worldwide.
In 2020, the WHO partnered up with Atlanta-based virtual influencer Knox Frost (@knoxfrost) to gather contributions for the COVID-19 Solidarity Response Fund.
Lu do Magalu (@magazineluiza) has been the virtual spokeswoman for Magalu since 2009, using social media to promote reviews, product recommendations, unboxing videos, and brand updates. Magalu's 10-year profit was $552M.
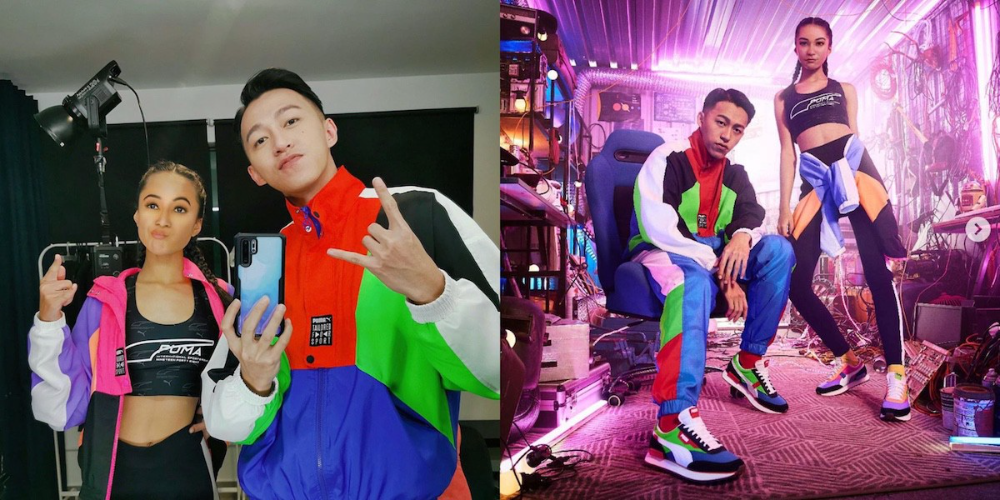
In 2020, PUMA partnered with Southeast Asia's first virtual model, Maya (@mayaaa.gram). She joined Singaporean actor Tosh Zhang in the PUMA campaign. Local virtual influencer Ava Lee-Graham (@avagram.ai) partnered with retail firm BHG to promote their in-house labels.
In Japan, Imma (@imma.gram) is the face of Nike, PUMA, Dior, Salvatore Ferragamo SpA, and Valentino. Imma's bubblegum pink bob and ultra-fine fashion landed her on the cover of Grazia magazine.

Lotte Home Shopping created Lucy (@here.me.lucy) in September 2020. She made her TV debut as a Christmas show host in 2021. Since then, she has 100K Instagram followers and 13K TikTok followers.
Liu Yiexi gained 3 million fans in five days on Douyin, China's TikTok, in 2021. Her two-minute video went viral overnight. She's posted 6 videos and has 830 million Douyin followers.

China's virtual human industry was worth $487 million in 2020, up 70% year over year, and is expected to reach $875.9 million in 2021.
Investors worldwide are interested. Immas creator Aww Inc. raised $1 million from Coral Capital in September 2020, according to Bloomberg. Superplastic Inc., the Vermont-based startup behind influencers Janky and Guggimon, raised $16 million by 2020. Craft Ventures, SV Angels, and Scooter Braun invested. Crunchbase shows the company has raised $47 million.
The industries they represent, including Augmented and Virtual reality, were worth $14.84 billion in 2020 and are projected to reach $454.73 billion by 2030, a CAGR of 40.7%, according to PR Newswire.
Advantages for brands
Forbes suggests brands embrace computer-generated influencers. Examples:
Unlimited creative opportunities: Because brands can personalize everything—from a person's look and activities to the style of their content—virtual influencers may be suited to a brand's needs and personalities.
100% brand control: Brand managers now have more influence over virtual influencers, so they no longer have to give up and rely on content creators to include brands into their storytelling and style. Virtual influencers can constantly produce social media content to promote a brand's identity and ideals because they are completely scandal-free.
Long-term cost savings: Because virtual influencers are made of pixels, they may be reused endlessly and never lose their beauty. Additionally, they can move anywhere around the world and even into space to fit a brand notion. They are also always available. Additionally, the expense of creating their content will not rise in step with their expanding fan base.
Introduction to the metaverse: Statista reports that 75% of American consumers between the ages of 18 and 25 follow at least one virtual influencer. As a result, marketers that support virtual celebrities may now interact with younger audiences that are more tech-savvy and accustomed to the digital world. Virtual influencers can be included into any digital space, including the metaverse, as they are entirely computer-generated 3D personas. Virtual influencers can provide brands with a smooth transition into this new digital universe to increase brand trust and develop emotional ties, in addition to the young generations' rapid adoption of the metaverse.
Better engagement than in-person influencers: A Hype Auditor study found that online influencers have roughly three times the engagement of their conventional counterparts. Virtual influencers should be used to boost brand engagement even though the data might not accurately reflect the entire sector.
Concerns about influencers created by computers
Virtual influencers could encourage excessive beauty standards in South Korea, which has a $10.7 billion plastic surgery industry.
A classic Korean beauty has a small face, huge eyes, and pale, immaculate skin. Virtual influencers like Lucy have these traits. According to Lee Eun-hee, a professor at Inha University's Department of Consumer Science, this could make national beauty standards more unrealistic, increasing demand for plastic surgery or cosmetic items.

Other parts of the world raise issues regarding selling items to consumers who don't recognize the models aren't human and the potential of cultural appropriation when generating influencers of other ethnicities, called digital blackface by some.
Meta, Facebook and Instagram's parent corporation, acknowledges this risk.
“Like any disruptive technology, synthetic media has the potential for both good and harm. Issues of representation, cultural appropriation and expressive liberty are already a growing concern,” the company stated in a blog post. “To help brands navigate the ethical quandaries of this emerging medium and avoid potential hazards, (Meta) is working with partners to develop an ethical framework to guide the use of (virtual influencers).”
Despite theoretical controversies, the industry will likely survive. Companies think virtual influencers are the next frontier in the digital world, which includes the metaverse, virtual reality, and digital currency.
In conclusion
Virtual influencers may garner millions of followers online and help marketers reach youthful audiences. According to a YouGov survey, the real impact of computer-generated influencers is yet unknown because people prefer genuine connections. Virtual characters can supplement brand marketing methods. When brands are metaverse-ready, the author predicts virtual influencer endorsement will continue to expand.