


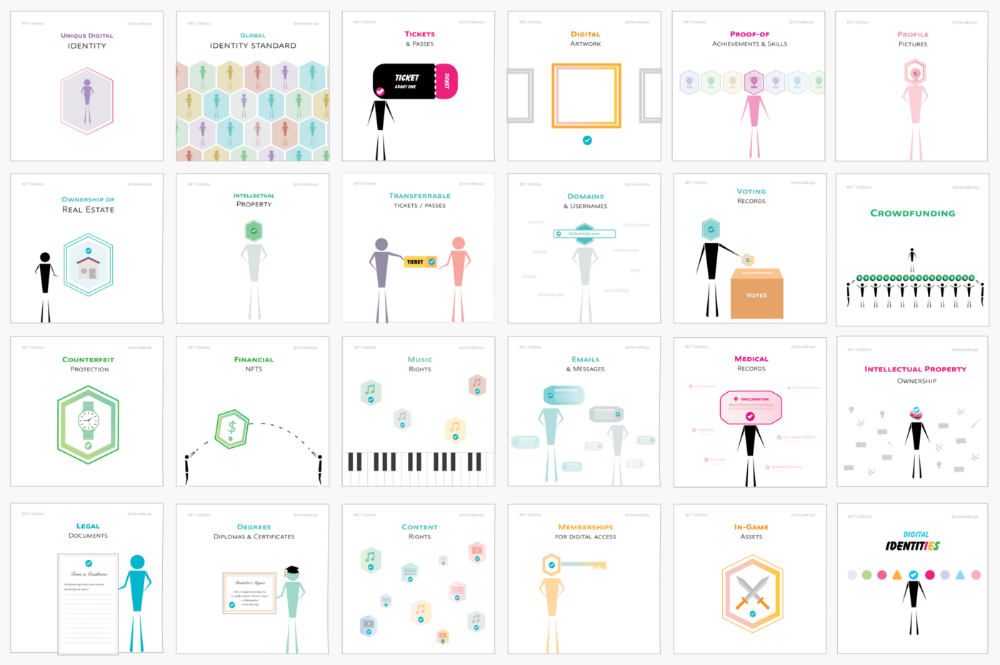
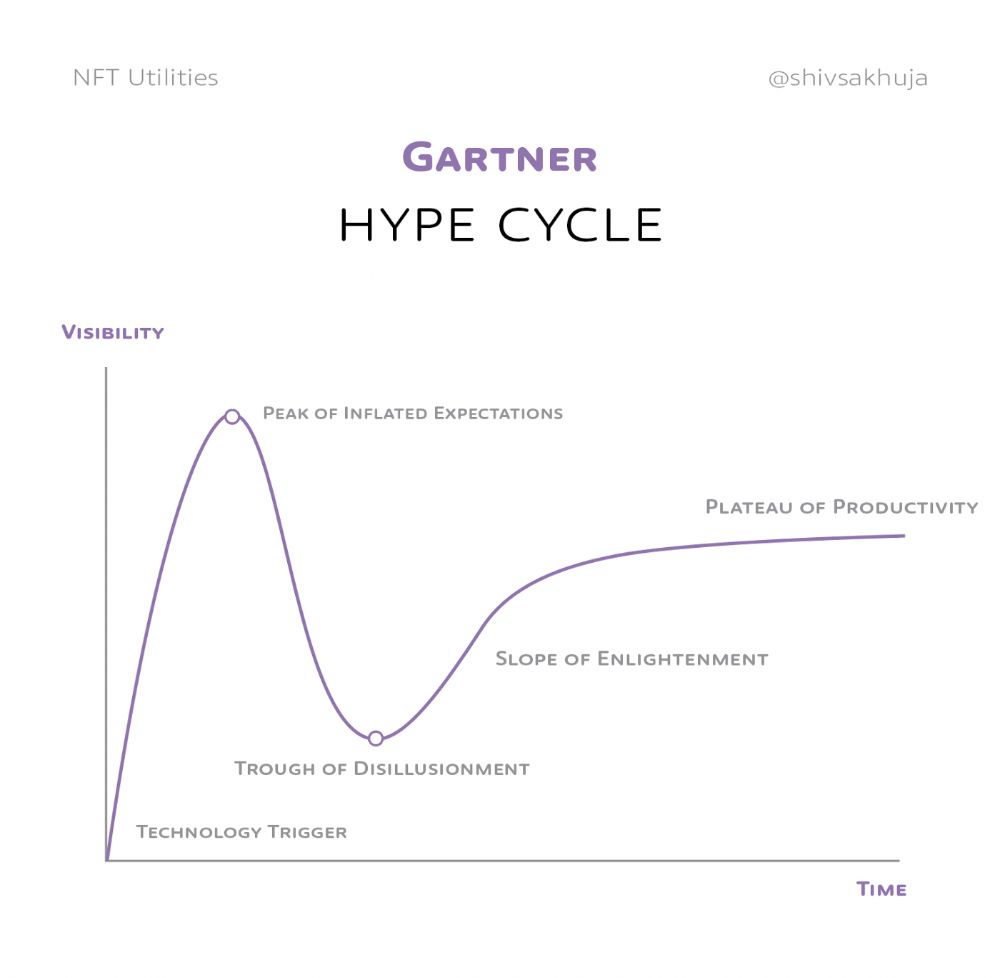
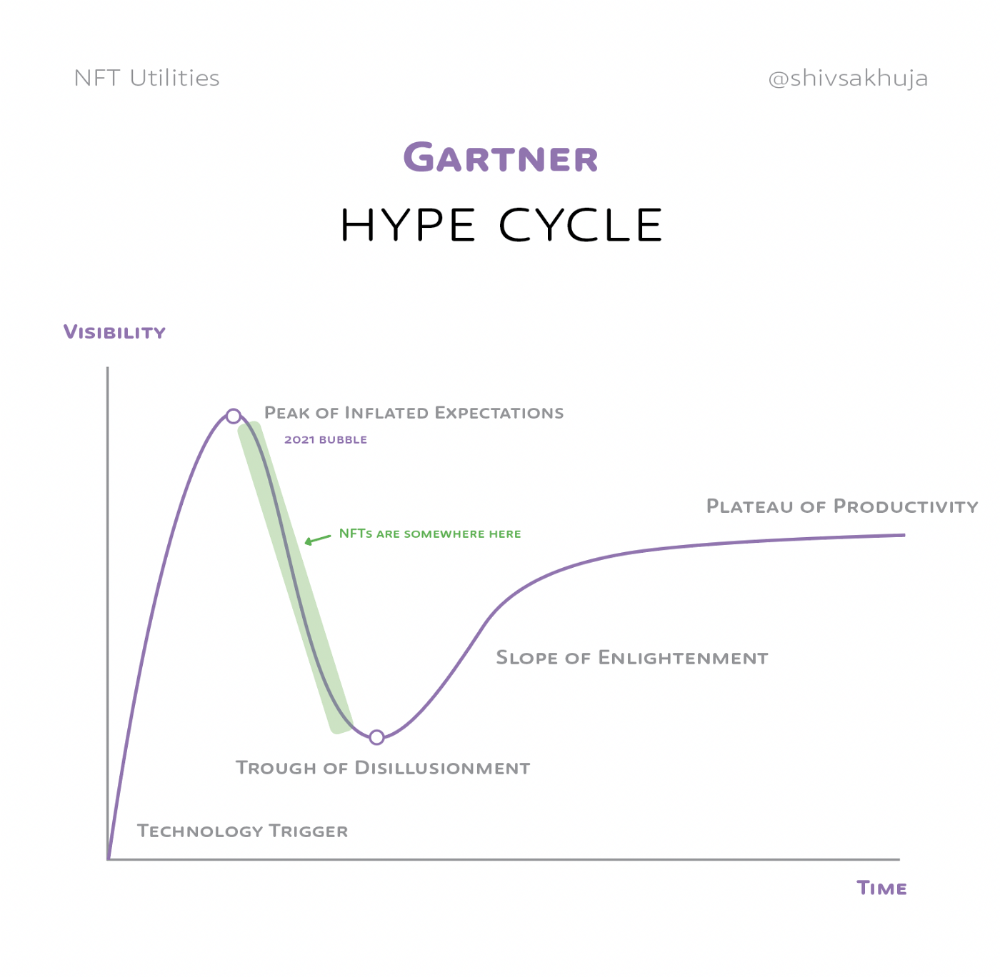


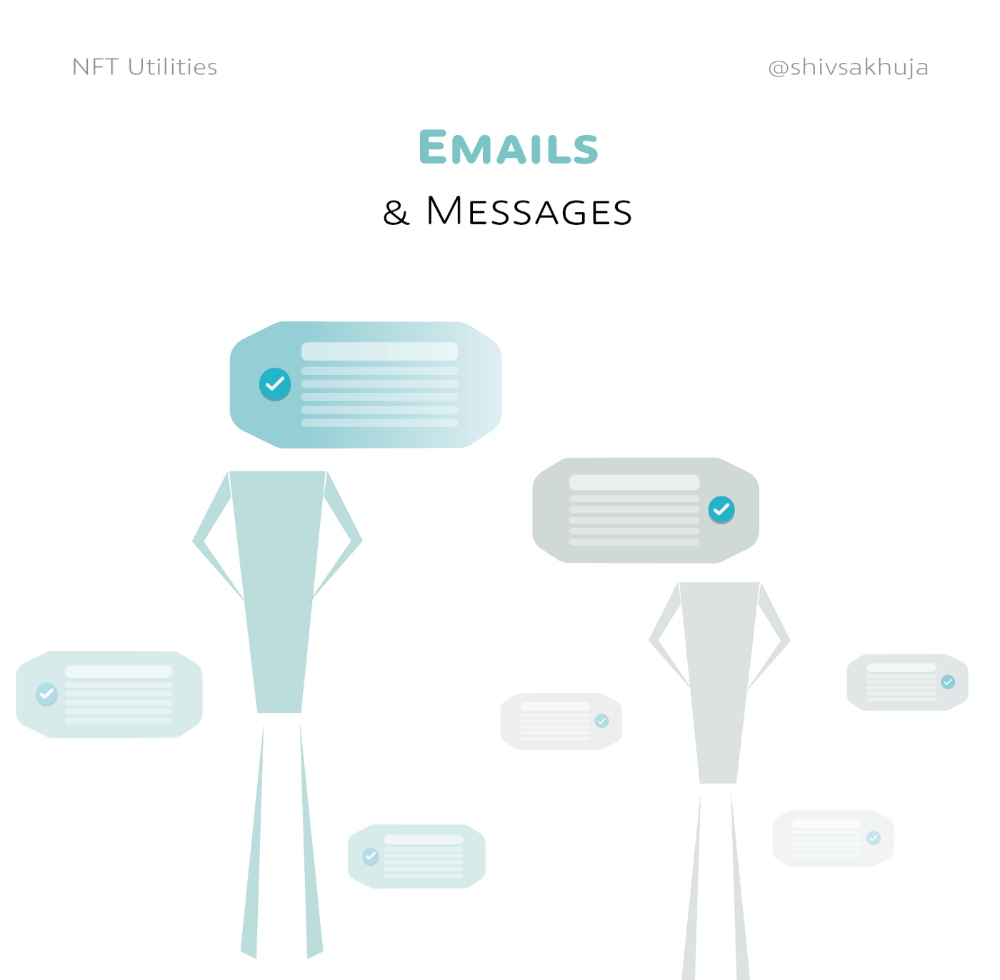
More on NFTs & Art

nft now
3 years ago
A Guide to VeeFriends and Series 2
VeeFriends is one of the most popular and unique NFT collections. VeeFriends launched around the same time as other PFP NFTs like Bored Ape Yacht Club.
Vaynerchuk (GaryVee) took a unique approach to his large-scale project, which has influenced the NFT ecosystem. GaryVee's VeeFriends is one of the most successful NFT membership use-cases, allowing him to build a community around his creative and business passions.
What is VeeFriends?
GaryVee's NFT collection, VeeFriends, was released on May 11, 2021. VeeFriends [Mini Drops], Book Games, and a forthcoming large-scale "Series 2" collection all stem from the initial drop of 10,255 tokens.
In "Series 1," there are G.O.O. tokens (Gary Originally Owned). GaryVee reserved 1,242 NFTs (over 12% of the supply) for his own collection, so only 9,013 were available at the Series 1 launch.
Each Series 1 token represents one of 268 human traits hand-drawn by Vaynerchuk. Gary Vee's NFTs offer owners incentives.
Who made VeeFriends?
Gary Vaynerchuk, AKA GaryVee, is influential in NFT. Vaynerchuk is the chairman of New York-based communications company VaynerX. Gary Vee, CEO of VaynerMedia, VaynerSports, and bestselling author, is worth $200 million.
GaryVee went from NFT collector to creator, launching VaynerNFT to help celebrities and brands.
Vaynerchuk's influence spans the NFT ecosystem as one of its most prolific voices. He's one of the most influential NFT figures, and his VeeFriends ecosystem keeps growing.
Vaynerchuk, a trend expert, thinks NFTs will be around for the rest of his life and VeeFriends will be a landmark project.
Why use VeeFriends NFTs?
The first VeeFriends collection has sold nearly $160 million via OpenSea. GaryVee insisted that the first 10,255 VeeFriends were just the beginning.
Book Games were announced to the VeeFriends community in August 2021. Mini Drops joined VeeFriends two months later.
Book Games
GaryVee's book "Twelve and a Half: Leveraging the Emotional Ingredients for Business Success" inspired Book Games. Even prior to the announcement Vaynerchuk had mapped out the utility of the book on an NFT scale. Book Games tied his book to the VeeFriends ecosystem and solidified its place in the collection.
GaryVee says Book Games is a layer 2 NFT project with 125,000 burnable tokens. Vaynerchuk's NFT fans were incentivized to buy as many copies of his new book as possible to receive NFT rewards later.
First, a bit about “layer 2.”
Layer 2 blockchain solutions help scale applications by routing transactions away from Ethereum Mainnet (layer 1). These solutions benefit from Mainnet's decentralized security model but increase transaction speed and reduce gas fees.
Polygon (integrated into OpenSea) and Immutable X are popular Ethereum layer 2 solutions. GaryVee chose Immutable X to reduce gas costs (transaction fees). Given the large supply of Book Games tokens, this decision will likely benefit the VeeFriends community, especially if the games run forever.
What's the strategy?
The VeeFriends patriarch announced on Aug. 27, 2021, that for every 12 books ordered during the Book Games promotion, customers would receive one NFT via airdrop. After nearly 100 days, GV sold over a million copies and announced that Book Games would go gamified on Jan. 10, 2022.
Immutable X's trading options make Book Games a "game." Book Games players can trade NFTs for other NFTs, sports cards, VeeCon tickets, and other prizes. Book Games can also whitelist other VeeFirends projects, which we'll cover in Series 2.
VeeFriends Mini Drops
GaryVee launched VeeFriends Mini Drops two months after Book Games, focusing on collaboration, scarcity, and the characters' "cultural longevity."
Spooky Vees, a collection of 31 1/1 Halloween-themed VeeFriends, was released on Halloween. First-come, first-served VeeFriend owners could claim these NFTs.
Mini Drops includes Gift Goat NFTs. By holding the Gift Goat VeeFriends character, collectors will receive 18 exclusive gifts curated by GaryVee and the team. Each gifting experience includes one physical gift and one NFT out of 555, to match the 555 Gift Goat tokens.
Gift Goat holders have gotten NFTs from Danny Cole (Creature World), Isaac "Drift" Wright (Where My Vans Go), Pop Wonder, and more.
GaryVee is poised to release the largest expansion of the VeeFriends and VaynerNFT ecosystem to date with VeeFriends Series 2.
VeeCon 101
By owning VeeFriends NFTs, collectors can join the VeeFriends community and attend VeeCon in 2022. The conference is only open to VeeCon NFT ticket holders (VeeFreinds + possibly more TBA) and will feature Beeple, Steve Aoki, and even Snoop Dogg.
The VeeFreinds floor in 2022 Q1 has remained at 16 ETH ($52,000), making VeeCon unattainable for most NFT enthusiasts. Why would someone spend that much crypto on a Minneapolis "superconference" ticket? Because of Gary Vaynerchuk.
Everything to know about VeeFriends Series 2
Vaynerchuk revealed in April 2022 that the VeeFriends ecosystem will grow by 55,555 NFTs after months of teasing.
With VeeFriends Series 2, each token will cost $995 USD in ETH, allowing NFT enthusiasts to join at a lower cost. The new series will be released on multiple dates in April.
Book Games NFT holders on the Friends List (whitelist) can mint Series 2 NFTs on April 12. Book Games holders have 32,000 NFTs.
VeeFriends Series 1 NFT holders can claim Series 2 NFTs on April 12. This allotment's supply is 10,255, like Series 1's.
On April 25, the public can buy 10,000 Series 2 NFTs. Unminted Friends List NFTs will be sold on this date, so this number may change.
The VeeFriends ecosystem will add 15 new characters (220 tokens each) on April 27. One character will be released per day for 15 days, and the only way to get one is to enter a daily raffle with Book Games tokens.
Series 2 NFTs won't give owners VeeCon access, but they will offer other benefits within the VaynerNFT ecosystem. Book Games and Series 2 will get new token burn mechanics in the upcoming drop.
Visit the VeeFriends blog for the latest collection info.
Where can you buy Gary Vee’s NFTs?
Need a VeeFriend NFT? Gary Vee recommends doing "50 hours of homework" before buying. OpenSea sells VeeFriends NFTs.

Yogita Khatri
3 years ago
Moonbirds NFT sells for $1 million in first week
On Saturday, Moonbird #2642, one of the collection's rarest NFTs, sold for a record 350 ETH (over $1 million) on OpenSea.
The Sandbox, a blockchain-based gaming company based in Hong Kong, bought the piece. The seller, "oscuranft" on OpenSea, made around $600,000 after buying the NFT for 100 ETH a week ago.
Owl avatars
Moonbirds is a 10,000 owl NFT collection. It is one of the quickest collections to achieve bluechip status. Proof, a media startup founded by renowned VC Kevin Rose, launched Moonbirds on April 16.
Rose is currently a partner at True Ventures, a technology-focused VC firm. He was a Google Ventures general partner and has 1.5 million Twitter followers.
Rose has an NFT podcast on Proof. It follows Proof Collective, a group of 1,000 NFT collectors and artists, including Beeple, who hold a Proof Collective NFT and receive special benefits.
These include early access to the Proof podcast and in-person events.
According to the Moonbirds website, they are "the official Proof PFP" (picture for proof).
Moonbirds NFTs sold nearly $360 million in just over a week, according to The Block Research and Dune Analytics. Its top ten sales range from $397,000 to $1 million.
In the current market, Moonbirds are worth 33.3 ETH. Each NFT is 2.5 ETH. Holders have gained over 12 times in just over a week.
Why was it so popular?
The Block Research's NFT analyst, Thomas Bialek, attributes Moonbirds' rapid rise to Rose's backing, the success of his previous Proof Collective project, and collectors' preference for proven NFT projects.
Proof Collective NFT holders have made huge gains. These NFTs were sold in a Dutch auction last December for 5 ETH each. According to OpenSea, the current floor price is 109 ETH.
According to The Block Research, citing Dune Analytics, Proof Collective NFTs have sold over $39 million to date.
Rose has bigger plans for Moonbirds. Moonbirds is introducing "nesting," a non-custodial way for holders to stake NFTs and earn rewards.
Holders of NFTs can earn different levels of status based on how long they keep their NFTs locked up.
"As you achieve different nest status levels, we can offer you different benefits," he said. "We'll have in-person meetups and events, as well as some crazy airdrops planned."
Rose went on to say that Proof is just the start of "a multi-decade journey to build a new media company."

Jayden Levitt
3 years ago
Starbucks' NFT Project recently defeated its rivals.
The same way Amazon killed bookstores. You just can’t see it yet.

Shultz globalized coffee. Before Starbucks, coffee sucked.
All accounts say 1970s coffee was awful.
Starbucks had three stores selling ground Indonesian coffee in the 1980s.
What a show!
A year after joining the company at 29, Shultz traveled to Italy for R&D.
He noticed the coffee shops' sense of theater and community and realized Starbucks was in the wrong business.
Integrating coffee and destination created a sense of community in the store.
Brilliant!
He told Starbucks' founders about his experience.
They disapproved.
For two years.
Shultz left and opened an Italian coffee shop chain like any good entrepreneur.
Starbucks ran into financial trouble, so the founders offered to sell to Shultz.
Shultz bought Starbucks in 1987 for $3.8 million, including six stores and a payment plan.
Starbucks is worth $100.79Billion, per Google Finance.
26,500 times Shultz's initial investment

Starbucks is releasing its own NFT Platform under Shultz and his early Vision.
This year, Starbucks Odyssey launches. The new digital experience combines a Loyalty Rewards program with NFT.
The side chain Polygon-based platform doesn't require a Crypto Wallet. Customers can earn and buy digital assets to unlock incentives and experiences.
They've removed all friction, making it more immersive and convenient than a coffee shop.
Brilliant!
NFTs are the access coupon to their digital community, but they don't highlight the technology.
They prioritize consumer experience by adding non-technical users to Web3. Their collectables are called journey stamps, not NFTs.
No mention of bundled gas fees.
Brady Brewer, Starbucks' CMO, said;
“It happens to be built on blockchain and web3 technologies, but the customer — to be honest — may very well not even know that what they’re doing is interacting with blockchain technology. It’s just the enabler,”
Rewards members will log into a web app using their loyalty program credentials to access Starbucks Odyssey. They won't know about blockchain transactions.
Starbucks has just dealt its rivals a devastating blow.
It generates more than ten times the revenue of its closest competitor Costa Coffee.
The coffee giant is booming.
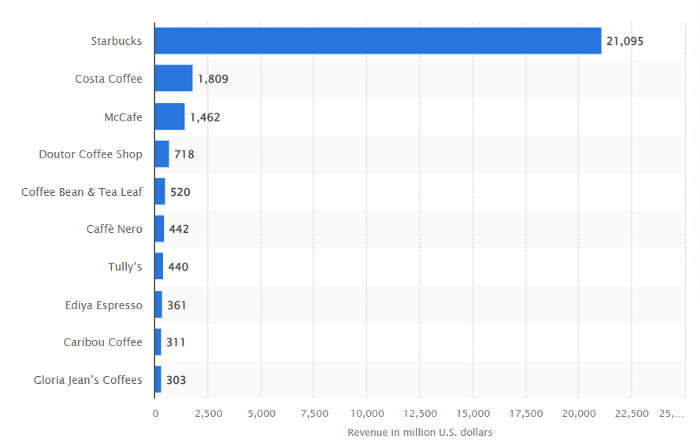
Starbucks is ahead of its competitors. No wonder.
They have an innovative, adaptable leadership team.
Starbucks' DNA challenges the narrative, especially when others reject their ideas.
I’m off for a cappuccino.
You might also like

CyberPunkMetalHead
3 years ago
195 countries want Terra Luna founder Do Kwon
Interpol has issued a red alert on Terraform Labs' CEO, South Korean prosecutors said.

After the May crash of Terra Luna revealed tax evasion issues, South Korean officials filed an arrest warrant for Do Kwon, but he is missing.
Do Kwon is now a fugitive in 195 countries after Seoul prosecutors placed him to Interpol's red list. Do Kwon hasn't commented since then. The red list allows any country's local authorities to apprehend Do Kwon.
Do Dwon and Terraform Labs were believed to have moved to Singapore days before the $40 billion wipeout, but Singapore authorities said he fled the country on September 17. Do Kwon tweeted that he wasn't on the run and cited privacy concerns.
Do Kwon was not on the red list at the time and said he wasn't "running," only to reply to his own tweet saying he hasn't jogged in a while and needed to trim calories.
Whether or not it makes sense to read too much into this, the reality is that Do Kwon is now on Interpol red list, despite the firmly asserts on twitter that he does absolutely nothing to hide.
UPDATE:
South Korean authorities are investigating alleged withdrawals of over $60 million U.S. and seeking to freeze these assets. Korean authorities believe a new wallet exchanged over 3000 BTC through OKX and Kucoin.
Do Kwon and the Luna Foundation Guard (of whom Do Kwon is a key member of) have declined all charges and dubbed this disinformation.
Singapore's Luna Foundation Guard (LFG) manages the Terra Ecosystem.
The Legal Situation
Multiple governments are searching for Do Kwon and five other Terraform Labs employees for financial markets legislation crimes.
South Korean authorities arrested a man suspected of tax fraud and Ponzi scheme.
The U.S. SEC is also examining Terraform Labs on how UST was advertised as a stablecoin. No legal precedent exists, so it's unclear what's illegal.
The future of Terraform Labs, Terra, and Terra 2 is unknown, and despite what Twitter shills say about LUNC, the company remains in limbo awaiting a decision that will determine its fate. This project isn't a wise investment.

Sam Hickmann
3 years ago
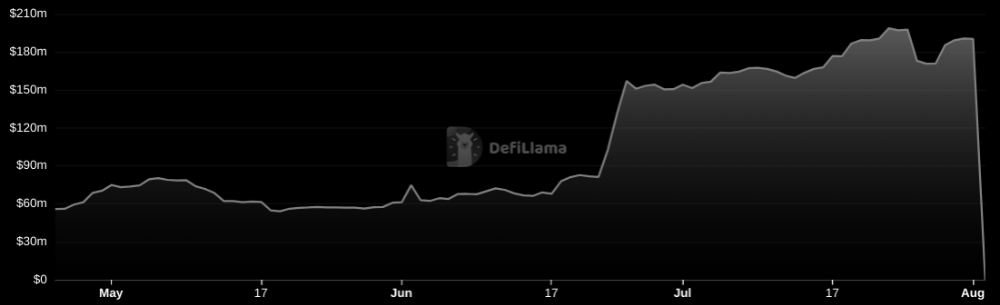
Nomad.xyz got exploited for $190M
Key Takeaways:
Another hack. This time was different. This is a doozy.
Why? Nomad got exploited for $190m. It was crypto's 5th-biggest hack. Ouch.
It wasn't hackers, but random folks. What happened:
A Nomad smart contract flaw was discovered. They couldn't drain the funds at once, so they tried numerous transactions. Rookie!
People noticed and copied the attack.
They just needed to discover a working transaction, substitute the other person's address with theirs, and run it.

In a two-and-a-half-hour attack, $190M was siphoned from Nomad Bridge.
Nomad is a novel approach to blockchain interoperability that leverages an optimistic mechanism to increase the security of cross-chain communication. — nomad.xyz
This hack was permissionless, therefore anyone could participate.
After the fatal blow, people fought over the scraps.
Cross-chain bridges remain a DeFi weakness and exploit target. When they collapse, it's typically total.
$190M...gobbled.
Unbacked assets are hurting Nomad-dependent chains. Moonbeam, EVMOS, and Milkomeda's TVLs dropped.
This incident is every-man-for-himself, although numerous whitehats exploited the issue...
But what triggered the feeding frenzy?
How did so many pick the bones?
After a normal upgrade in June, the bridge's Replica contract was initialized with a severe security issue. The 0x00 address was a trusted root, therefore all messages were valid by default.
After a botched first attempt (costing $350k in gas), the original attacker's exploit tx called process() without first 'proving' its validity.
The process() function executes all cross-chain messages and checks the merkle root of all messages (line 185).
The upgrade caused transactions with a'messages' value of 0 (invalid, according to old logic) to be read by default as 0x00, a trusted root, passing validation as 'proven'
Any process() calls were valid. In reality, a more sophisticated exploiter may have designed a contract to drain the whole bridge.
Copycat attackers simply copied/pasted the same process() function call using Etherscan, substituting their address.
The incident was a wild combination of crowdhacking, whitehat activities, and MEV-bot (Maximal Extractable Value) mayhem.
For example, 🍉🍉🍉. eth stole $4M from the bridge, but claims to be whitehat.

Others stood out for the wrong reasons. Repeat criminal Rari Capital (Artibrum) exploited over $3M in stablecoins, which moved to Tornado Cash.
The top three exploiters (with 95M between them) are:
$47M: 0x56D8B635A7C88Fd1104D23d632AF40c1C3Aac4e3
$40M: 0xBF293D5138a2a1BA407B43672643434C43827179
$8M: 0xB5C55f76f90Cc528B2609109Ca14d8d84593590E
Here's a list of all the exploiters:
The project conducted a Quantstamp audit in June; QSP-19 foreshadowed a similar problem.
The auditor's comments that "We feel the Nomad team misinterpreted the issue" speak to a troubling attitude towards security that the project's "Long-Term Security" plan appears to confirm:
Concerns were raised about the team's response time to a live, public exploit; the team's official acknowledgement came three hours later.
"Removing the Replica contract as owner" stopped the exploit, but it was too late to preserve the cash.
Closed blockchain systems are only as strong as their weakest link.
The Harmony network is in turmoil after its bridge was attacked and lost $100M in late June.
What's next for Nomad's ecosystems?
Moonbeam's TVL is now $135M, EVMOS's is $3M, and Milkomeda's is $20M.
Loss of confidence may do more damage than $190M.
Cross-chain infrastructure is difficult to secure in a new, experimental sector. Bridge attacks can pollute an entire ecosystem or more.
Nomadic liquidity has no permanent home, so consumers will always migrate in pursuit of the "next big thing" and get stung when attentiveness wanes.
DeFi still has easy prey...
Sources: rekt.news & The Milk Road.

Crypto Zen Monk
2 years ago
How to DYOR in the world of cryptocurrency
RESEARCH
We must create separate ideas and handle our own risks to be better investors. DYOR is crucial.
The only thing unsustainable is your cluelessness.
DYOR: Why
On social media, there is a lot of false information and divergent viewpoints. All of these facts might be accurate, but they might not be appropriate for your portfolio and investment preferences.
You become a more knowledgeable investor thanks to DYOR.
DYOR improves your portfolio's risk management.
My DYOR resources are below.

Messari: Major Blockchains' Activities
New York-based Messari provides cryptocurrency open data libraries.
Major blockchains offer 24-hour on-chain volume. https://messari.io/screener/most-active-chains-DB01F96B
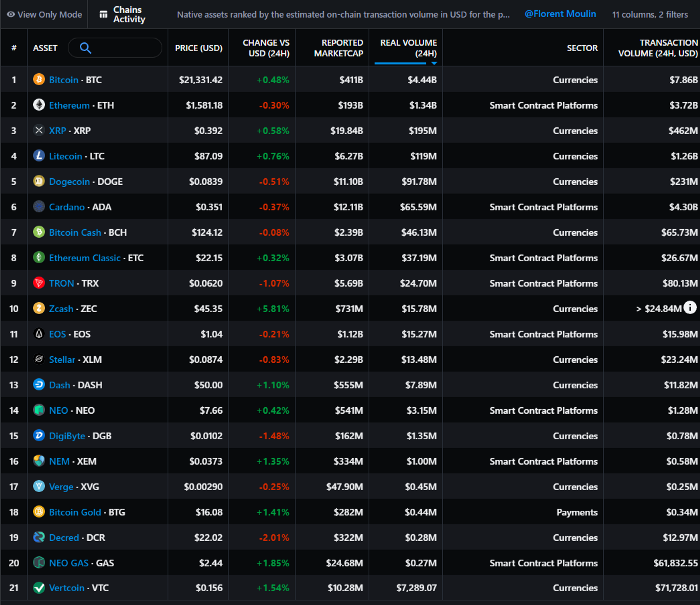
What to do
Invest in stable cryptocurrencies. Sort Messari by Real Volume (24H) or Reported Market Cap.
Coingecko: Research on Ecosystems
Top 10 Ecosystems by Coingecko are good.
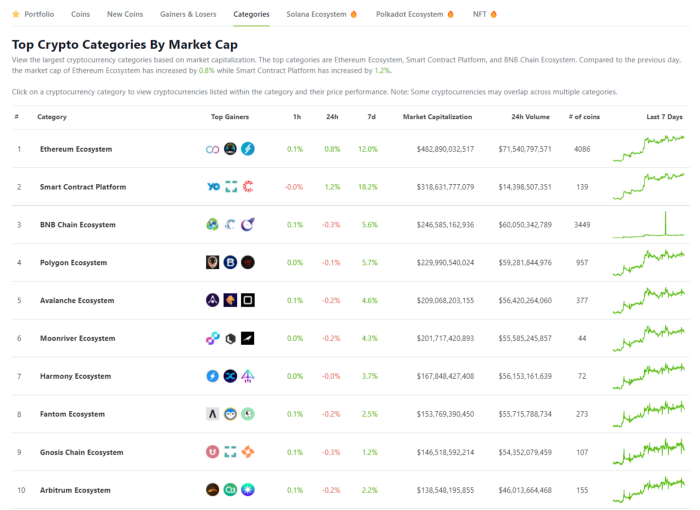
What to do
Invest in quality.
Leading ten Ecosystems by Market Cap
There are a lot of coins in the ecosystem (second last column of above chart)
CoinGecko's Market Cap Crypto Categories Market capitalization-based cryptocurrency categories. Ethereum Ecosystem www.coingecko.com
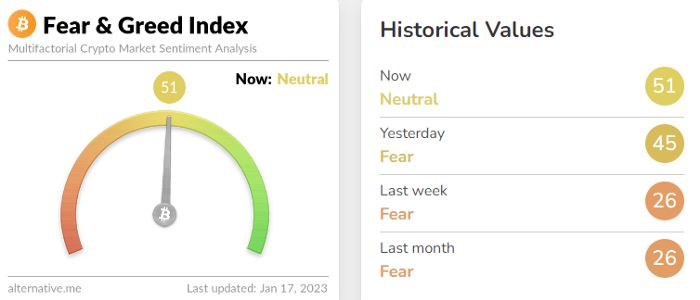
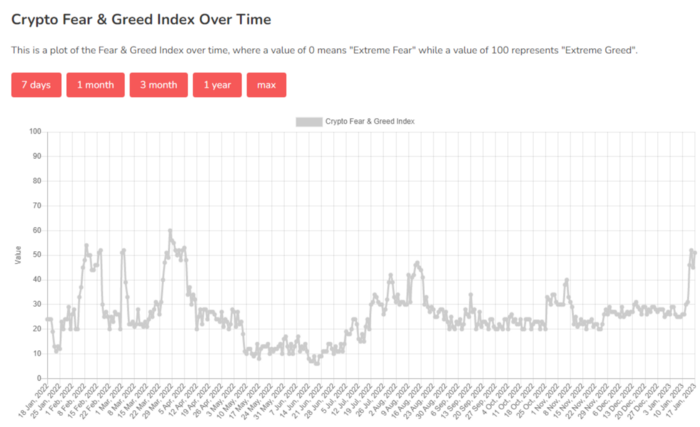
Fear & Greed Index for Bitcoin (FGI)
The Bitcoin market sentiment index ranges from 0 (extreme dread) to 100. (extreme greed).
How to Apply
See market sentiment:
Extreme fright = opportunity to buy
Extreme greed creates sales opportunity (market due for correction).
Glassnode
Glassnode gives facts, information, and confidence to make better Bitcoin, Ethereum, and cryptocurrency investments and trades.
Explore free and paid metrics.
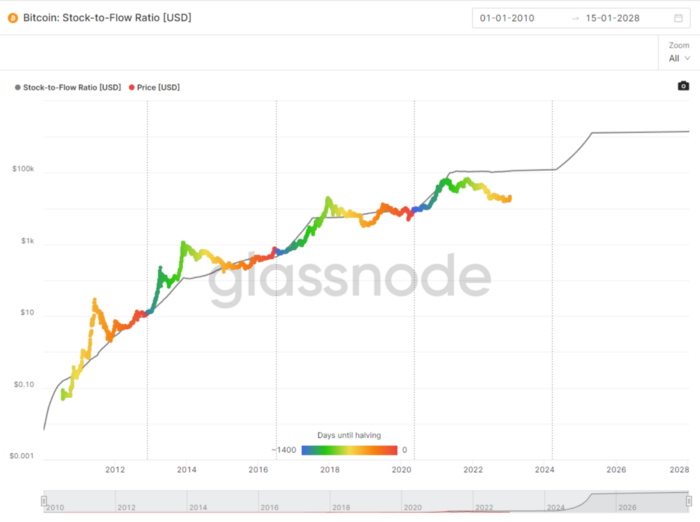
Stock to Flow Ratio: Application
The popular Stock to Flow Ratio concept believes scarcity drives value. Stock to flow is the ratio of circulating Bitcoin supply to fresh production (i.e. newly mined bitcoins). The S/F Ratio has historically predicted Bitcoin prices. PlanB invented this metric.
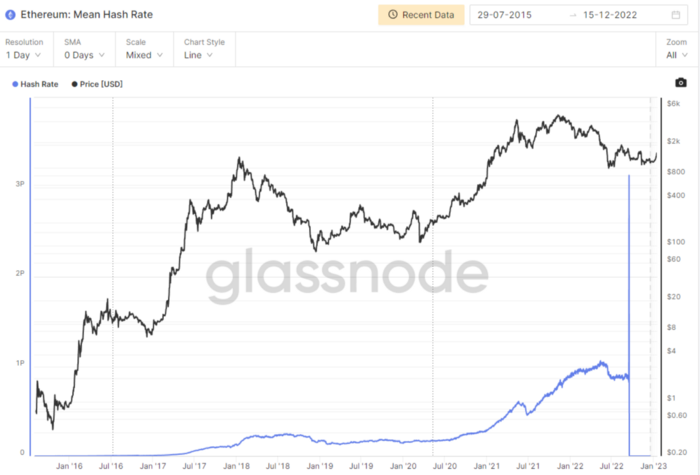
Utilization: Ethereum Hash Rate
Ethereum miners produce an estimated number of hashes per second.
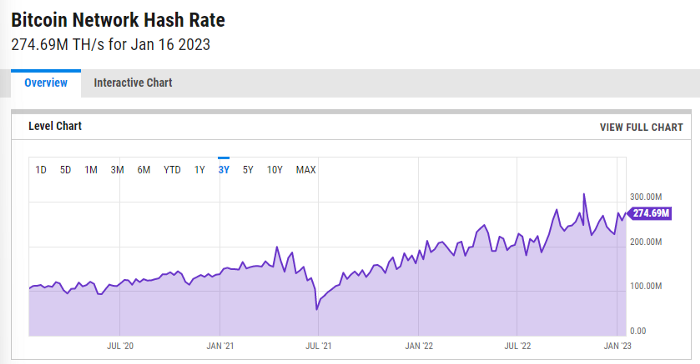
ycharts: Hash rate of the Bitcoin network
TradingView
TradingView is your go-to tool for investment analysis, watch lists, technical analysis, and recommendations from other traders/investors.
Research for a cryptocurrency project
Two key questions every successful project must ask: Q1: What is this project trying to solve? Is it a big problem or minor? Q2: How does this project make money?
Each cryptocurrency:
Check out the white paper.
check out the project's internet presence on github, twitter, and medium.
the transparency of it
Verify the team structure and founders. Verify their LinkedIn profile, academic history, and other qualifications. Search for their names with scam.
Where to purchase and use cryptocurrencies Is it traded on trustworthy exchanges?
From CoinGecko and CoinMarketCap, we may learn about market cap, circulations, and other important data.
The project must solve a problem. Solving a problem is the goal of the founders.
Avoid projects that resemble multi-level marketing or ponzi schemes.
Your use of social media
Use social media carefully or ignore it: Twitter, TradingView, and YouTube
Someone said this before and there are some truth to it. Social media bullish => short.
Your Behavior
Investigate. Spend time. You decide. Worth it!
Only you have the best interest in your financial future.