


Yuga Labs (BAYC and MAYC) buys CryptoPunks and Meebits and gives them commercial rights
Yuga has acquired the CryptoPunks and Meebits NFT IP from Larva Labs. These include 423 CryptoPunks and 1711 Meebits.
We set out to create in the NFT space because we admired CryptoPunks and the founders' visionary work. A lot of their work influenced how we built BAYC and NFTs. We're proud to lead CryptoPunks and Meebits into the future as part of our broader ecosystem.
"Yuga Labs invented the modern profile picture project and are the best in the world at operating these projects. They are ideal CrytoPunk and Meebit stewards. We are confident that in their hands, these projects will thrive in the emerging decentralized web.”
–The founders of Larva Labs, CryptoPunks, and Meebits
This deal grew out of discussions between our partner Guy Oseary and the Larva Labs founders. One call led to another, and now we're here. This does not mean Matt and John will join Yuga. They'll keep running Larva Labs and creating awesome projects that help shape the future of web3.
Next steps
Here's what we plan to do with CryptoPunks and Meebits now that we own the IP. Owners of CryptoPunks and Meebits will soon receive commercial rights equal to those of BAYC and MAYC holders. Our legal teams are working on new terms and conditions for both collections, which we hope to share with the community soon. We expect a wide range of third-party developers and community creators to incorporate CryptoPunks and Meebits into their web3 projects. We'll build the brand alongside them.
We don't intend to cram these NFT collections into the BAYC club model. We see BAYC as the hub of the Yuga universe, and CryptoPunks as a historical collection. We will work to improve the CryptoPunks and Meebits collections as good stewards. We're not in a hurry. We'll consult the community before deciding what to do next.
For us, NFTs are about culture. We're deeply invested in the BAYC community, and it's inspiring to see them grow, collaborate, and innovate. We're excited to see what CryptoPunks and Meebits do with IP rights. Our goal has always been to create a community-owned brand that goes beyond NFTs, and now we can include CryptoPunks and Meebits.
More on NFTs & Art

Web3Lunch
2 years ago
An employee of OpenSea might get a 40-year prison sentence for insider trading using NFTs.

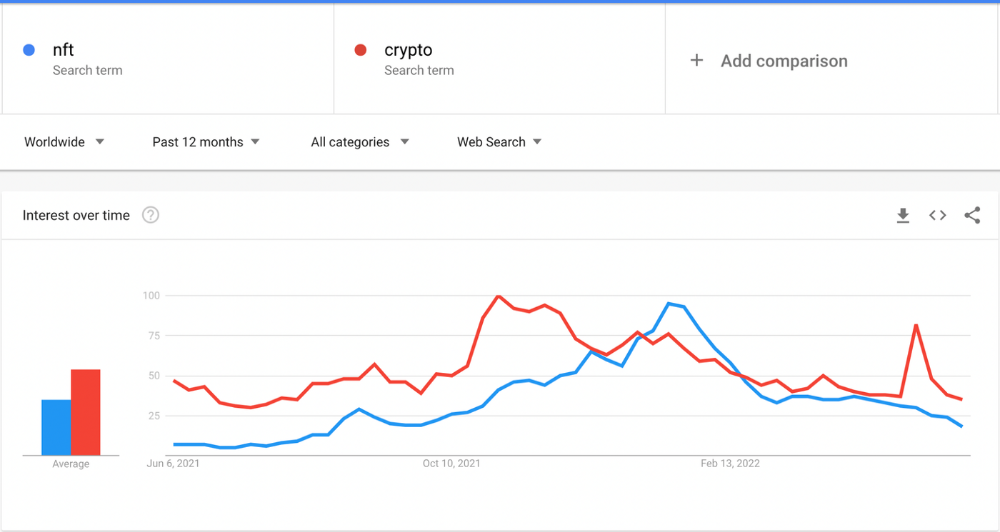
The space had better days. Those greenish spikes...oh wow, haven't felt that in ages. Cryptocurrencies and NFTs have lost popularity. Google agrees. Both are declining.
As seen below, crypto interest spiked in May because of the Luna fall. NFT interest is similar to early October last year.
This makes me think NFTs are mostly hype and FOMO. No art or community. I've seen enough initiatives to know that communities stick around if they're profitable. Once it starts falling, they move on to the next project. The space has no long-term investments. Flip everything.
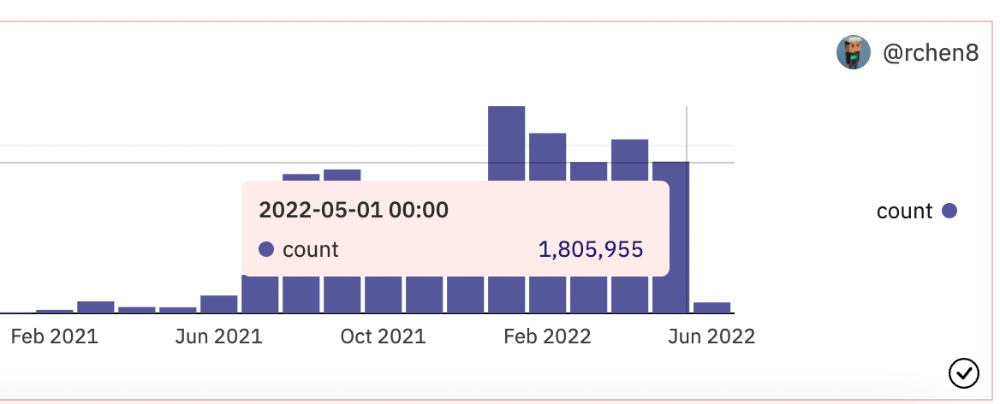
OpenSea trading volume has stayed steady for months. May's volume is 1.8 million ETH ($3.3 billion).
Despite this, I think NFTs and crypto will stick around. In bad markets, builders gain most.
Only 4k developers are active on Ethereum blockchain. It's low. A great chance for the space enthusiasts.
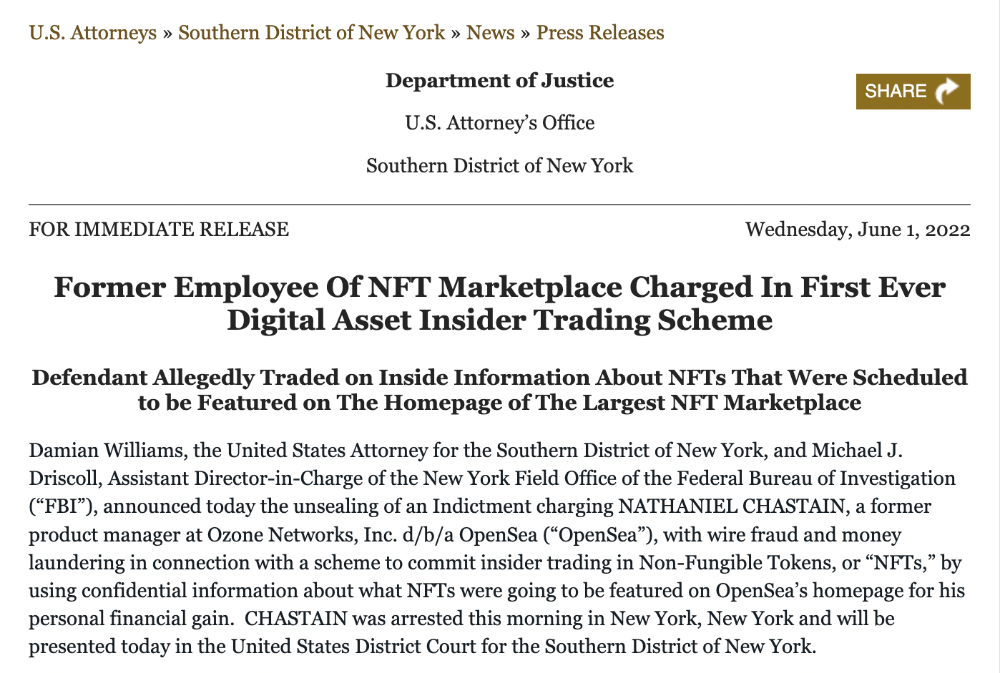
An employee of OpenSea might get a 40-year prison sentence for insider trading using NFTs.
Nathaniel Chastian, an OpenSea employee, traded on insider knowledge. He'll serve 40 years for that.
Here's what happened if you're unfamiliar.
OpenSea is a secondary NFT marketplace. Their homepage featured remarkable drops. Whatever gets featured there, NFT prices will rise 5x.
Chastian was at OpenSea. He chose forthcoming NFTs for OpenSeas' webpage.
Using anonymous digital currency wallets and OpenSea accounts, he would buy NFTs before promoting them on the homepage, showcase them, and then sell them for at least 25 times the price he paid.
From June through September 2021, this happened. Later caught, fired. He's charged with wire fraud and money laundering, each carrying a 20-year maximum penalty.
Although web3 space is all about decentralization, a step like this is welcomed since it restores faith in the area. We hope to see more similar examples soon.
Here's the press release.
Understanding smart contracts
@cantino.eth has a Twitter thread on smart contracts. Must-read. Also, he appears educated about the space, so follow him.


Steffan Morris Hernandez
1 year ago
10 types of cognitive bias to watch out for in UX research & design
10 biases in 10 visuals

Cognitive biases are crucial for UX research, design, and daily life. Our biases distort reality.
After learning about biases at my UX Research bootcamp, I studied Erika Hall's Just Enough Research and used the Nielsen Norman Group's wealth of information. 10 images show my findings.
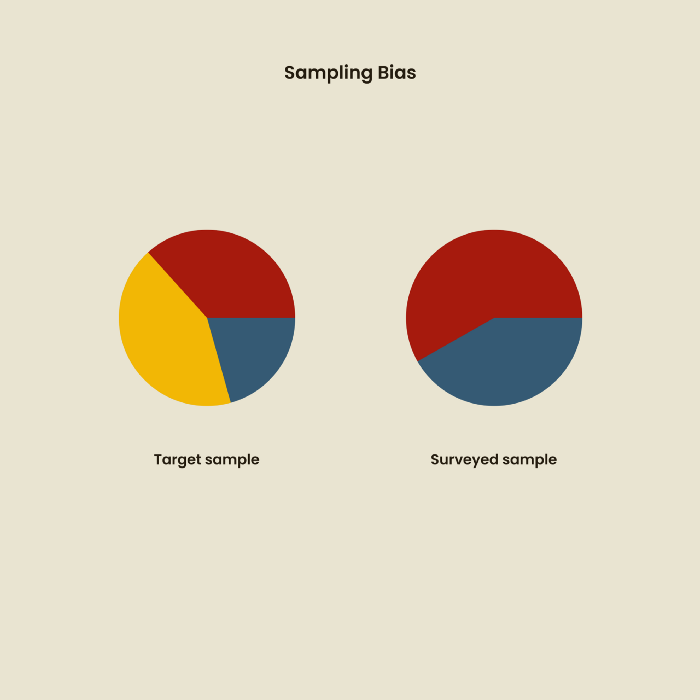
1. Bias in sampling
Misselection of target population members causes sampling bias. For example, you are building an app to help people with food intolerances log their meals and are targeting adult males (years 20-30), adult females (ages 20-30), and teenage males and females (ages 15-19) with food intolerances. However, a sample of only adult males and teenage females is biased and unrepresentative.
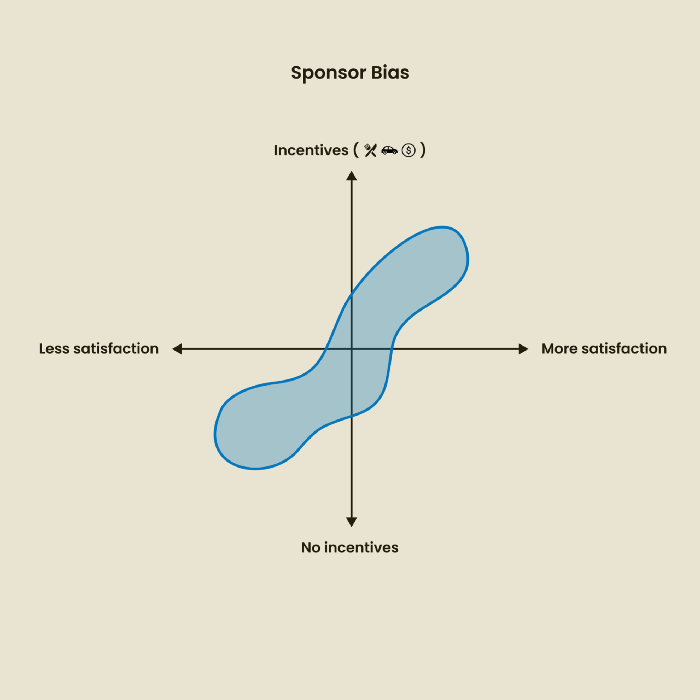
2. Sponsor Disparity
Sponsor bias occurs when a study's findings favor an organization's goals. Beware if X organization promises to drive you to their HQ, compensate you for your time, provide food, beverages, discounts, and warmth. Participants may endeavor to be neutral, but incentives and prizes may bias their evaluations and responses in favor of X organization.
In Just Enough Research, Erika Hall suggests describing the company's aims without naming it.
Third, False-Consensus Bias
False-consensus bias is when a person thinks others think and act the same way. For instance, if a start-up designs an app without researching end users' needs, it could fail since end users may have different wants. https://www.nngroup.com/videos/false-consensus-effect/
Working directly with the end user and employing many research methodologies to improve validity helps lessen this prejudice. When analyzing data, triangulation can boost believability.

Bias of the interviewer
I struggled with this bias during my UX research bootcamp interviews. Interviewing neutrally takes practice and patience. Avoid leading questions that structure the story since the interviewee must interpret them. Nodding or smiling throughout the interview may subconsciously influence the interviewee's responses.

The Curse of Knowledge
The curse of knowledge occurs when someone expects others understand a subject as well as they do. UX research interviews and surveys should reduce this bias because technical language might confuse participants and harm the research. Interviewing participants as though you are new to the topic may help them expand on their replies without being influenced by the researcher's knowledge.

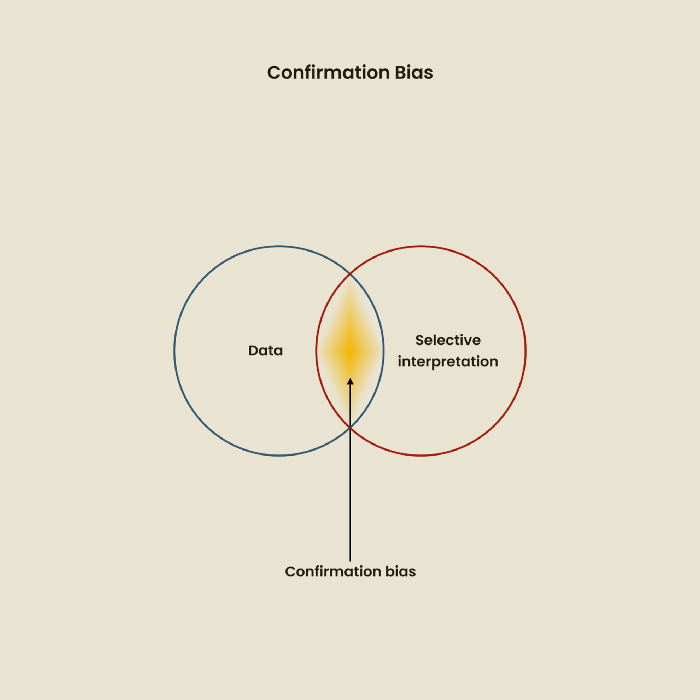
Confirmation Bias
Most prevalent bias. People highlight evidence that supports their ideas and ignore data that doesn't. The echo chamber of social media creates polarization by promoting similar perspectives.
A researcher with confirmation bias may dismiss data that contradicts their research goals. Thus, the research or product may not serve end users.
Design biases
UX Research design bias pertains to study construction and execution. Design bias occurs when data is excluded or magnified based on human aims, assumptions, and preferences.

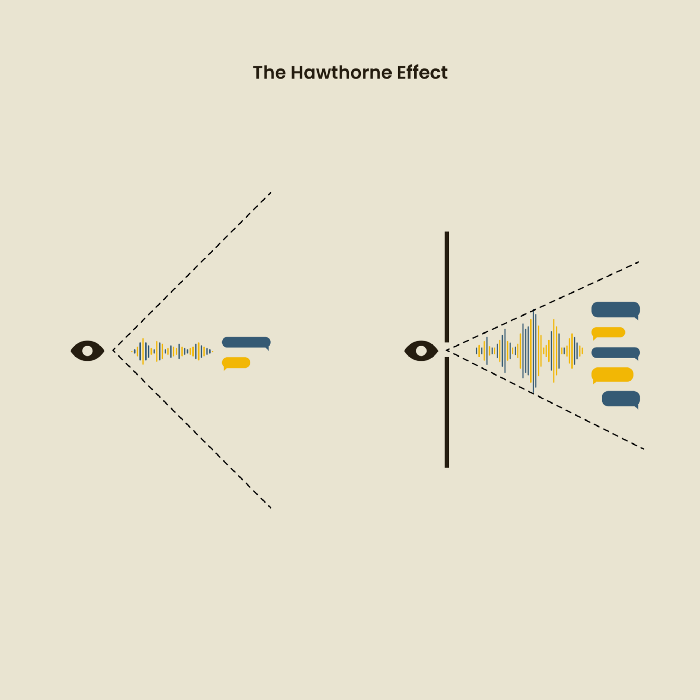
The Hawthorne Impact
Remember when you behaved differently while the teacher wasn't looking? When you behaved differently without your parents watching? A UX research study's Hawthorne Effect occurs when people modify their behavior because you're watching. To escape judgment, participants may act and speak differently.
To avoid this, researchers should blend into the background and urge subjects to act alone.
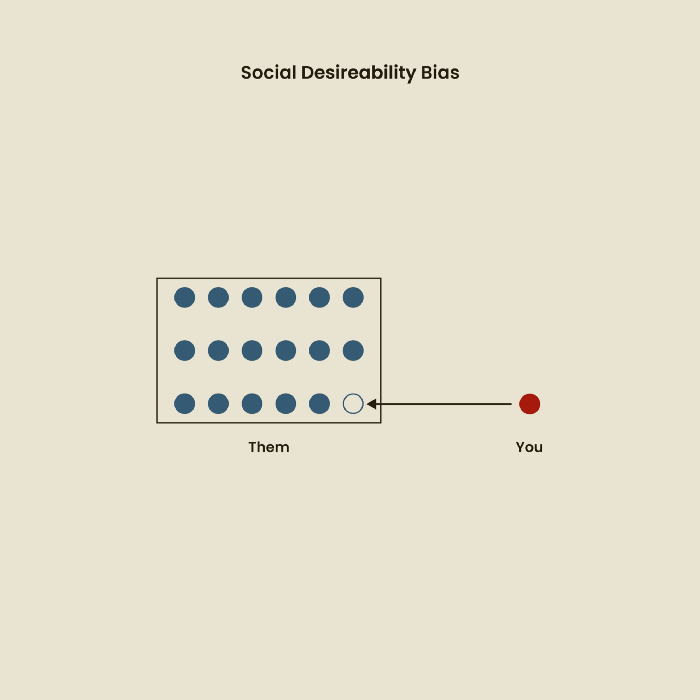
The bias against social desire
People want to belong to escape rejection and hatred. Research interviewees may mislead or slant their answers to avoid embarrassment. Researchers should encourage honesty and confidentiality in studies to address this. Observational research may reduce bias better than interviews because participants behave more organically.
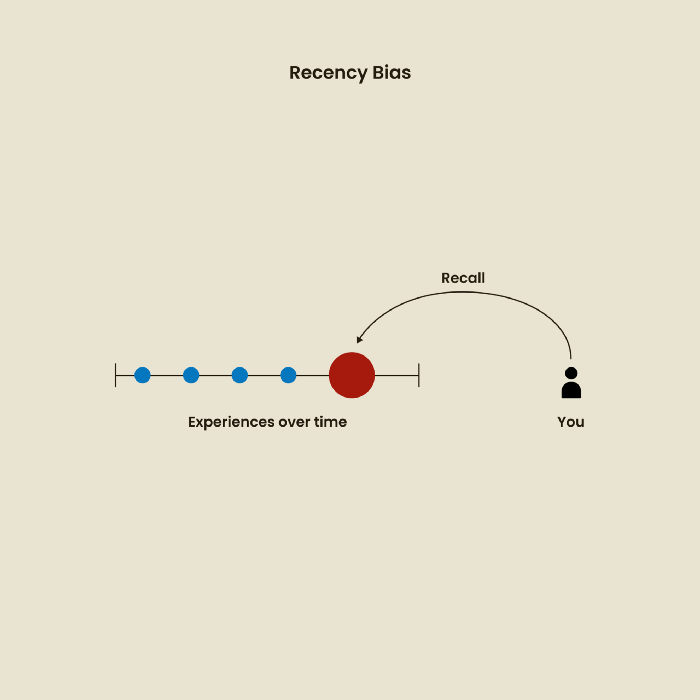
Relative Time Bias
Humans tend to appreciate recent experiences more. Consider school. Say you failed a recent exam but did well in the previous 7 exams. Instead, you may vividly recall the last terrible exam outcome.
If a UX researcher relies their conclusions on the most recent findings instead of all the data and results, recency bias might occur.
I hope you liked learning about UX design, research, and real-world biases.

Jake Prins
1 year ago
What are NFTs 2.0 and what issues are they meant to address?
New standards help NFTs reach their full potential.
NFTs lack interoperability and functionality. They have great potential but are mostly speculative. To maximize NFTs, we need flexible smart contracts.
Current requirements are too restrictive.
Most NFTs are based on ERC-721, which makes exchanging them easy. CryptoKitties, a popular online game, used the 2017 standard to demonstrate NFTs' potential.
This simple standard includes a base URI and incremental IDs for tokens. Add the tokenID to the base URI to get the token's metadata.
This let creators collect NFTs. Many NFT projects store metadata on IPFS, a distributed storage network, but others use Google Drive. NFT buyers often don't realize that if the creators delete or move the files, their NFT is just a pointer.
This isn't the standard's biggest issue. There's no way to validate NFT projects.
Creators are one of the most important aspects of art, but nothing is stored on-chain.
ERC-721 contracts only have a name and symbol.
Most of the data on OpenSea's collection pages isn't from the NFT's smart contract. It was added through a platform input field, so it's in the marketplace's database. Other websites may have different NFT information.
In five years, your NFT will be just a name, symbol, and ID.
Your NFT doesn't mention its creators. Although the smart contract has a public key, it doesn't reveal who created it.
The NFT's creators and their reputation are crucial to its value. Think digital fashion and big brands working with well-known designers when more professionals use NFTs. Don't you want them in your NFT?
Would paintings be as valuable if their artists were unknown? Would you believe it's real?
Buying directly from an on-chain artist would reduce scams. Current standards don't allow this data.
Most creator profiles live on centralized marketplaces and could disappear. Current platforms have outpaced underlying standards. The industry's standards are lagging.
For NFTs to grow beyond pointers to a monkey picture file, we may need to use new Web3-based standards.
Introducing NFTs 2.0
Fabian Vogelsteller, creator of ERC-20, developed new web3 standards. He proposed LSP7 Digital Asset and LSP8 Identifiable Digital Asset, also called NFT 2.0.
NFT and token metadata inputs are extendable. Changes to on-chain metadata inputs allow NFTs to evolve. Instead of public keys, the contract can have Universal Profile addresses attached. These profiles show creators' faces and reputations. NFTs can notify asset receivers, automating smart contracts.
LSP7 and LSP8 use ERC725Y. Using a generic data key-value store gives contracts much-needed features:
The asset can be customized and made to stand out more by allowing for unlimited data attachment.
Recognizing changes to the metadata
using a hash reference for metadata rather than a URL reference
This base will allow more metadata customization and upgradeability. These guidelines are:
Genuine and Verifiable Now, the creation of an NFT by a specific Universal Profile can be confirmed by smart contracts.
Dynamic NFTs can update Flexible & Updatable Metadata, allowing certain things to evolve over time.
Protected metadata Now, secure metadata that is readable by smart contracts can be added indefinitely.
Better NFTS prevent the locking of NFTs by only being sent to Universal Profiles or a smart contract that can interact with them.
Summary
NFTS standards lack standardization and powering features, limiting the industry.
ERC-721 is the most popular NFT standard, but it only represents incremental tokenIDs without metadata or asset representation. No standard sender-receiver interaction or security measures ensure safe asset transfers.
NFT 2.0 refers to the new LSP7-DigitalAsset and LSP8-IdentifiableDigitalAsset standards.
They have new standards for flexible metadata, secure transfers, asset representation, and interactive transfer.
With NFTs 2.0 and Universal Profiles, creators could build on-chain reputations.
NFTs 2.0 could bring the industry's needed innovation if it wants to move beyond trading profile pictures for speculation.
You might also like

Desiree Peralta
2 years ago
Why Now Is Your Chance To Create A Millionaire Career
People don’t believe in influencers anymore; they need people like you.

Social media influencers have dominated for years. We've seen videos, images, and articles of *famous* individuals unwrapping, reviewing, and endorsing things.
This industry generates billions. This year, marketers spent $2.23 billion on Instagram, $1 million on Youtube, and $775 million on Tiktok. This marketing has helped start certain companies.
Influencers are dying, so ordinary people like us may take over this billion-dollar sector. Why?
Why influencers are perishing
Most influencers lie to their fans, especially on Instagram. Influencers' first purpose was to make their lives so flawless that others would want to buy their stuff.
In 2015, an Australian influencer with 600,000 followers went viral for revealing all her photos and everything she did to seem great before deleting her account.
“I dramatically edited the pictures, I manipulated the environements, and made my life look perfect in social media… I remember I obsessively checked the like count for a full week since uploading it, a selfie that now has close to 2,500 likes. It got 5 likes. This was when I was so hungry for social media validation … This was the reason why I quit social media: for me, personally, it consumed me. I wasn’t living in a 3D world.”
Influencers then lost credibility.
Influencers seem to live in a bubble, separate from us. Thanks to self-popularity love's and constant awareness campaigns, people find these people ridiculous.
Influencers are praised more for showing themselves as natural and common than for showing luxuries and lies.

Little by little, they are dying, making room for a new group to take advantage of this multi-million dollar business, which gives us (ordinary people) a big opportunity to grow on any content creation platform we want.
Why this is your chance to develop on any platform for creating content
In 2021, I wrote “Not everyone who talks about money is a Financial Advisor, be careful of who you take advice from,”. In it, I warned that not everyone with a large following is a reputable source of financial advice.
Other writers hated this post and said I was wrong.
People don't want Jeff Bezos or Elon Musk's counsel, they said. They prefer to hear about their neighbor's restroom problems or his closest friend's terrible business.
Real advice from regular folks.
And I found this was true when I returned to my independent YouTube channel and had more than 1000 followers after having abandoned it with fewer than 30 videos in 2021 since there were already many personal finance and travel channels and I thought mine wasn't special.
People appreciated my videos because I was a 20-something girl trying to make money online, and they believed my advice more than that of influencers with thousands of followers.
I think today is the greatest time to grow on any platform as an ordinary person. Normal individuals give honest recommendations about what works for them and look easier to make because they have the same options as us.
Nobody cares how a millionaire acquired a Lamborghini unless it's entertaining. Education works now. Real counsel from average people is replicable.
Many individuals don't appreciate how false influencers seem (unreal bodies and excessive surgery and retouching) since it makes them feel uneasy.
That's why body-positive advertisements have been so effective, but they've lost ground in places like Tiktok, where the audience wants more content from everyday people than influencers living amazing lives. More people will relate to your content if you appear genuine.
Last thoughts
Influencers are dwindling. People want more real people to give real advice and demonstrate an ordinary life.
People will enjoy anything you tell about your daily life as long as you provide value, and you can build a following rapidly if you're honest.
This is a millionaire industry that is getting more expensive and will go with what works, so stand out immediately.

Ashraful Islam
2 years ago
Clean API Call With React Hooks
| Photo by Juanjo Jaramillo on Unsplash |
Calling APIs is the most common thing to do in any modern web application. When it comes to talking with an API then most of the time we need to do a lot of repetitive things like getting data from an API call, handling the success or error case, and so on.
When calling tens of hundreds of API calls we always have to do those tedious tasks. We can handle those things efficiently by putting a higher level of abstraction over those barebone API calls, whereas in some small applications, sometimes we don’t even care.
The problem comes when we start adding new features on top of the existing features without handling the API calls in an efficient and reusable manner. In that case for all of those API calls related repetitions, we end up with a lot of repetitive code across the whole application.
In React, we have different approaches for calling an API. Nowadays mostly we use React hooks. With React hooks, it’s possible to handle API calls in a very clean and consistent way throughout the application in spite of whatever the application size is. So let’s see how we can make a clean and reusable API calling layer using React hooks for a simple web application.
I’m using a code sandbox for this blog which you can get here.
import "./styles.css";
import React, { useEffect, useState } from "react";
import axios from "axios";
export default function App() {
const [posts, setPosts] = useState(null);
const [error, setError] = useState("");
const [loading, setLoading] = useState(false);
useEffect(() => {
handlePosts();
}, []);
const handlePosts = async () => {
setLoading(true);
try {
const result = await axios.get(
"https://jsonplaceholder.typicode.com/posts"
);
setPosts(result.data);
} catch (err) {
setError(err.message || "Unexpected Error!");
} finally {
setLoading(false);
}
};
return (
<div className="App">
<div>
<h1>Posts</h1>
{loading && <p>Posts are loading!</p>}
{error && <p>{error}</p>}
<ul>
{posts?.map((post) => (
<li key={post.id}>{post.title}</li>
))}
</ul>
</div>
</div>
);
}
I know the example above isn’t the best code but at least it’s working and it’s valid code. I will try to improve that later. For now, we can just focus on the bare minimum things for calling an API.
Here, you can try to get posts data from JsonPlaceholer. Those are the most common steps we follow for calling an API like requesting data, handling loading, success, and error cases.
If we try to call another API from the same component then how that would gonna look? Let’s see.
500: Internal Server Error
Now it’s going insane! For calling two simple APIs we’ve done a lot of duplication. On a top-level view, the component is doing nothing but just making two GET requests and handling the success and error cases. For each request, it’s maintaining three states which will periodically increase later if we’ve more calls.
Let’s refactor to make the code more reusable with fewer repetitions.
Step 1: Create a Hook for the Redundant API Request Codes
Most of the repetitions we have done so far are about requesting data, handing the async things, handling errors, success, and loading states. How about encapsulating those things inside a hook?
The only unique things we are doing inside handleComments and handlePosts are calling different endpoints. The rest of the things are pretty much the same. So we can create a hook that will handle the redundant works for us and from outside we’ll let it know which API to call.
500: Internal Server Error
Here, this request function is identical to what we were doing on the handlePosts and handleComments. The only difference is, it’s calling an async function apiFunc which we will provide as a parameter with this hook. This apiFunc is the only independent thing among any of the API calls we need.
With hooks in action, let’s change our old codes in App component, like this:
500: Internal Server Error
How about the current code? Isn’t it beautiful without any repetitions and duplicate API call handling things?
Let’s continue our journey from the current code. We can make App component more elegant. Now it knows a lot of details about the underlying library for the API call. It shouldn’t know that. So, here’s the next step…
Step 2: One Component Should Take Just One Responsibility
Our App component knows too much about the API calling mechanism. Its responsibility should just request the data. How the data will be requested under the hood, it shouldn’t care about that.
We will extract the API client-related codes from the App component. Also, we will group all the API request-related codes based on the API resource. Now, this is our API client:
import axios from "axios";

const apiClient = axios.create({
  // Later read this URL from an environment variable
  baseURL: "https://jsonplaceholder.typicode.com"
});

export default apiClient;
All API calls for comments resource will be in the following file:
import client from "./client";

const getComments = () => client.get("/comments");

export default {
  getComments
};
All API calls for posts resource are placed in the following file:
import client from "./client";

const getPosts = () => client.get("/posts");

export default {
  getPosts
};
Finally, the App component looks like the following:
import "./styles.css";
import React, { useEffect } from "react";
import commentsApi from "./api/comments";
import postsApi from "./api/posts";
import useApi from "./hooks/useApi";

export default function App() {
  const getPostsApi = useApi(postsApi.getPosts);
  const getCommentsApi = useApi(commentsApi.getComments);

  useEffect(() => {
    getPostsApi.request();
    getCommentsApi.request();
  }, []);

  return (
    <div className="App">
      {/* Post List */}
      <div>
        <h1>Posts</h1>
        {getPostsApi.loading && <p>Posts are loading!</p>}
        {getPostsApi.error && <p>{getPostsApi.error}</p>}
        <ul>
          {getPostsApi.data?.map((post) => (
            <li key={post.id}>{post.title}</li>
          ))}
        </ul>
      </div>
      {/* Comment List */}
      <div>
        <h1>Comments</h1>
        {getCommentsApi.loading && <p>Comments are loading!</p>}
        {getCommentsApi.error && <p>{getCommentsApi.error}</p>}
        <ul>
          {getCommentsApi.data?.map((comment) => (
            <li key={comment.id}>{comment.name}</li>
          ))}
        </ul>
      </div>
    </div>
  );
}
Now it doesn’t know anything about how the APIs get called. Tomorrow if we want to change the API calling library from axios to fetch or anything else, our App component code will not get affected. We can just change the codes form client.js This is the beauty of abstraction.
Apart from the abstraction of API calls, Appcomponent isn’t right the place to show the list of the posts and comments. It’s a high-level component. It shouldn’t handle such low-level data interpolation things.
So we should move this data display-related things to another low-level component. Here I placed those directly in the App component just for the demonstration purpose and not to distract with component composition-related things.
Final Thoughts
The React library gives the flexibility for using any kind of third-party library based on the application’s needs. As it doesn’t have any predefined architecture so different teams/developers adopted different approaches to developing applications with React. There’s nothing good or bad. We choose the development practice based on our needs/choices. One thing that is there beyond any choices is writing clean and maintainable codes.

Sofien Kaabar, CFA
1 year ago
How to Make a Trading Heatmap
Python Heatmap Technical Indicator

Heatmaps provide an instant overview. They can be used with correlations or to predict reactions or confirm the trend in trading. This article covers RSI heatmap creation.
The Market System
Market regime:
Bullish trend: The market tends to make higher highs, which indicates that the overall trend is upward.
Sideways: The market tends to fluctuate while staying within predetermined zones.
Bearish trend: The market has the propensity to make lower lows, indicating that the overall trend is downward.
Most tools detect the trend, but we cannot predict the next state. The best way to solve this problem is to assume the current state will continue and trade any reactions, preferably in the trend.
If the EURUSD is above its moving average and making higher highs, a trend-following strategy would be to wait for dips before buying and assuming the bullish trend will continue.
Indicator of Relative Strength
J. Welles Wilder Jr. introduced the RSI, a popular and versatile technical indicator. Used as a contrarian indicator to exploit extreme reactions. Calculating the default RSI usually involves these steps:
Determine the difference between the closing prices from the prior ones.
Distinguish between the positive and negative net changes.
Create a smoothed moving average for both the absolute values of the positive net changes and the negative net changes.
Take the difference between the smoothed positive and negative changes. The Relative Strength RS will be the name we use to describe this calculation.
To obtain the RSI, use the normalization formula shown below for each time step.
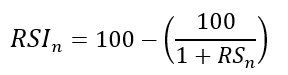
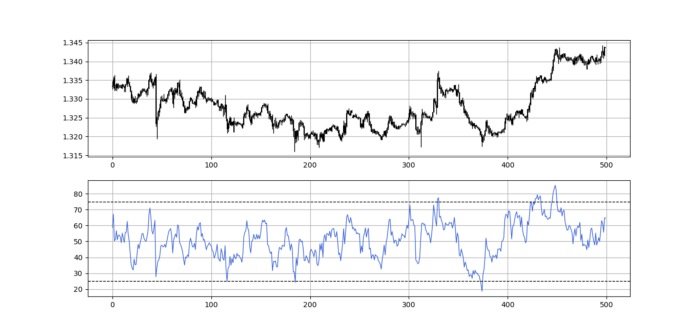
The 13-period RSI and black GBPUSD hourly values are shown above. RSI bounces near 25 and pauses around 75. Python requires a four-column OHLC array for RSI coding.
import numpy as np
def add_column(data, times):

    for i in range(1, times + 1):

        new = np.zeros((len(data), 1), dtype = float)

        data = np.append(data, new, axis = 1)
    return data
def delete_column(data, index, times):

    for i in range(1, times + 1):

        data = np.delete(data, index, axis = 1)
    return data
def delete_row(data, number):

    data = data[number:, ]

    return data
def ma(data, lookback, close, position):

    data = add_column(data, 1)

    for i in range(len(data)):

            try:

                data[i, position] = (data[i - lookback + 1:i + 1, close].mean())

            except IndexError:

                pass

    data = delete_row(data, lookback)

    return data
def smoothed_ma(data, alpha, lookback, close, position):

    lookback = (2 * lookback) - 1

    alpha = alpha / (lookback + 1.0)

    beta  = 1 - alpha

    data = ma(data, lookback, close, position)
    data[lookback + 1, position] = (data[lookback + 1, close] * alpha) + (data[lookback, position] * beta)
    for i in range(lookback + 2, len(data)):

            try:

                data[i, position] = (data[i, close] * alpha) + (data[i - 1, position] * beta)

            except IndexError:

                pass

    return data
def rsi(data, lookback, close, position):

    data = add_column(data, 5)

    for i in range(len(data)):

        data[i, position] = data[i, close] - data[i - 1, close]

    for i in range(len(data)):

        if data[i, position] > 0:

            data[i, position + 1] = data[i, position]

        elif data[i, position] < 0:

            data[i, position + 2] = abs(data[i, position])

    data = smoothed_ma(data, 2, lookback, position + 1, position + 3)
    data = smoothed_ma(data, 2, lookback, position + 2, position + 4)
    data[:, position + 5] = data[:, position + 3] / data[:, position + 4]

    data[:, position + 6] = (100 - (100 / (1 + data[:, position + 5])))
    data = delete_column(data, position, 6)
    data = delete_row(data, lookback)
    return data
Make sure to focus on the concepts and not the code. You can find the codes of most of my strategies in my books. The most important thing is to comprehend the techniques and strategies.
My weekly market sentiment report uses complex and simple models to understand the current positioning and predict the future direction of several major markets. Check out the report here:
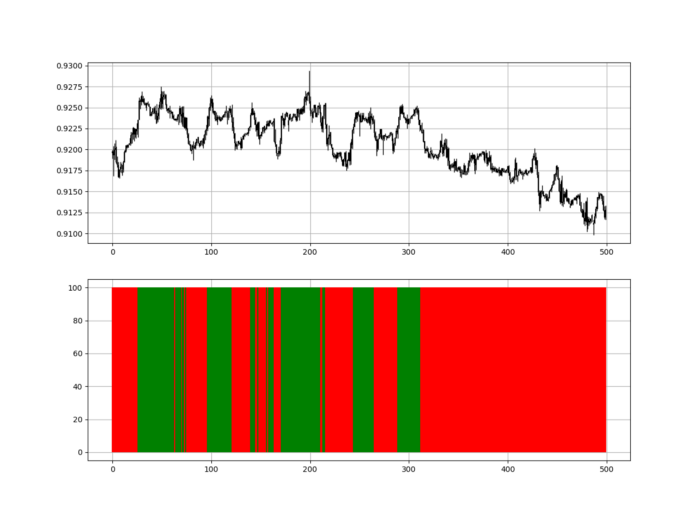
Using the Heatmap to Find the Trend
RSI trend detection is easy but useless. Bullish and bearish regimes are in effect when the RSI is above or below 50, respectively. Tracing a vertical colored line creates the conditions below. How:
When the RSI is higher than 50, a green vertical line is drawn.
When the RSI is lower than 50, a red vertical line is drawn.
Zooming out yields a basic heatmap, as shown below.
Plot code:
def indicator_plot(data, second_panel, window = 250):
    fig, ax = plt.subplots(2, figsize = (10, 5))
    sample = data[-window:, ]
    for i in range(len(sample)):
        ax[0].vlines(x = i, ymin = sample[i, 2], ymax = sample[i, 1], color = 'black', linewidth = 1)
        if sample[i, 3] > sample[i, 0]:
            ax[0].vlines(x = i, ymin = sample[i, 0], ymax = sample[i, 3], color = 'black', linewidth = 1.5)
        if sample[i, 3] < sample[i, 0]:
            ax[0].vlines(x = i, ymin = sample[i, 3], ymax = sample[i, 0], color = 'black', linewidth = 1.5)
        if sample[i, 3] == sample[i, 0]:
            ax[0].vlines(x = i, ymin = sample[i, 3], ymax = sample[i, 0], color = 'black', linewidth = 1.5)
    ax[0].grid()
    for i in range(len(sample)):
        if sample[i, second_panel] > 50:
            ax[1].vlines(x = i, ymin = 0, ymax = 100, color = 'green', linewidth = 1.5)
        if sample[i, second_panel] < 50:
            ax[1].vlines(x = i, ymin = 0, ymax = 100, color = 'red', linewidth = 1.5)
    ax[1].grid()
indicator_plot(my_data, 4, window = 500)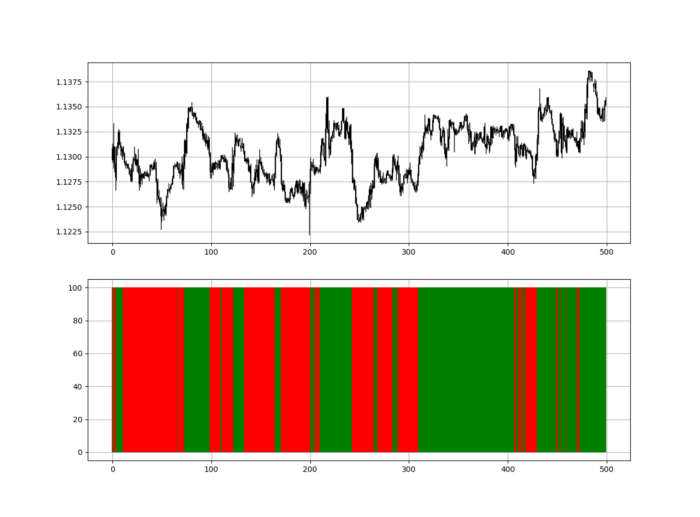
Call RSI on your OHLC array's fifth column. 4. Adjusting lookback parameters reduces lag and false signals. Other indicators and conditions are possible.
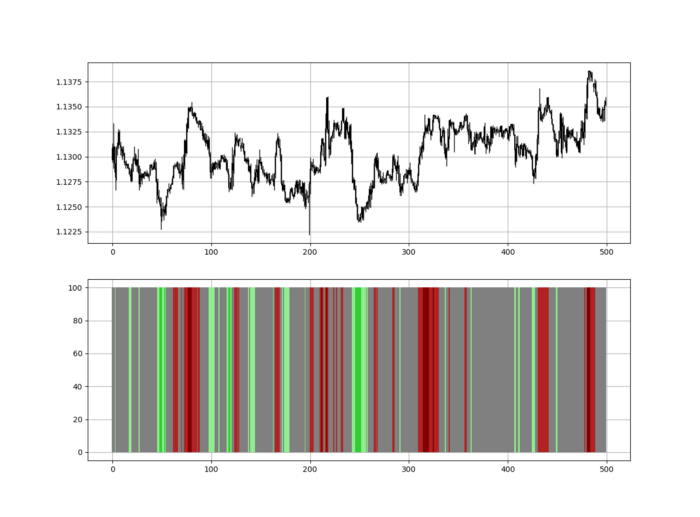
Another suggestion is to develop an RSI Heatmap for Extreme Conditions.
Contrarian indicator RSI. The following rules apply:
Whenever the RSI is approaching the upper values, the color approaches red.
The color tends toward green whenever the RSI is getting close to the lower values.
Zooming out yields a basic heatmap, as shown below.
Plot code:
import matplotlib.pyplot as plt
def indicator_plot(data, second_panel, window = 250):
    fig, ax = plt.subplots(2, figsize = (10, 5))
    sample = data[-window:, ]
    for i in range(len(sample)):
        ax[0].vlines(x = i, ymin = sample[i, 2], ymax = sample[i, 1], color = 'black', linewidth = 1)
        if sample[i, 3] > sample[i, 0]:
            ax[0].vlines(x = i, ymin = sample[i, 0], ymax = sample[i, 3], color = 'black', linewidth = 1.5)
        if sample[i, 3] < sample[i, 0]:
            ax[0].vlines(x = i, ymin = sample[i, 3], ymax = sample[i, 0], color = 'black', linewidth = 1.5)
        if sample[i, 3] == sample[i, 0]:
            ax[0].vlines(x = i, ymin = sample[i, 3], ymax = sample[i, 0], color = 'black', linewidth = 1.5)
    ax[0].grid()
    for i in range(len(sample)):
        if sample[i, second_panel] > 90:
            ax[1].vlines(x = i, ymin = 0, ymax = 100, color = 'red', linewidth = 1.5)
        if sample[i, second_panel] > 80 and sample[i, second_panel] < 90:
            ax[1].vlines(x = i, ymin = 0, ymax = 100, color = 'darkred', linewidth = 1.5)
        if sample[i, second_panel] > 70 and sample[i, second_panel] < 80:
            ax[1].vlines(x = i, ymin = 0, ymax = 100, color = 'maroon', linewidth = 1.5)
        if sample[i, second_panel] > 60 and sample[i, second_panel] < 70:
            ax[1].vlines(x = i, ymin = 0, ymax = 100, color = 'firebrick', linewidth = 1.5)
        if sample[i, second_panel] > 50 and sample[i, second_panel] < 60:
            ax[1].vlines(x = i, ymin = 0, ymax = 100, color = 'grey', linewidth = 1.5)
        if sample[i, second_panel] > 40 and sample[i, second_panel] < 50:
            ax[1].vlines(x = i, ymin = 0, ymax = 100, color = 'grey', linewidth = 1.5)
        if sample[i, second_panel] > 30 and sample[i, second_panel] < 40:
            ax[1].vlines(x = i, ymin = 0, ymax = 100, color = 'lightgreen', linewidth = 1.5)
        if sample[i, second_panel] > 20 and sample[i, second_panel] < 30:
            ax[1].vlines(x = i, ymin = 0, ymax = 100, color = 'limegreen', linewidth = 1.5)
        if sample[i, second_panel] > 10 and sample[i, second_panel] < 20:
            ax[1].vlines(x = i, ymin = 0, ymax = 100, color = 'seagreen', linewidth = 1.5)
        if sample[i, second_panel] > 0 and sample[i, second_panel] < 10:
            ax[1].vlines(x = i, ymin = 0, ymax = 100, color = 'green', linewidth = 1.5)
    ax[1].grid()
indicator_plot(my_data, 4, window = 500)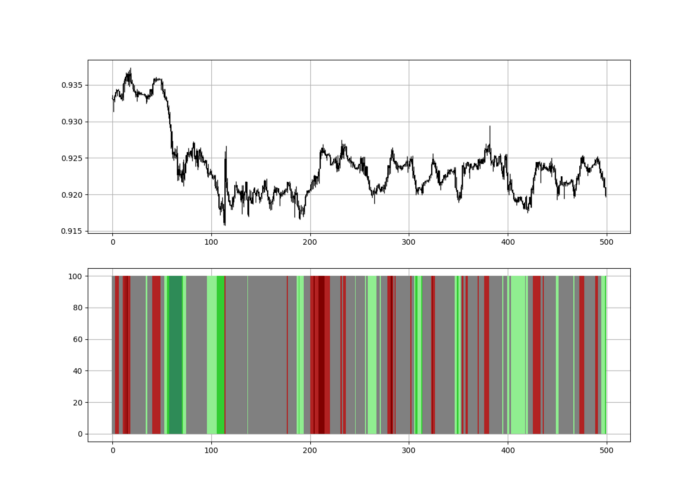
Dark green and red areas indicate imminent bullish and bearish reactions, respectively. RSI around 50 is grey.
Summary
To conclude, my goal is to contribute to objective technical analysis, which promotes more transparent methods and strategies that must be back-tested before implementation.
Technical analysis will lose its reputation as subjective and unscientific.
When you find a trading strategy or technique, follow these steps:
Put emotions aside and adopt a critical mindset.
Test it in the past under conditions and simulations taken from real life.
Try optimizing it and performing a forward test if you find any potential.
Transaction costs and any slippage simulation should always be included in your tests.
Risk management and position sizing should always be considered in your tests.
After checking the above, monitor the strategy because market dynamics may change and make it unprofitable.