


More on Technology

Shalitha Suranga
3 years ago
The Top 5 Mathematical Concepts Every Programmer Needs to Know
Using math to write efficient code in any language
Programmers design, build, test, and maintain software. Employ cases and personal preferences determine the programming languages we use throughout development. Mobile app developers use JavaScript or Dart. Some programmers design performance-first software in C/C++.
A generic source code includes language-specific grammar, pre-implemented function calls, mathematical operators, and control statements. Some mathematical principles assist us enhance our programming and problem-solving skills.
We all use basic mathematical concepts like formulas and relational operators (aka comparison operators) in programming in our daily lives. Beyond these mathematical syntaxes, we'll see discrete math topics. This narrative explains key math topics programmers must know. Master these ideas to produce clean and efficient software code.
Expressions in mathematics and built-in mathematical functions
A source code can only contain a mathematical algorithm or prebuilt API functions. We develop source code between these two ends. If you create code to fetch JSON data from a RESTful service, you'll invoke an HTTP client and won't conduct any math. If you write a function to compute the circle's area, you conduct the math there.
When your source code gets more mathematical, you'll need to use mathematical functions. Every programming language has a math module and syntactical operators. Good programmers always consider code readability, so we should learn to write readable mathematical expressions.
Linux utilizes clear math expressions.
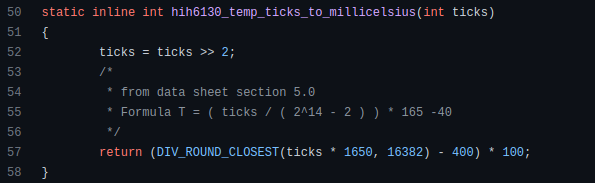
Inbuilt max and min functions can minimize verbose if statements.
How can we compute the number of pages needed to display known data? In such instances, the ceil function is often utilized.
import math as m
results = 102
items_per_page = 10
pages = m.ceil(results / items_per_page)
print(pages)
Learn to write clear, concise math expressions.
Combinatorics in Algorithm Design
Combinatorics theory counts, selects, and arranges numbers or objects. First, consider these programming-related questions. Four-digit PIN security? what options exist? What if the PIN has a prefix? How to locate all decimal number pairs?
Combinatorics questions. Software engineering jobs often require counting items. Combinatorics counts elements without counting them one by one or through other verbose approaches, therefore it enables us to offer minimum and efficient solutions to real-world situations. Combinatorics helps us make reliable decision tests without missing edge cases. Write a program to see if three inputs form a triangle. This is a question I commonly ask in software engineering interviews.
Graph theory is a subfield of combinatorics. Graph theory is used in computerized road maps and social media apps.
Logarithms and Geometry Understanding
Geometry studies shapes, angles, and sizes. Cartesian geometry involves representing geometric objects in multidimensional planes. Geometry is useful for programming. Cartesian geometry is useful for vector graphics, game development, and low-level computer graphics. We can simply work with 2D and 3D arrays as plane axes.
GetWindowRect is a Windows GUI SDK geometric object.
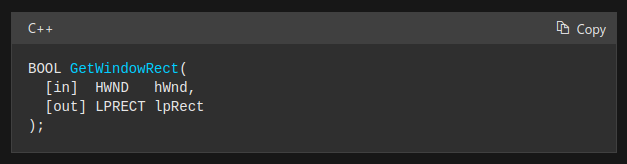
High-level GUI SDKs and libraries use geometric notions like coordinates, dimensions, and forms, therefore knowing geometry speeds up work with computer graphics APIs.
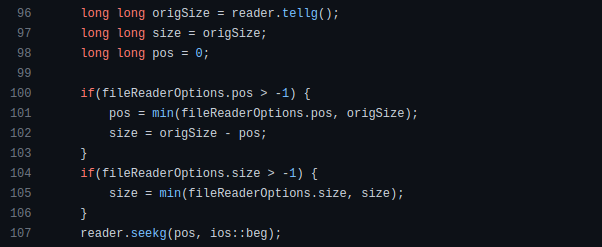
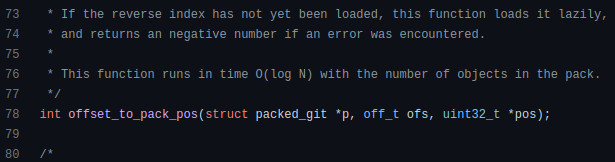
How does exponentiation's inverse function work? Logarithm is exponentiation's inverse function. Logarithm helps programmers find efficient algorithms and solve calculations. Writing efficient code involves finding algorithms with logarithmic temporal complexity. Programmers prefer binary search (O(log n)) over linear search (O(n)). Git source specifies O(log n):
Logarithms aid with programming math. Metas Watchman uses a logarithmic utility function to find the next power of two.

Employing Mathematical Data Structures
Programmers must know data structures to develop clean, efficient code. Stack, queue, and hashmap are computer science basics. Sets and graphs are discrete arithmetic data structures. Most computer languages include a set structure to hold distinct data entries. In most computer languages, graphs can be represented using neighboring lists or objects.
Using sets as deduped lists is powerful because set implementations allow iterators. Instead of a list (or array), store WebSocket connections in a set.
Most interviewers ask graph theory questions, yet current software engineers don't practice algorithms. Graph theory challenges become obligatory in IT firm interviews.
Recognizing Applications of Recursion
A function in programming isolates input(s) and output(s) (s). Programming functions may have originated from mathematical function theories. Programming and math functions are different but similar. Both function types accept input and return value.
Recursion involves calling the same function inside another function. In its implementation, you'll call the Fibonacci sequence. Recursion solves divide-and-conquer software engineering difficulties and avoids code repetition. I recently built the following recursive Dart code to render a Flutter multi-depth expanding list UI:
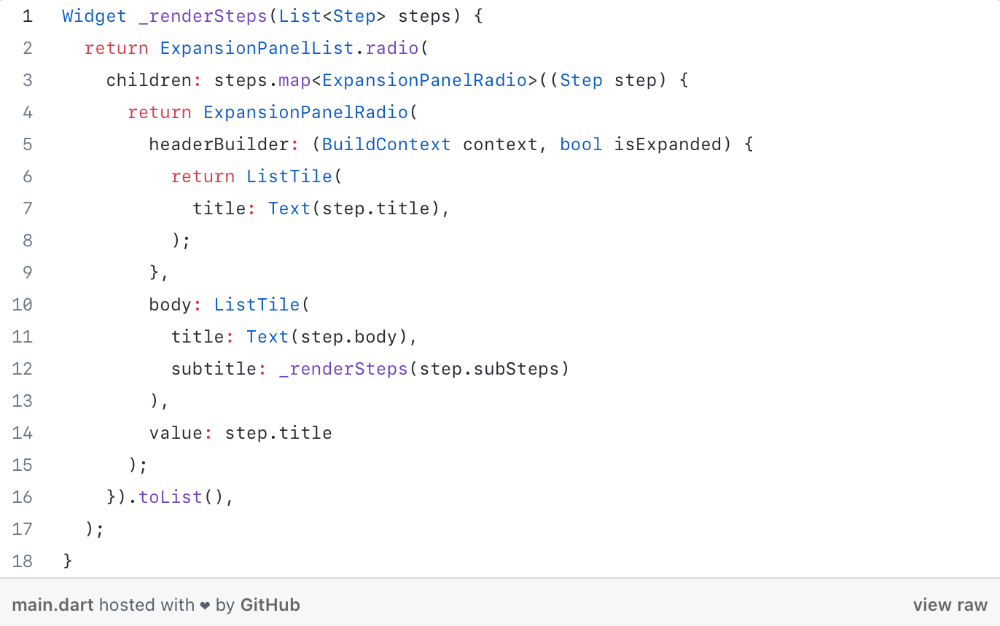
Recursion is not the natural linear way to solve problems, hence thinking recursively is difficult. Everything becomes clear when a mathematical function definition includes a base case and recursive call.
Conclusion
Every codebase uses arithmetic operators, relational operators, and expressions. To build mathematical expressions, we typically employ log, ceil, floor, min, max, etc. Combinatorics, geometry, data structures, and recursion help implement algorithms. Unless you operate in a pure mathematical domain, you may not use calculus, limits, and other complex math in daily programming (i.e., a game engine). These principles are fundamental for daily programming activities.
Master the above math fundamentals to build clean, efficient code.

Jussi Luukkonen, MBA
3 years ago
Is Apple Secretly Building A Disruptive Tsunami?
A TECHNICAL THOUGHT
The IT giant is seeding the digital Great Renaissance.

Recently, technology has been dull.
We're still fascinated by processing speeds. Wearables are no longer an engineer's dream.
Apple has been quiet and avoided huge announcements. Slowness speaks something. Everything in the spaceship HQ seems to be turning slowly, unlike competitors around buzzwords.
Is this a sign of the impending storm?
Metas stock has fallen while Google milks dumb people. Microsoft steals money from corporations and annexes platforms like Linkedin.
Just surface bubbles?
Is Apple, one of the technology continents, pushing against all others to create a paradigm shift?
The fundamental human right to privacy
Apple's unusual remarks emphasize privacy. They incorporate it into their business models and judgments.
Apple believes privacy is a human right. There are no compromises.
This makes it hard for other participants to gain Apple's ecosystem's efficiencies.
Other players without hardware platforms lose.
Apple delivers new kidneys without rejection, unlike other software vendors. Nothing compromises your privacy.
Corporate citizenship will become more popular.
Apples have full coffers. They've started using that flow to better communities, which is great.
Apple's $2.5B home investment is one example. Google and Facebook are building or proposing to build workforce housing.
Apple's funding helps marginalized populations in more than 25 California counties, not just Apple employees.
Is this a trend, and does Apple keep giving back? Hope so.
I'm not cynical enough to suspect these investments have malicious motives.
The last frontier is the environment.
Climate change is a battle-to-win.
Long-term winners will be companies that protect the environment, turning climate change dystopia into sustainable growth.
Apple has been quietly changing its supply chain to be carbon-neutral by 2030.
“Apple is dedicated to protecting the planet we all share with solutions that are supporting the communities where we work.” Lisa Jackson, Apple’s vice president of environment.
Apple's $4.7 billion Green Bond investment will produce 1.2 gigawatts of green energy for the corporation and US communities. Apple invests $2.2 billion in Europe's green energy. In the Philippines, Thailand, Nigeria, Vietnam, Colombia, Israel, and South Africa, solar installations are helping communities obtain sustainable energy.
Apple is already carbon neutral today for its global corporate operations, and this new commitment means that by 2030, every Apple device sold will have net zero climate impact. -Apple.
Apple invests in green energy and forests to reduce its paper footprint in China and the US. Apple and the Conservation Fund are safeguarding 36,000 acres of US working forest, according to GreenBiz.
Apple's packaging paper is recycled or from sustainably managed forests.
What matters is the scale.
$1 billion is a rounding error for Apple.
These small investments originate from a tree with deep, spreading roots.
Apple's genes are anchored in building the finest products possible to improve consumers' lives.
I felt it when I switched to my iPhone while waiting for a train and had to pack my Macbook. iOS 16 dictation makes writing more enjoyable. Small change boosts productivity. Smooth transition from laptop to small screen and dictation.
Apples' tiny, well-planned steps have great growth potential for all consumers in everything they do.
There is clearly disruption, but it doesn't have to be violent
Digital channels, methods, and technologies have globalized human consciousness. One person's responsibility affects many.
Apple gives us tools to be privately connected. These technologies foster creativity, innovation, fulfillment, and safety.
Apple has invented a mountain of technologies, services, and channels to assist us adapt to the good future or combat evil forces who cynically aim to control us and ruin the environment and communities. Apple has quietly disrupted sectors for decades.
Google, Microsoft, and Meta, among others, should ride this wave. It's a tsunami, but it doesn't have to be devastating if we care, share, and cooperate with political decision-makers and community leaders worldwide.
A fresh Renaissance
Renaissance geniuses Michelangelo and Da Vinci. Different but seeing something no one else could yet see. Both were talented in many areas and could discover art in science and science in art.
These geniuses exemplified a period that changed humanity for the better. They created, used, and applied new, valuable things. It lives on.
Apple is a digital genius orchard. Wozniak and Jobs offered us fertile ground for the digital renaissance. We'll build on their legacy.
We may put our seeds there and see them bloom despite corporate greed and political ignorance.
I think the coming tsunami will illuminate our planet like the Renaissance.

Jano le Roux
3 years ago
Apple Quietly Introduces A Revolutionary Savings Account That Kills Banks
Would you abandon your bank for Apple?

Banks are struggling.
not as a result of inflation
not due to the economic downturn.
not due to the conflict in Ukraine.
But because they’re underestimating Apple.
Slowly but surely, Apple is looking more like a bank.
An easy new savings account like Apple
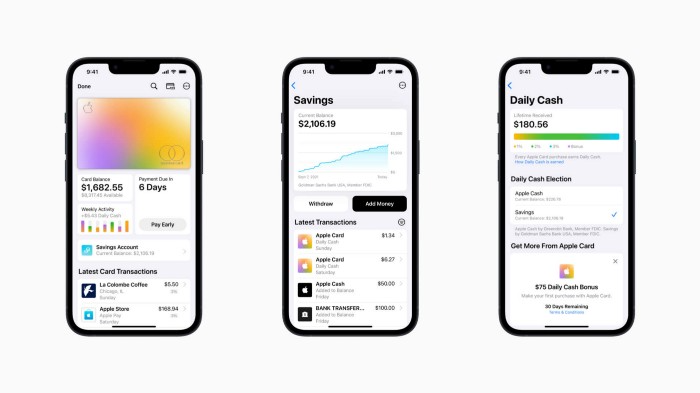
Apple has a new savings account.
Apple says Apple Card users may set up and manage savings straight in Wallet.
No more charges
Colorfully high yields
With no minimum balance
No minimal down payments
Most consumer-facing banks will have to match Apple's offer or suffer disruption.
Users may set it up from their iPhones without traveling to a bank or filling out paperwork.
It’s built into the iPhone in your pocket.
So now more waiting for slow approval processes.
Once the savings account is set up, Apple will automatically transfer all future Daily Cash into it. Users may also add these cash to an Apple Cash card in their Apple Wallet app and adjust where Daily Cash is paid at any time.

Apple Pay and Apple Wallet VP Jennifer Bailey:
Savings enables Apple Card users to grow their Daily Cash rewards over time, while also saving for the future.
Bailey says Savings adds value to Apple Card's Daily Cash benefit and offers another easy-to-use tool to help people lead healthier financial lives.
Transfer money from a linked bank account or Apple Cash to a Savings account. Users can withdraw monies to a connected bank account or Apple Cash card without costs.
Once set up, Apple Card customers can track their earnings via Wallet's Savings dashboard. This dashboard shows their account balance and interest.
This product targets younger people as the easiest way to start a savings account on the iPhone.
Why would a Gen Z account holder travel to the bank if their iPhone could be their bank?
Using this concept, Apple will transform the way we think about banking by 2030.
Two other nightmares keep bankers awake at night
Apple revealed two new features in early 2022 that banks and payment gateways hated.
Tap to Pay with Apple
Late Apple Pay
They startled the industry.
Tap To Pay converts iPhones into mobile POS card readers. Apple Pay Later is pushing the BNPL business in a consumer-friendly direction, hopefully ending dodgy lending practices.
Tap to Pay with Apple
iPhone POS
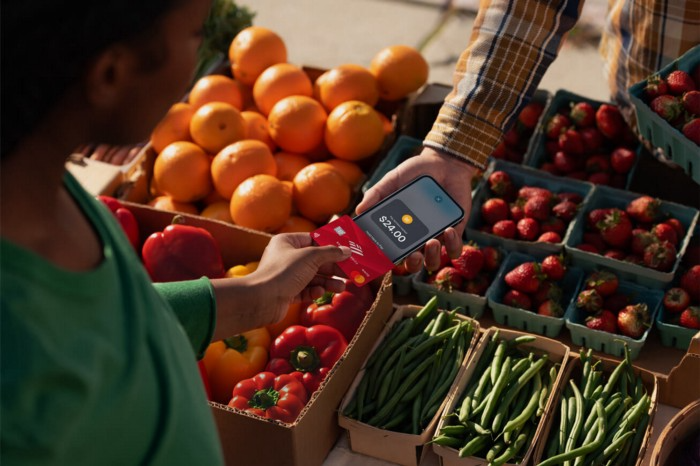
Millions of US merchants, from tiny shops to huge establishments, will be able to accept Apple Pay, contactless credit and debit cards, and other digital wallets with a tap.
No hardware or payment terminal is needed.
Revolutionary!
Stripe has previously launched this feature.
Tap to Pay on iPhone will provide companies with a secure, private, and quick option to take contactless payments and unleash new checkout experiences, said Bailey.
Apple's solution is ingenious. Brilliant!
Bailey says that payment platforms, app developers, and payment networks are making it easier than ever for businesses of all sizes to accept contactless payments and thrive.
I admire that Apple is offering this up to third-party services instead of closing off other functionalities.
Slow POS terminals, farewell.
Late Apple Pay
Pay Apple later.

Apple Pay Later enables US consumers split Apple Pay purchases into four equal payments over six weeks with no interest or fees.
The Apple ecosystem integration makes this BNPL scheme unique. Nonstick. No dumb forms.
Frictionless.
Just double-tap the button.
Apple Pay Later was designed with users' financial well-being in mind. Apple makes it easy to use, track, and pay back Apple Pay Later from Wallet.
Apple Pay Later can be signed up in Wallet or when using Apple Pay. Apple Pay Later can be used online or in an app that takes Apple Pay and leverages the Mastercard network.
Apple Pay Order Tracking helps consumers access detailed receipts and order tracking in Wallet for Apple Pay purchases at participating stores.
Bad BNPL suppliers, goodbye.
Most bankers will be caught in Apple's eye playing mini golf in high-rise offices.
The big problem:
Banks still think about features and big numbers just like other smartphone makers did not too long ago.
Apple thinks about effortlessness, seamlessness, and frictionlessness that just work through integrated hardware and software.
Let me know what you think Apple’s next power moves in the banking industry could be.
You might also like

Esteban
3 years ago
The Berkus Startup Valuation Method: What Is It?
What Is That?
Berkus is a pre-revenue valuation method based exclusively on qualitative criteria, like Scorecard.
Few firms match their financial estimates, especially in the early stages, so valuation methodologies like the Berkus method are a good way to establish a valuation when the economic measures are not reliable.
How does it work?
This technique evaluates five key success factors.
Fundamental principle
Technology
Execution
Strategic alliances in its primary market
Production, followed by sales
The Berkus technique values the business idea and four success factors. As seen in the matrix below, each of these dimensions poses a danger to the startup's success.
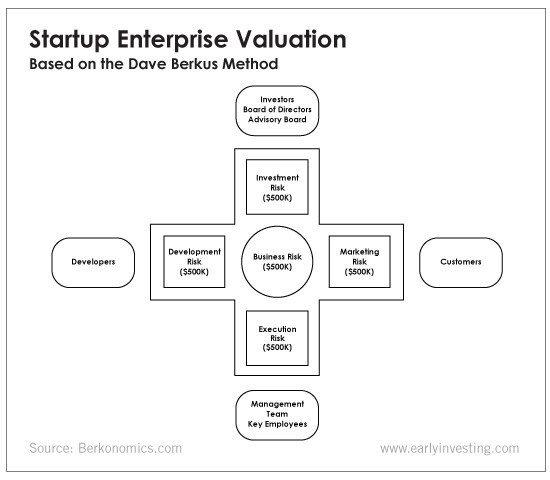
It assigns $0-$500,000 to each of these beginning regions. This approach enables a maximum $2.5M pre-money valuation.
This approach relies significantly on geography and uses the US as a baseline, as it differs in every country in Europe.
A set of standards for analyzing each dimension individually
Fundamental principle (or strength of the idea)
Ideas are worthless; execution matters. Most of us can relate to seeing a new business open in our area or a startup get funded and thinking, "I had this concept years ago!" Someone did it.
The concept remains. To assess the idea's viability, we must consider several criteria.
The concept's exclusivity It is necessary to protect a product or service's concept using patents and copyrights. Additionally, it must be capable of generating large profits.
Planned growth and growth that goes in a specific direction have a lot of potential, therefore incorporating them into a business is really advantageous.
The ability of a concept to grow A venture's ability to generate scalable revenue is a key factor in its emergence and continuation. A startup needs a scalable idea in order to compete successfully in the market.
The attraction of a business idea to a broad spectrum of people is significantly influenced by the current socio-political climate. Thus, the requirement for the assumption of conformity.
Concept Validation Ideas must go through rigorous testing with a variety of audiences in order to lower risk during the implementation phase.
Technology (Prototype)
This aspect reduces startup's technological risk. How good is the startup prototype when facing cyber threats, GDPR compliance (in Europe), tech stack replication difficulty, etc.?
Execution
Check the management team's efficacy. A potential angel investor must verify the founders' experience and track record with previous ventures. Good leadership is needed to chart a ship's course.
Strategic alliances in its primary market
Existing and new relationships will play a vital role in the development of both B2B and B2C startups. What are the startup's synergies? potential ones?
Production, followed by sales (product rollout)
Startup success depends on its manufacturing and product rollout. It depends on the overall addressable market, the startup's ability to market and sell their product, and their capacity to provide consistent, high-quality support.
Example
We're now founders of EyeCaramba, a machine vision-assisted streaming platform. My imagination always goes to poor puns when naming a startup.
Since we're first-time founders and the Berkus technique depends exclusively on qualitative methods and the evaluator's skill, we ask our angel-investor acquaintance for a pre-money appraisal of EyeCaramba.
Our friend offers us the following table:
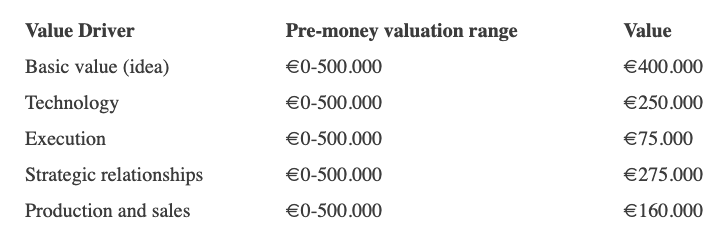
Because we're first-time founders, our pal lowered our Execution score. He knows the idea's value and that the gaming industry is red-hot, with worse startup ideas getting funded, therefore he gave the Basic value the highest value (idea).
EyeCaramba's pre-money valuation is $400,000 + $250,000 + $75,000 + $275,000 + $164,000 (1.16M). Good.
References
https://medium.com/humble-ventures/how-angel-investors-value-pre-revenue-startups-part-iii-8271405f0774#:~:text=pre%2Drevenue%20startups.-,Berkus%20Method,potential%20of%20the%20idea%20itself.%E2%80%9D
https://eqvista.com/berkus-valuation-method-for-startups/
https://www.venionaire.com/early-stage-startup-valuation-part-2-the-berkus-method/

Jon Brosio
3 years ago
You can learn more about marketing from these 8 copywriting frameworks than from a college education.
Email, landing pages, and digital content

Today's most significant skill:
Copywriting.
Unfortunately, most people don't know how to write successful copy because they weren't taught in school.
I've been obsessed with copywriting for two years. I've read 15 books, completed 3 courses, and studied internet's best digital entrepreneurs.
Here are 8 copywriting frameworks that educate more than a four-year degree.
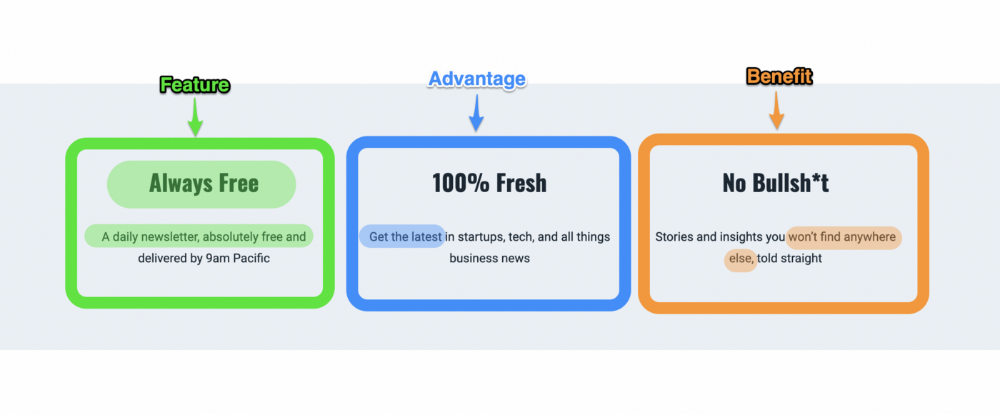
1. Feature — Advantage — Benefit (F.A.B)
This is the most basic copywriting foundation. Email marketing, landing page copy, and digital video ads can use it.
F.A.B says:
How it works (feature)
which is helpful (advantage)
What's at stake (benefit)
The Hustle uses this framework on their landing page to convince people to sign up:
2. P. A. S. T. O. R.
This framework is for longer-form copywriting. PASTOR uses stories to engage with prospects. It explains why people should buy this offer.
PASTOR means:
Problem
Amplify
Story
Testimonial
Offer
Response
Dan Koe's landing page is a great example. It shows PASTOR frame-by-frame.

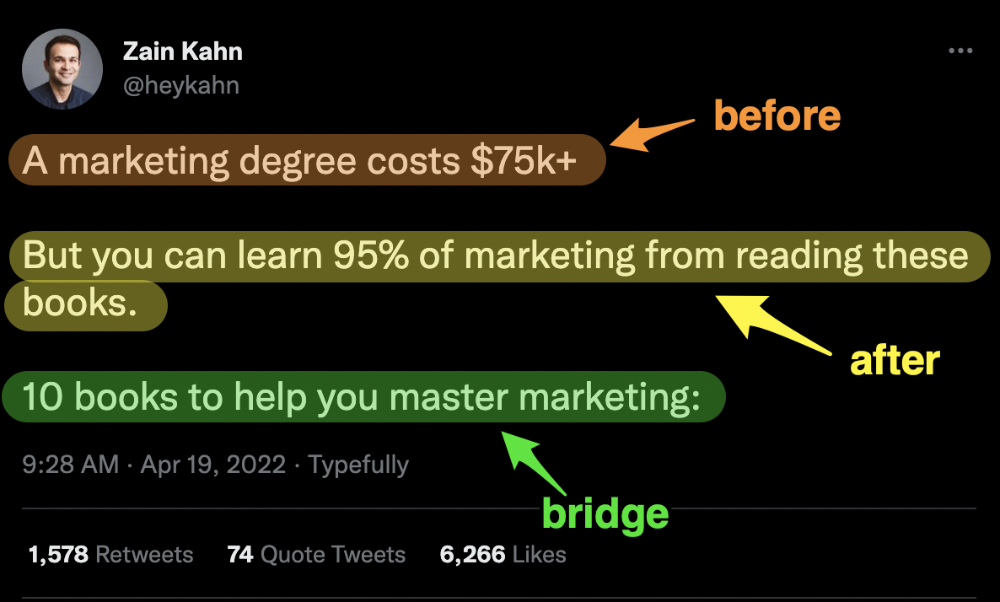
3. Before — After — Bridge
Before-after-bridge is a copywriting framework that draws attention and shows value quickly.
This framework highlights:
where you are
where you want to be
how to get there
Works great for: Email threads/landing pages
Zain Kahn utilizes this framework to write viral threads.
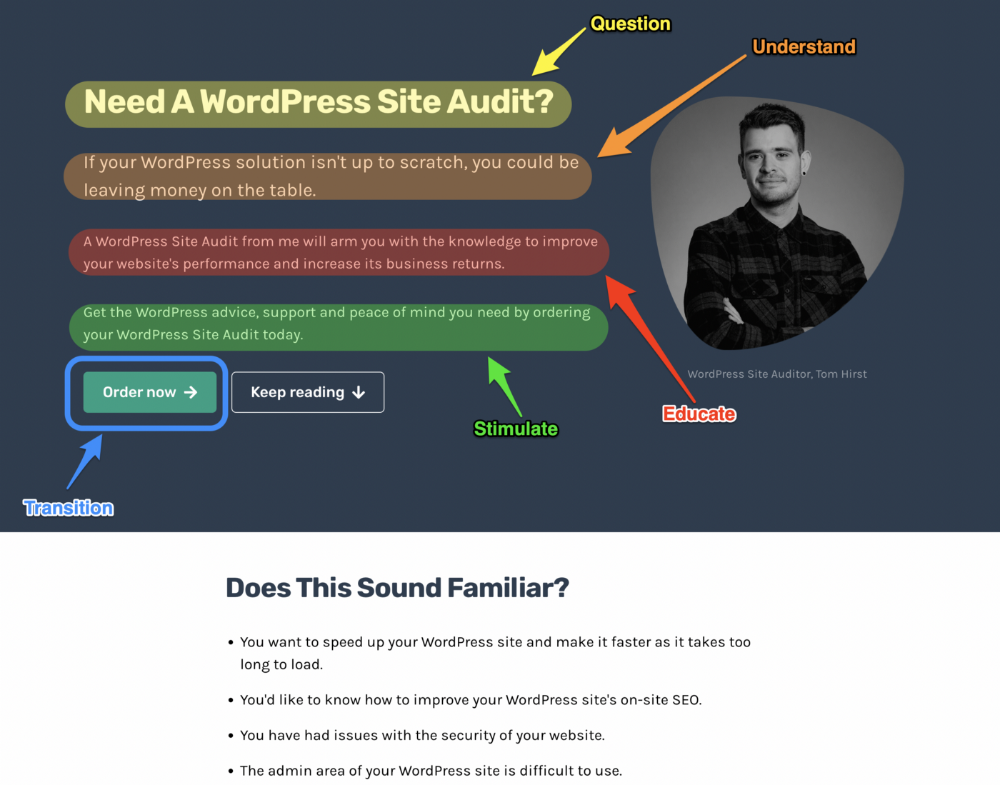
4. Q.U.E.S.T
QUEST is about empathetic writing. You know their issues, obstacles, and headaches. This allows coverups.
QUEST:
Qualifies
Understands
Educates
Stimulates
Transitions
Tom Hirst's landing page uses the QUEST framework.
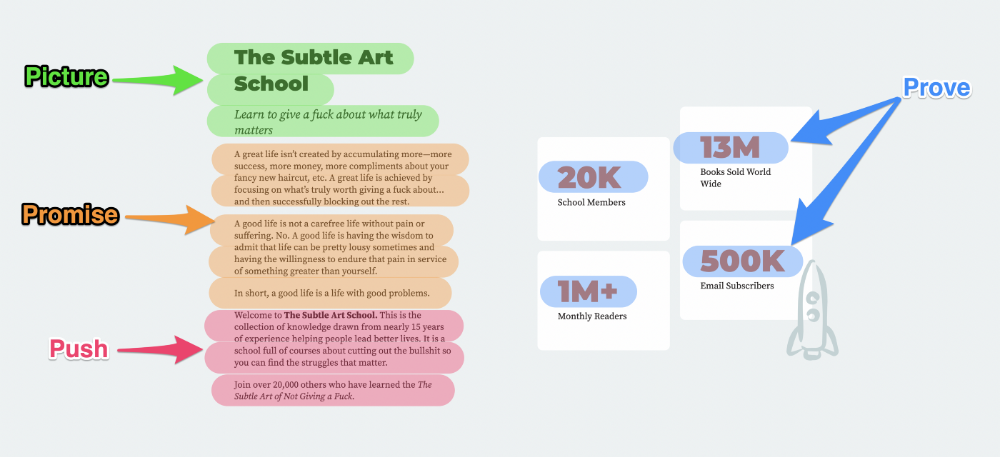
5. The 4P’s model
The 4P’s approach pushes your prospect to action. It educates and persuades quickly.
4Ps:
The problem the visitor is dealing with
The promise that will help them
The proof the promise works
A push towards action
Mark Manson is a bestselling author, digital creator, and pop-philosopher. He's also a great copywriter, and his membership offer uses the 4P’s framework.
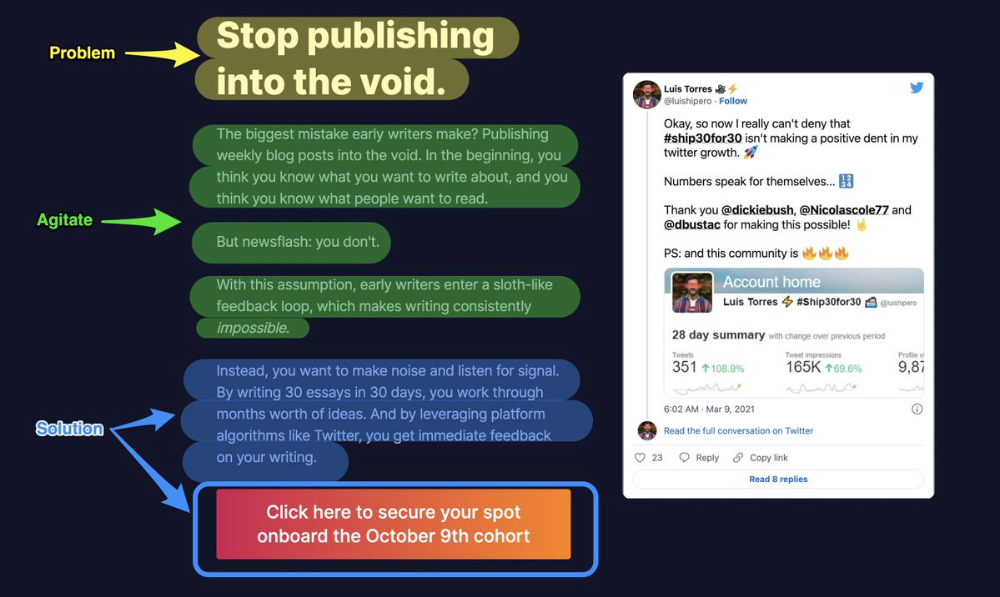
6. Problem — Agitate — Solution (P.A.S)
Up-and-coming marketers should understand problem-agitate-solution copywriting. Once you understand one structure, others are easier. It drives passion and presents a clear solution.
PAS outlines:
The issue the visitor is having
It then intensifies this issue through emotion.
finally offers an answer to that issue (the offer)
The customer's story loops. Nicolas Cole and Dickie Bush use PAS to promote Ship 30 for 30.
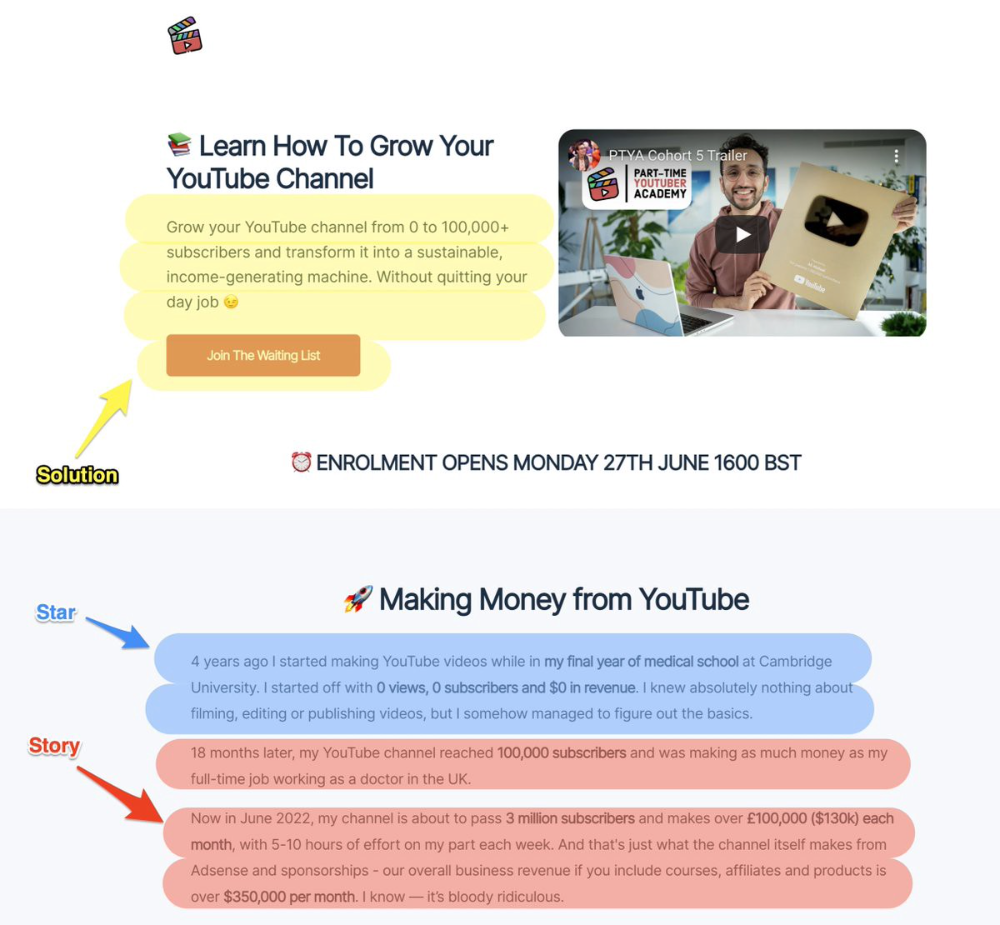
7. Star — Story — Solution (S.S.S)
PASTOR + PAS = star-solution-story. Like PAS, it employs stories to persuade.
S.S.S. is effective storytelling:
Star: (Person had a problem)
Story: (until they had a breakthrough)
Solution: (That created a transformation)
Ali Abdaal is a YouTuber with a great S.S.S copy.
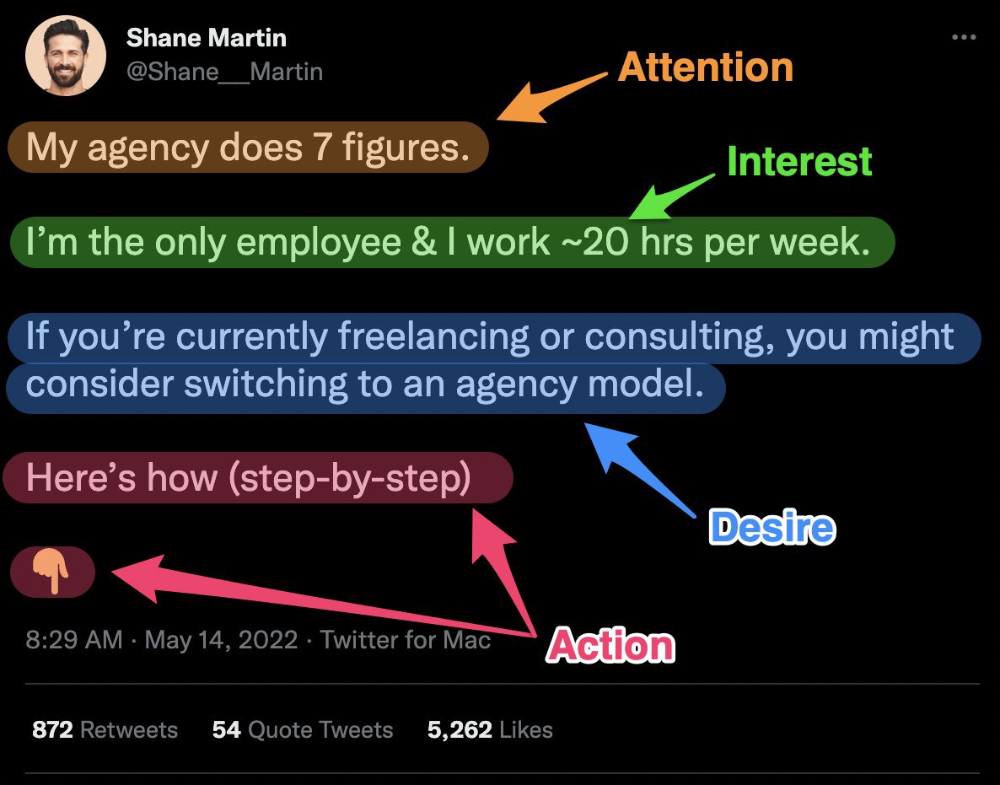
8. Attention — Interest — Desire — Action
AIDA is another classic. This copywriting framework is great for fast-paced environments (think all digital content on Linkedin, Twitter, Medium, etc.).
It works with:
Page landings
writing on thread
Email
It's a good structure since it's concise, attention-grabbing, and action-oriented.
Shane Martin, Twitter's creator, uses this approach to create viral content.
TL;DR
8 copywriting frameworks that teach marketing better than a four-year degree
Feature-advantage-benefit
Before-after-bridge
Star-story-solution
P.A.S.T.O.R
Q.U.E.S.T
A.I.D.A
P.A.S
4P’s

Nojus Tumenas
3 years ago
NASA: Strange Betelgeuse Explosion Just Took Place

Orion's red supergiant Betelgeuse erupted. This is astronomers' most magnificent occurrence.
Betelgeuse, a supergiant star in Orion, garnered attention in 2019 for its peculiar appearance. It continued to dim in 2020.
The star was previously thought to explode as a supernova. Studying the event has revealed what happened to Betelgeuse since it happened.
Astronomers saw that the star released a large amount of material, causing it to lose a section of its surface.
They have never seen anything like this and are unsure what caused the star to release so much material.
According to Harvard-Smithsonian Center for Astrophysics astrophysicist Andrea Dupre, astronomers' data reveals an unexplained mystery.
They say it's a new technique to examine star evolution. The James Webb telescope revealed the star's surface features.
Corona flares are stellar mass ejections. These eruptions change the Sun's outer atmosphere.
This could affect power grids and satellite communications if it hits Earth.
Betelgeuse's flare ejected four times more material than the Sun's corona flare.
Astronomers have monitored star rhythms for 50 years. They've seen its dimming and brightening cycle start, stop, and repeat.
Monitoring Betelgeuse's pulse revealed the eruption's power.
Dupre believes the star's convection cells are still amplifying the blast's effects, comparing it to an imbalanced washing machine tub.
The star's outer layer has returned to normal, Hubble data shows. The photosphere slowly rebuilds its springy surface.
Dupre noted the star's unusual behavior. For instance, it’s causing its interior to bounce.
This suggests that the mass ejections that caused the star's surface to lose mass were two separate processes.
Researchers hope to better understand star mass ejection with the James Webb Space Telescope.